Fix WinX Menu Not Working on Windows 10
WinX Menu helps to quickly access system tools but sometimes it fails to open. TipsMake will guide you how to fix the error using Registry Editor, ShellExView to restore WinX Menu on Windows 10..
WinX menu broken on Windows 10? TipsMake shows how to fix it using Registry, ShellExView and system settings for quick recovery.
Fix Winx menu error on Win 10
Method 1: Uninstall QuickSFV application
According to many users, the cause of the Winx Menu error on Windows 10 not working is mainly due to the QuickSFV application . This application is added to the context menu (right-click menu or context menu) and can cause problems with the WinX Menu.
To fix Winx Menu not working on Windows 10 simply uninstall the QuickSFV application. If you are not using QuickSFV, try uninstalling any applications that you have added to the context menu.
Method 2: Uninstall or update AirDroid
Tools like AirDroid can interfere with the WinX Menu and cause the Winx Menu not working error on Windows 10. To fix the error, try uninstalling or updating to the latest version of AirDroid and check if the error persists. Some users have applied the solution of updating to the latest version of AirDroid and fixed the Winx Menu not working error on Windows 10.
Method 3: Add new items to the WinX Menu
One interesting point is that you can customize the WinX Menu by adding new shortcuts to the menu, such as adding Control Panel to the WinX menu . To fix the Winx Menu on Windows 10 not working error, try applying the method of adding new items to the WinX Menu.
Follow the steps below to add a new item to the WinX Menu:
Step 1 : Press the Windows + R key combination to open the Run command window, then type %localappdata% into it and press Enter or click OK .

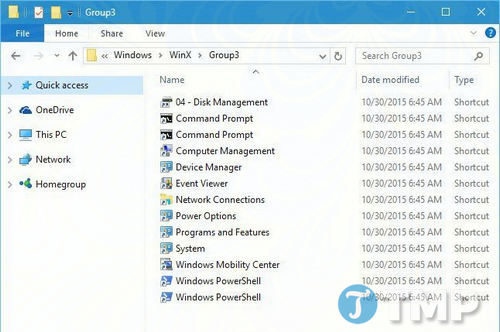
Step 2 : Access the MicrosoftWindowsWinX folder .
Step 3 : Here you will see 3 Group folders . Access any folder and add a shortcut.
Once done, the WinX Menu should work normally without any further issues.
Method 4: Copy the WinX folder from the Default User folder
Sometimes in some cases users can fix the Winx Menu error on Windows 10 not working by copying the WinX folder from the Default User folder. To do this, follow the steps below:
Step 1 : Access the folder C:UsersDefaultAppDataLocalMicrosoftWindows .
Step 2 : Find and copy the WinX folder to your profile. To do this, first press the Windows + R key combination to open the Run command window, then type %localappdata% into it and press Enter to open the MicrosoftWindows folder .
Paste the WinX folder you copied here.
Finally check if the WinX Menu is working properly again.
Method 5: Install Language Pack
On some forums, many users shared that installing the Language Pack can also fix the Winx Menu error on Windows 10 not working.
Step 1 : Press the Windows + I key combination to open the Settings application.
Step 2 : On the Settings window, go to Time & language => Region & language .
Step 3 : Click on the Add a language option .
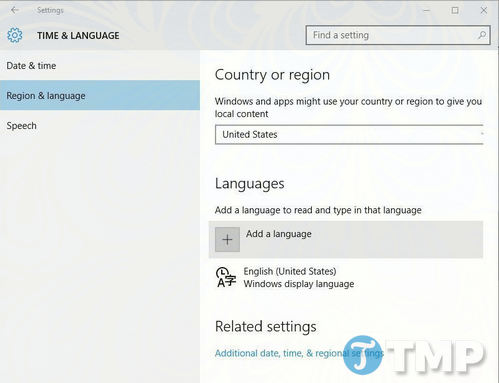
Step 4 : From the list, select a language you want.

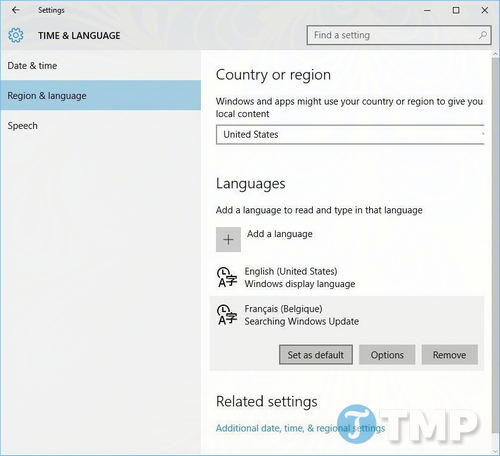
Step 5 : After installing the new language, click to select that language and select Set as default .
Finally, check if the WinX Menu is working properly again. If not, you can uninstall the Language Pack you just installed and switch back to the default language.
Method 6: Using CCleaner
The cause of the Winx Menu error on Windows 10 not working may be due to Shell Extension, however you can use CCleaner to disable Shell Extension. To disable Shell Extension on CCleaner, go to Tools => Startup => Context Menu.
In addition, the cause of the error may be due to the NVIDIA Shell Extension called OpenGLShExt Class . To fix the Winx Menu error on Windows 10 not working by disabling OpenGLShExt Class.
Applications like RWipe & Clean, JRiver Media Center, NCH Express Zip or WinMerge can also be the cause of the error. In fact, almost any Shell Extension can be the cause of the error, so you can try disabling Shell Extensions before finding the culprit.
Method 7: Using ShellExView
In addition to the above method, you can also disable Shell Extension by using the ShellExView tool .
It's simple, just open the tool and disable all non-Microsoft items. Restart Windows Explorer and go back to ShellExView. Try re-enabling each Shell Extension in the group one by one until you find the culprit. Note that each time you enable or disable a Shell Extension, you will have to restart Windows Explorer.
Method 8: Check Registry
Sometimes the culprit for the Winx Menu not working error on Windows 10 is the Registry. Changing the settings shortcut in the Registry can be the cause of the error. So if you made any changes in the Registry related to shortcuts, try to revert the change and check if the WinX Menu is working properly again.
To fix the Winx Menu error on Windows 10 not working, follow the steps below:
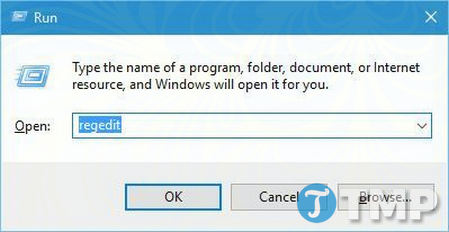
Step 1 : Press the Windows + R key combination to open the Run command window, then type regedit into it and press Enter or click OK to open the Registry Editor window.
Step 2 : On the Registry Editor window, in the left pane, navigate to the key:
HKEY_CLASSES_ROOTpiffile
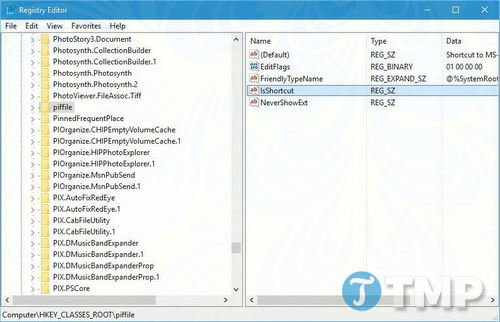
Make sure that the IsShortcut entry is available in the right pane . You can change the appearance of the shortcut icon by renaming the entry to ShortcutIs , but this may cause the WinX Menu to not work. So to fix the error, just rename the entry back to its original name.
Step 3 : Next, access the key HKEY_CLASSES_ROOTlnkfile and perform the same steps.
In addition to the above methods, you can seek the support of ReimagePlus to fix errors. ReimagePlus is a tool to fix common computer errors, protect your computer from malware, repair hardware errors, file loss errors and optimize your computer for maximum performance.
Follow the steps below to fix Winx Menu on Windows 10 not working and some other errors:
Step 1 : Download the Reimage tool to your computer and install it.
Download the Reimage tool to your computer and install it here: Download Reimage
Step 2 : Run the tool, click Start Scan to find problems on Windows that may be the cause of the error.
Step 3 : Click Repair All to fix all errors.
When the Winx menu on Windows 10 is not working, here are the most effective ways to fix the error. Hopefully, with the methods that TipsMake provides, you can successfully fix it.