Table of Contents
Understanding Layer requires more than a headline. The overview below breaks down the key facts, changes, and user impact.
Layer Overview

Also hidden image should have a compact, cubic content, no need too detailed. If the size is smaller than the wallpaper, place it in a font of the same size as the wallpaper and fill it with a light color.
 Hidden picture.
Note: In order for the hidden content to be in the correct position on the wallpaper, such as the upper shadow is exactly in the heart, people should create an image (image) in Photoshop with the same size and paste the above 2 images. Into two separate layers in the same image.
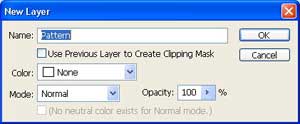
Step 2: Create an image of a grid pattern with a 2 x 2 pixel size with white - transparent - transparent - white (white - transparent) color. You can download a pattern. JPG file (300 bytes) made available to your computer. Step 3: Work with the image file created in Photoshop in the "Note" section (step 1). Right-click on the "Background" layer, select Delete Layer to delete the white Background Layer. Then go to the Layer menu bar and select New / Layer to create a new layer with the following parameters:
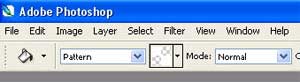
Open the downloaded pattern. JPG file in step 2, go to the Edit menu, select Define Pattern. You will then have a pattern brush based on the above file. Fill the Pattern layer just created with the Paint Bucket Tool (press the G shortcut to select this tool) with the fill color just created by selecting:
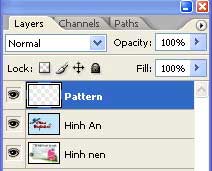
You will have a file with layers:
And your picture now looks like this:

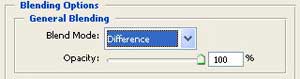
Right click on the Pattern layer and choose Blending Option with mode: Difference and Opacity: 100%
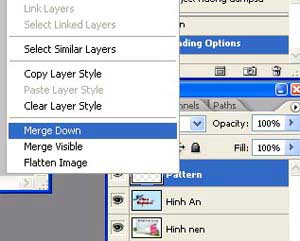
Combine the Pattern layer and the Image layer by merging the two layers together:
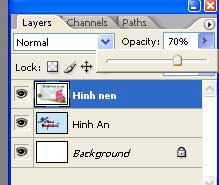
Rearrange the order of the layers (using the drag and drop) and select the transparency of the Layers layer as follows:
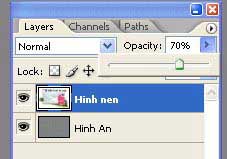
Note: You can optionally choose the Opacity to match your eyes so that the background is bright and not hidden by the content. 70 -80% is suitable in most cases. Finally, save the image as a JPG and post it to the blog. Then prompt the donor to use Internet Explorer and press Ctrl + A to read the message saying:
 Use IE and press Ctrl + A to admire the work.
Hai Nguyen
FAQ
What happened in Pictures Bring Hidden Messages on the Blog: Layer?
Understanding Layer requires more than a headline.
What factors influenced Layer?
The overview below breaks down the key facts, changes, and user impact.
What was the practical impact on users?
Layer Overview Also hidden image should have a compact, cubic content, no need too detailed.
Related Articles
 How to Start a Blog: Step-by-Step Guide13 minutes read
 How to Hide Zalo Messages on iOS and Review Messages Zalo Has Hidden4 minutes read
 How to Choose Your Blog Name: Step-by-Step Guide11 minutes read
 How to Create a Personal Blog: Step-by-Step Guide18 minutes read
 The Way to 'Hunt Down' Hidden Messages in Facebok Messenger4 minutes read
 All Handicaps About the Blog's Development History21 minutes read
Reader Comments 0
Sign in with email or Google to join the discussion.