Managing printers in Windows Server 2008 - Part 1
In this article series, I will show you some of the advantages of how to manage printers in the Windows Server 2008 network.
In this series, I will show you some of the advantages of how to manage printers in the Windows Server 2008 network.
Go back a bit about the time when Windows NT Server 3.5. Microsoft's server operating system is now capable of managing printers. However, at this point, managed printers need to be physically connected to the server. In addition, the print string that a server can host is limited by the number of parallel ports available on that server.
Today, most printers are directly connected to the network, parallel ports have not existed as before. When the printer hardware changes, the printer management features included in the Windows server also change. Not all changes in Windows, however, are due to a change in the printer's hardware problem, and the fact that Microsoft has made some very valuable changes to make printer management easier. . When Microsoft created Windows Server 2008, they redesigned the printer management interface to make management easier. In this article, we will introduce you to that new interface and how to use it in printer management.
Install printing service tools
When designing Windows Server 2008, Microsoft chose the method of installing only a few initial components. What is needed for your task needs to be added later.
Printer management feature is one such component. Print Services Tools are not installed by default, so to use it you need to install this component first. To install Print Services Tools, open Server Manager and select Features . After selecting, click the Add Features link found in the results panel. Windows will then launch the Add Features Wizard . The initial screen of the wizard will ask you to select the feature you want to install. Find the list of available features until you find the Remote Server Administration Tools option .
Some items in the Remote Server Administration Tools will be installed by default, so you need to expand the Remote Services Administration Tools section, then open the Role Administration Tools section that appears at the next level. Finally, select the Print Services Tools check box as shown in Figure A, then click Next , then Install and Close .
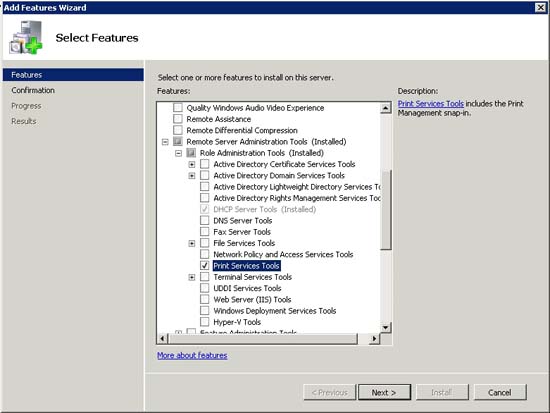
Figure A: Select the Print Services Tools check box and click Next .
Visit Print Services Tools
Now that you have installed Print Services Tools and can access the Print Management console by selecting the Print Management command from the server's Administrative Tools menu. When you do this, you will see a screen similar to the one shown in Figure B below.
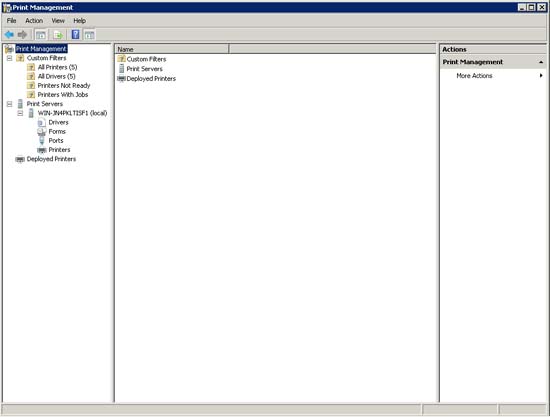
Figure B: You can see the new printer management interface in the picture
Manage printers in the network
So far, you have introduced the look of the Print Management printer interface, and then look at Figure C below. You will see in this picture the number of printers defined and the number of printers available in the interface. You will also see the All Drives section also has drivers that correspond to different printer devices.
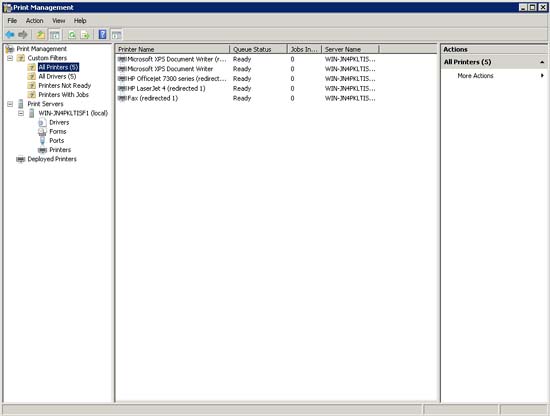
Figure C: You can see All Drives with different network printer devices
First, you need to know that Windows has automatically placed All Printers and All Drivers in this case. Another interesting point is that the server that we installed the Print Management interface is not a member of the Active Directory domain, so the list of unreleased printers from Active Directory. The reason why printer devices appear is because Windows Server 2008 automatically detects network printers that exist on the same subnet that have servers, then installs them and the necessary drivers.
Another point that I want to show you in Figure C is the server name corresponding to each printer. Although network printers are located at some point in the network, Windows automatically creates a queue for each printer on the server. One of the main functions of the Print Management management interface is to allow you to manage centralized network printing. In this series, I will show you how to use group policy settings to automatically connect workstations to print strings that are on the print management server.
Conclude
In this section, we introduced how to install the Print Management interface. In the next article in this series, I will show you how to transfer other network printers to the network print server and how to use group policy settings to connect workstations to work with machines. different print.
Was this article helpful?
Your feedback helps us improve.
Related Articles
 Managing printers in Windows Server 2008 - Part 36 minutes read
 Efficiently exploit printers in Windows Server 2003 (Part 2)8 minutes read
 Managing printers in Windows Server 2008 - Part 25 minutes read
 Efficiently exploit printers in Windows Server 2003 (Part 1)10 minutes read
 Top 5 best printers of 20266 minutes read
 Managing mailboxes in Exchange Server 2007 (Part 2)10 minutes read
Reader Comments 0
Sign in with email or Google to join the discussion.