Failover Cluster Management configuration of Server 2008
Failover Cluster Management tool in Windows Server 2008 allows users to create and manage multiple Cluster.
Although all versions of Windows Server 2008 include the Network Load Balance feature, however, only the Enterprise version and Datacenter have integrated Failover features that provide higher levels of functionality. this.
The cluster allows users to set high-level features available for general services or for specific applications. Failover Cluster Management tool in Windows Server 2008 allows users to create and manage multiple Cluster.
Here we will understand some of the most unique features about this tool.
Overview of settings and tasks
To deploy Clustering in the environment, the following steps need to be taken:
1. Ensure hardware compatibility with Windows Server 2008 Clustering.
2. Configure the drive on the shared storage area to be connected and appear on both servers.
3. Install the Failover Clustering feature on each Cluster node to use.
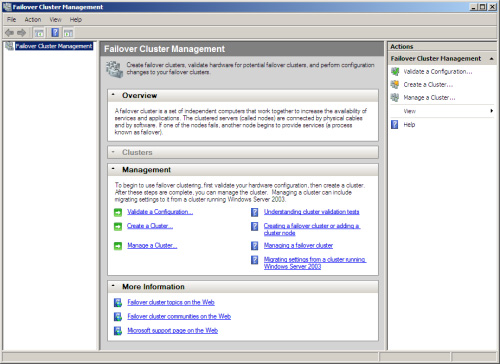
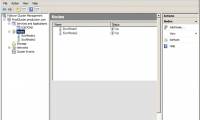
After you have completed these steps, you can open the Failover Cluster Management Console by going to Start | Administrative Tools | Failover Cluster Management . During the initial launch, we will see a window like Figure 1 appear. This window does not contain any configured Clustered Server.
The configuration options on this Console are very similar to other Microsoft administration tools, including a navigation panel on the left, a working table with the middle objects, and an Actions panel on the right.
The left panel of the Console shows the Cluster classification and various objects in a Cluster , such as Nodes , Services , Services , Storage , Networks , etc. When you click on one object in the left table, the content of that object will be displayed in the right panel. For example, when clicking on the Active Resources object of a certain node, its content will display in the right table along with the State , Owner , Group , and many. Other properties.
The tasks we can do with the Failover Cluster Management tool include:
Failover tool Cluster Management has four following menus:
File menu. The File menu contains very few tasks in this Console, only the Options and Exit commands.
Action. The Action menu contains most of the Cluster management tasks in the Failover Cluster Management tool. The commands in the File menu will vary depending on the selected object in the tables in the Console. In any case, we can choose the Open Connection command from the File menu to open a connection to an existing Cluster or create a new Cluster. It is best to work with the context menu of each object to create errors.
View menu. The View menu provides several options for customizing the interface of the Management Console.
Menu Help. Use this menu to call Failover Cluster Management Console help.
In addition, on this Console also contains a toolbar including the following buttons: Back, Forward, Up One Level (Irregular display), Show / Hide Console Tree, Properties, Refresh (Not often displayed) and Help .
Console tree
Although the Failover Cluster Management tool is not an MMC snap-in, it does have the interface and functionality of an MMC. In the Console tree (the left panel) contains an open Cluster connection that is displayed in the hierarchy tree. This tree includes the following objects:
Services and Applications: Select this navigation option to open the list of services and applications configured in the Cluster.
Nodes: Each node in the Cluster will be displayed in the Console tree under the Nodes option (Figure 2). When a node is selected, all details of that node will appear in the working table (middle table) of the Console. If you want to add a drive to the Cluster, right-click this option, on the context menu, select Add Node .
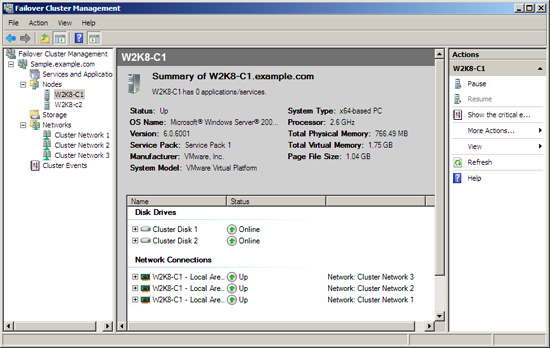
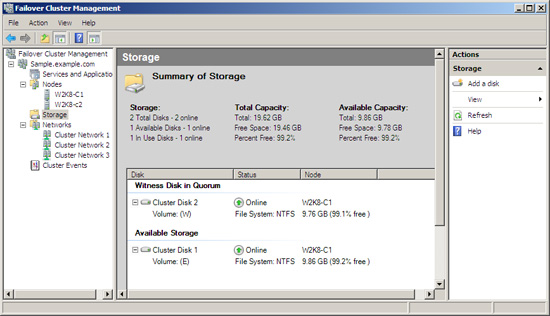
Figure 3: List of storage resources in the Cluster.
Cluster Events : This link contains all events related to the Cluster service.
Working with the Failover Cluster Management Wizard
Failover Cluster Management tool provides many wizards to help users perform many common tasks such as installing a Cluster, adding nodes, adding groups, and adding resources.
Determine the hardware configuration
Before creating the Cluster, we need to check the hardware in use to ensure that the hardware system supports the High Avaiability configuration. To perform this task, launch the Hardware And Infrastructure Validation Wizard with one of the following methods:
2. On the Select Servers or a Cluster page , enter the name of the server that will join the Cluster and then click Next .

Create a Cluster
Adding Cluster service
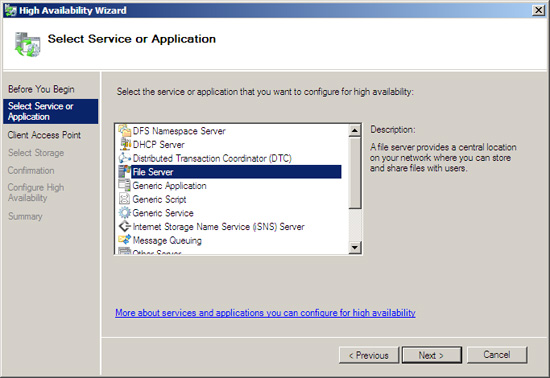
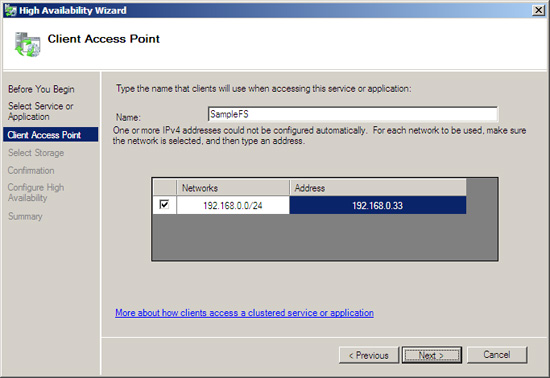
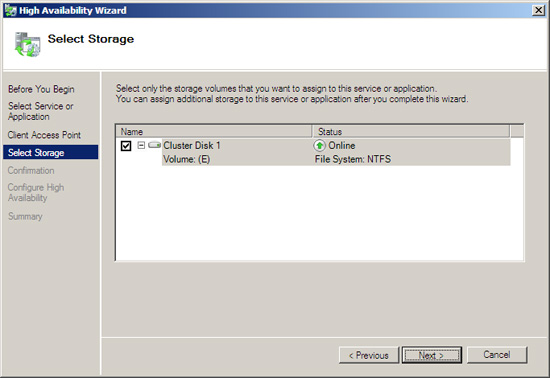
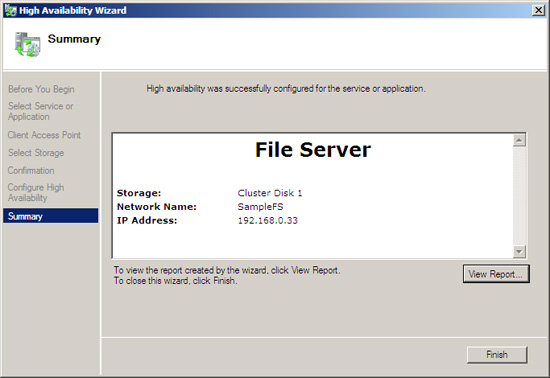
Figure 16: Server sharing data.
Action Manipulate Cluster hardware configuration
The cluster allows users to set high-level features available for general services or for specific applications. Failover Cluster Management tool in Windows Server 2008 allows users to create and manage multiple Cluster.
Here we will understand some of the most unique features about this tool.
Overview of settings and tasks
To deploy Clustering in the environment, the following steps need to be taken:
1. Ensure hardware compatibility with Windows Server 2008 Clustering.
2. Configure the drive on the shared storage area to be connected and appear on both servers.
3. Install the Failover Clustering feature on each Cluster node to use.
After you have completed these steps, you can open the Failover Cluster Management Console by going to Start | Administrative Tools | Failover Cluster Management . During the initial launch, we will see a window like Figure 1 appear. This window does not contain any configured Clustered Server.
Figure 1: Failover Cluster Management.
The configuration options on this Console are very similar to other Microsoft administration tools, including a navigation panel on the left, a working table with the middle objects, and an Actions panel on the right.
The left panel of the Console shows the Cluster classification and various objects in a Cluster , such as Nodes , Services , Services , Storage , Networks , etc. When you click on one object in the left table, the content of that object will be displayed in the right panel. For example, when clicking on the Active Resources object of a certain node, its content will display in the right table along with the State , Owner , Group , and many. Other properties.
The tasks we can do with the Failover Cluster Management tool include:
- Create or cancel a Cluster.
- Add and remove node from Cluster.
- Add disk drives to Cluster.
- Supplement or type of services for Cluster.
- Configure the number of rules for the drive.
- Check for events related to all Cluster components.
Failover tool Cluster Management has four following menus:
File menu. The File menu contains very few tasks in this Console, only the Options and Exit commands.
Action. The Action menu contains most of the Cluster management tasks in the Failover Cluster Management tool. The commands in the File menu will vary depending on the selected object in the tables in the Console. In any case, we can choose the Open Connection command from the File menu to open a connection to an existing Cluster or create a new Cluster. It is best to work with the context menu of each object to create errors.
View menu. The View menu provides several options for customizing the interface of the Management Console.
Menu Help. Use this menu to call Failover Cluster Management Console help.
In addition, on this Console also contains a toolbar including the following buttons: Back, Forward, Up One Level (Irregular display), Show / Hide Console Tree, Properties, Refresh (Not often displayed) and Help .
Console tree
Although the Failover Cluster Management tool is not an MMC snap-in, it does have the interface and functionality of an MMC. In the Console tree (the left panel) contains an open Cluster connection that is displayed in the hierarchy tree. This tree includes the following objects:
Services and Applications: Select this navigation option to open the list of services and applications configured in the Cluster.
Nodes: Each node in the Cluster will be displayed in the Console tree under the Nodes option (Figure 2). When a node is selected, all details of that node will appear in the working table (middle table) of the Console. If you want to add a drive to the Cluster, right-click this option, on the context menu, select Add Node .
Figure 2: Details of a Cluster Node.
Storage: When selecting Storage in the navigation panel, the working table will list all shared drives in that Cluster (Figure 3). If you want to open an additional drive into that Cluster, right-click on Storage and select Add a Disk .
Figure 3: List of storage resources in the Cluster.
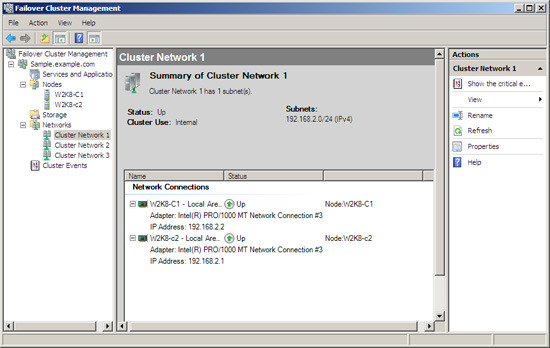
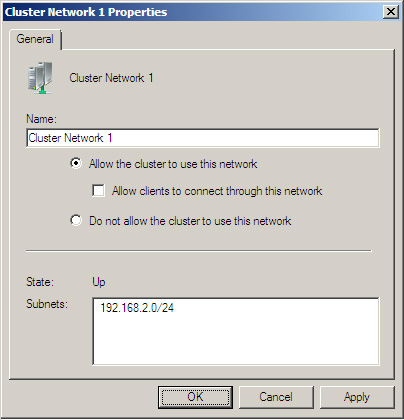
Networks : Each network of the Cluster is displayed in the Networks section of the Console tree (Figure 4). When selecting a network, all details of that network will appear in the middle pane of the workspace.
Figure 4: Details of a Cluster network.
We can specify the Cluster to use a specific network by right-clicking on a network entry, select Properties . There are two options on the Properties dialog box, including Allow the cluster to use this network (allow Cluster to use the network), and Do not allow the cluster to use this network (do not allow Cluster to use the network). In addition, there is an additional checkbox of the first option, when selecting this box, the clients will be connected via the network that Cluster uses.
Figure 5: Change network configuration.
Cluster Events : This link contains all events related to the Cluster service.
Working with the Failover Cluster Management Wizard
Failover Cluster Management tool provides many wizards to help users perform many common tasks such as installing a Cluster, adding nodes, adding groups, and adding resources.
Determine the hardware configuration
Before creating the Cluster, we need to check the hardware in use to ensure that the hardware system supports the High Avaiability configuration. To perform this task, launch the Hardware And Infrastructure Validation Wizard with one of the following methods:
-
Go to Action menu select Validate A Configuration .
- Right-clicking on Failover Cluster Management selects Validate A Configuration from the context menu.
-
In the Actions panel select Validate A Configuration .
-
When the Failover Cluster Management tool has just been launched, the Validate A Configuration option is in the middle table.
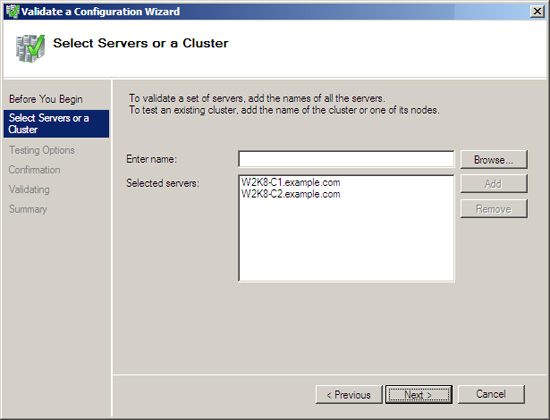
2. On the Select Servers or a Cluster page , enter the name of the server that will join the Cluster and then click Next .
Figure 6: Validate A Configuration Wizard.
3. Many configuration verification processes will be performed, including iSCSI counting or Fiber Channel storage adapters, configuring network groups, configuring Cluster member firewall system exceptions, and storage systems file. We can choose to carry out any testing process, or specify certain processes (Figure 7).
Figure 7: Select the test process you want to perform.
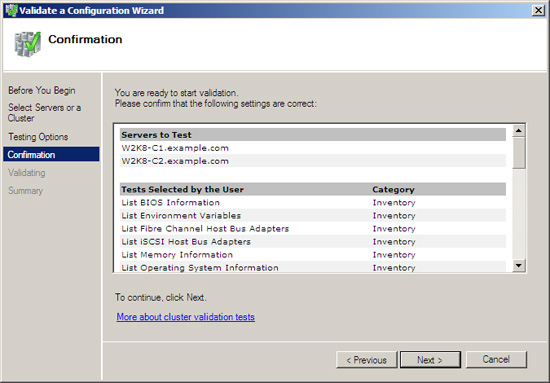
4. After selecting one of the two options (Figure 7) then click Next , the processes will be listed on the Confirmation page. Once confirmed, click Next to begin the process (Figure 8).
Figure 8: Confirm the test method.
5. When you are checking, if a process is completed we will receive a message with the green text on the right side of the test window, if a failure is displayed, a message with red text will appear. In this case we can check the detailed report that accurately describes the cause of the error. If all processes have completed successfully, click Finish to continue.
Create a Cluster
The purpose of management tasks is to group servers. Microsoft provides a Wizard called Create Cluster that helps users easily perform this task.
We can launch Create Cluster Wizard according to one of the following methods:
We can launch Create Cluster Wizard according to one of the following methods:
- Go to the Action menu and choose Create A Cluster .
- Click on Failover Cluster Management and select Create A Cluster from the context menu.
- In the Actions panel, select Create A Cluster .
- When the new Failover Cluster Management tool is launched, select Create A Cluster in the middle pane.
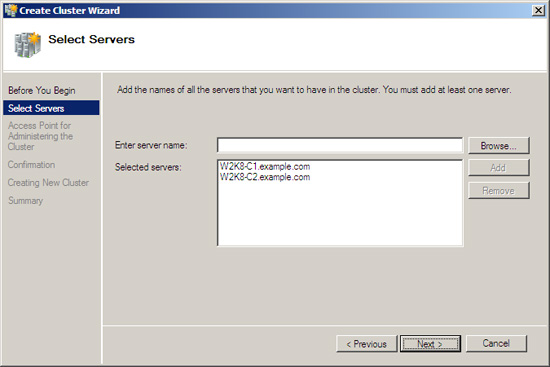
2. On the Select Servers page, select the servers that contain this Cluster. Use the Browse button to browse for servers in Active Directory. Now click Next .
Figure 9: Create Cluster Wizard's Select Servers page.
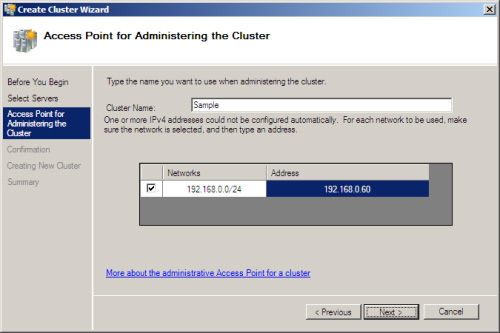
3. On the Access Point For Administering The Cluster page , enter a name for the new Cluster, when required, enter the IP address that will be used to identify this Cluster (Figure 10). Then click Next .
Note: Although standalone servers will use their IP addresses, this Cluster also needs an IP address.
Note: Although standalone servers will use their IP addresses, this Cluster also needs an IP address.
Figure 10: Create Cluster Wizard Access Point For Administering The Cluster
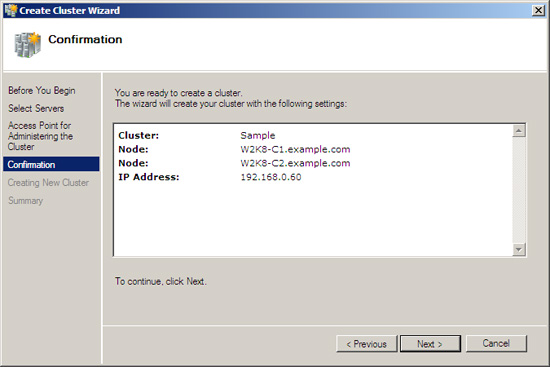
4 On the Confirmation page, confirm the settings that were made and click Next .
Figure 11: Confirm page of Create Cluster Wizard.
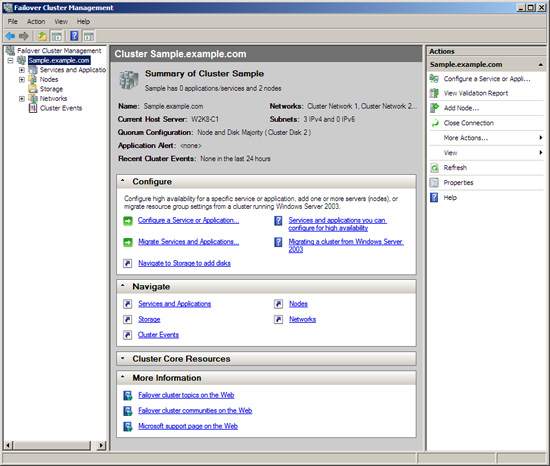
Once the settings have been confirmed, the new Cluster will be created, and we will see a summary page showing the results of the creation process. If there is a problem, we can check in the detailed report created in the Cluster creation process. Then, when done, click Finish . At that time, if the Failover Cluster Management tool was started, a screen similar to Figure 12 would appear confirming that the Cluster creation process was successful.
Figure 12: The navigation panel of the Management Console after the Cluster has been created.
Adding Cluster service
To add to the Cluster service, launch the Failover Cluster Management tool, browse to the Cluster that needs to be added to the service, and then click on Services and Applications . From the context menu, select the Configure a service or application option . The High Availability Wizard will then launch.
1. On the Select Service or Application page , we will receive a request to select the service or application you want to use. Check the software vendor to determine Cluster compatibility. This wizard will change depending on what is selected on this page (Figure 13).
1. On the Select Service or Application page , we will receive a request to select the service or application you want to use. Check the software vendor to determine Cluster compatibility. This wizard will change depending on what is selected on this page (Figure 13).
Figure 13: Select Service or Application page of High Availability Wizard.
2. On the Client Access Point page, for each service configured, we must specify the client method to access that service. Remember that the service cluster will display as a single entity with workstations. Name and enter a private IP address for this service.
Figure 14: Client Access Point page of High Availability Wizard.
3. On the Select Storage page, select the shared storage area. Once the selection is made, we can confirm the selected storage area. Then, the wizard will display the selected service on the network.
Figure 15: The selected service is displayed on the network.
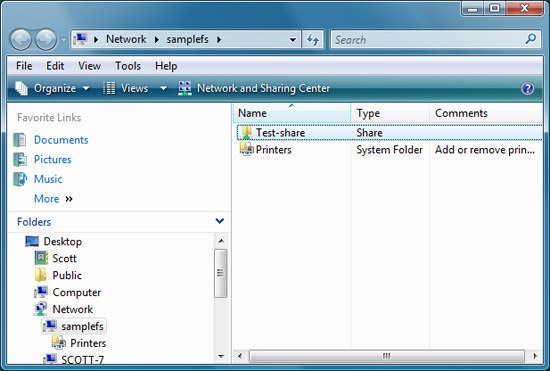
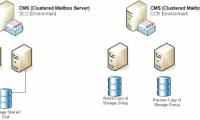
In Figure 16 we can see the data sharing server running.
Figure 16: Server sharing data.
In Figure 17 we can see the shared file servers are active.
Figure 17: Shared file server.
Task list
Up to now, we have learned quite a lot about Failover Cluster Management tool, able to create and manage Cluster. The following table lists common Cluster administration tasks, and outlines how to perform these tasks with the Failover Cluster Management tool.
Action Manipulate Cluster hardware configuration
- Go to Action menu select Validate A Configuration .
- Right-clicking on Failover Cluster Management selects Validate A Configuration from the context menu.
- In the Actions panel select Validate A Configuration .
- When the Failover Cluster Management tool has just been launched, the Validate A Configuration option is in the middle table.
- Go to the Action menu and choose Create A Cluster .
- Click on Failover Cluster Management and select Create A Cluster from the context menu.
- In the Actions panel, select Create A Cluster .
- When the new Failover Cluster Management tool is launched, select Create A Cluster in the middle pane.
Install the Service Failover / Failback Policy
Right click on the service you want to install and select Properties . Select the Failover tab. Moving the service to another node Clicking on the cluster contains the service you want to move to select More Actions | Migrate Services And Applications . Create a new resource Right-click on a group select New | Resource để bắt đầu Phần mềm mới. Delete resources Change the status of resources to offline, right-click it and select Delete . Change the online status of a resource Right-click on the resource selected Take Offline or Bring Online . Check service information Right-click on the service that select Show Dependency Report . Specify the nodes that can own resources Right-click on the resource and select Properties . Edit the nodes that can have resources in the Avanced Policies tab. Forwarding simulation resources Right-clicking on the resource selects More Actions | Simulate Failure Of This Resource.Was this article helpful?
Your feedback helps us improve.
Related Articles
 Deploy CCR Cluster of Exchange 2007 SP1 on Windows Server 2008 Failover Cluster (Part 2)12 minutes read
 Strategy for checking Failover Cluster - Part 28 minutes read
 Checkover Failover Cluster Strategy - Part 17 minutes read
 Deploy CCR Cluster of Exchange 2007 SP1 on Windows Server 2008 Failover Cluster (Part 1)10 minutes read
 Instructions for configuring pfSense 2.0 Cluster using CARP5 minutes read
 Standby Continuous Replication Management (SCR) - Part 110 minutes read
Reader Comments 0
Sign in with email or Google to join the discussion.