Instructions for scheduling sending emails and delaying sending emails in Outlook
There are three ways users can use to delay, delay sending mail in Outlook: delay a specific mail, delay all emails will send by rules and schedule the following to send automatically.
This feature on Outlook helps you solve the confusion when accidentally sending unwanted email content, mistakenly sending important messages to others.
This is an opportunity for you to think and retrieve the mail sent from the inbox before it actually reaches the recipient. So how to use this feature? Please follow the article to find the answer!
How to schedule sending emails on Outlook
If you want to send your email at a specific time, it's best to schedule exactly which to send. Follow the steps below:
Step 1: On the current window of composing mail, do either of the following:
- Method 1: On the Message tab , in the Tags group , click the Message Options extension icon .
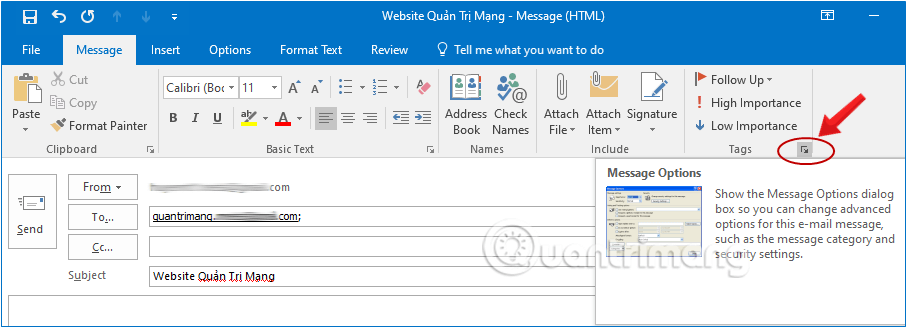
- Method 2: Switch to the Options tab , follow to the More Options group , click Delay Delivery.

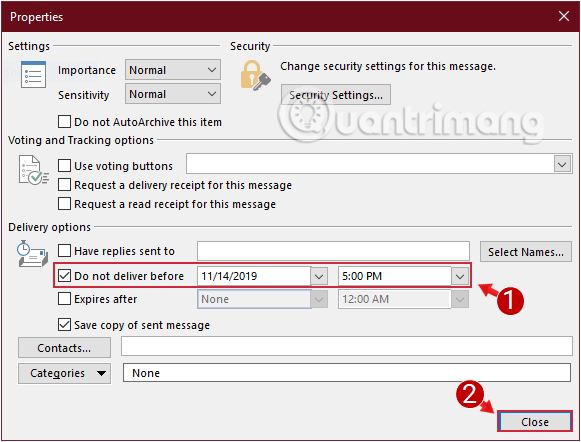
Step 2: The Properties dialog box opens, check the Do not deliver before check box in the Delivery options section, then set the delivery date and time. Click Close to close.
Step 3: Complete your email and click Send to send mail.
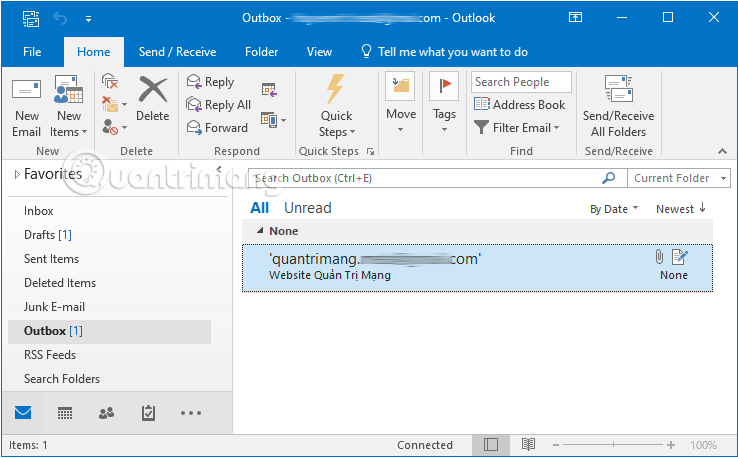
At this point, your email will be located in the Outbox mailbox and you are free to edit and delete messages if any changes. At the reserved time, emails will automatically be sent to the specified recipient.
Cancel the delivery schedule or change the delivery schedule on Outlook
If you have edited your email and want to send it immediately or resend it, follow these steps:
Step 1: Open the mail in the Outbox folder.
Step 2: Navigate to Options tab , find More Options group , click Delay Delivery.
Step 3: The Properties dialog box opens, choose one of the following two options:
- Uncheck the Do not deliver before check box in the Delivery options section if you want to send mail immediately.
- Change the sending date and time if you want to change the delivery schedule .
Step 4: Click Close to save the operation.
Step 5: Go back to the compose window, click Send to confirm the delivery.
Depending on your choice in step 3, this message will be sent immediately or in the Outbox box to wait for sending.
Note:
- This option is only available on the personal computer's Outlook application, not in Outlook on the web.
- Emails can only be sent and received while Outlook is running. If Outlook is closed at the time you send it, the email will move on the next time you open Outlook.
- Similarly, if the recipient's Outlook is closed at that time, they will receive your mail the next time they start.
Delay sending all emails on Outlook
All messages sent in Outlook are transferred via Outbox folder will be sent immediately. To change this, set up a rule to delay sending emails. Here's how:
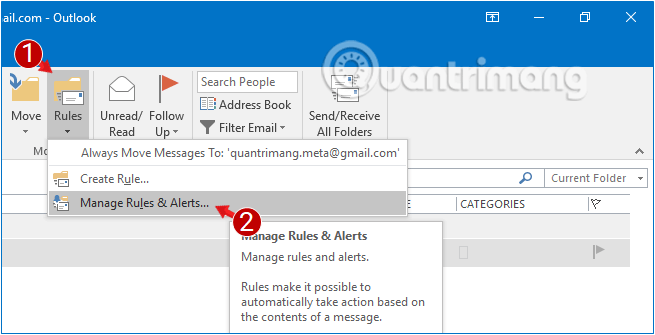
Step 1: On the File tab , click Manage Rules & Alerts right on the Info section .
Or you can also open Manage Rules & Alerts on the default Home tab, in the Move> Rules group .
Step 2: The Rules and Alerts dialog box opens, click New Rule.
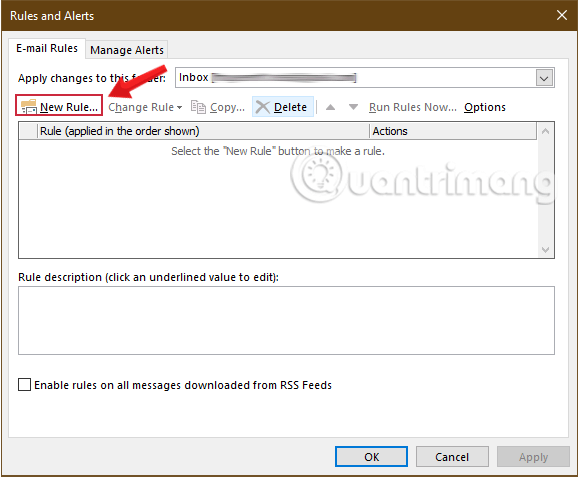
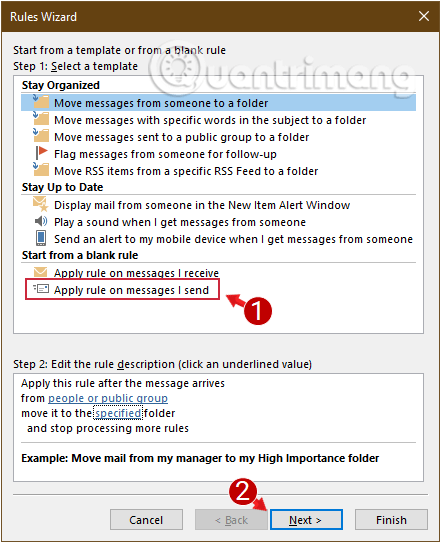
Step 3: Under Start from a Blank Rule , click the Apply rule on messages I send option and click Next.
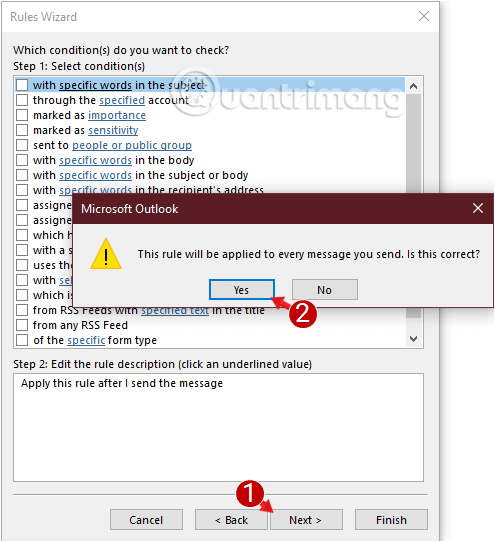
Step 4: If you want to delay emails that meet certain conditions then select the corresponding checkboxes and then click Next. For example, if you want to delay sending mail to a specific address, select "though the specified account".
If you want to delay sending all emails, just click Next. Outlook will display a confirmation message that you want to apply the rule to all sent mail, click Yes .
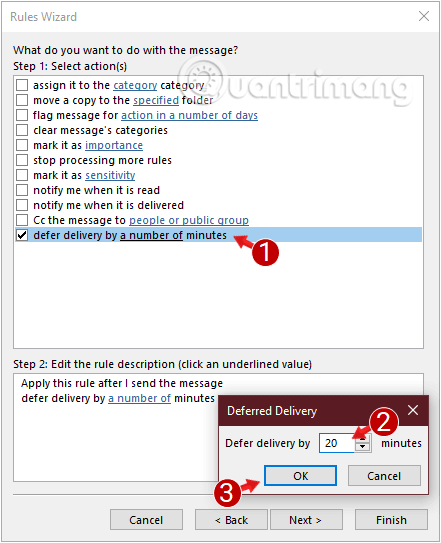
Step 5: Next interface, pay attention to the box above Step 1: Select actions , you check defer delivery by a number of minutes.
Step 6: Under the box Step 2: Edit the rule description , click on the link a number of.
This will open the small Deferred Delivery dialog box below, enter the number of minutes you want to delay sending emails (up to 120) and then click OK.
Step 7: In the next interface, you can set exception emails without applying the rule you are creating. If there is no need to use this section, you always click on Next to skip.
Step 8: This is the final step to create the rule, you name the rule so you can remember and categorize it with other rules to avoid confusion, for example "Delay email".
Under step 2, remember to check the Turn on this rule box and click Finish.
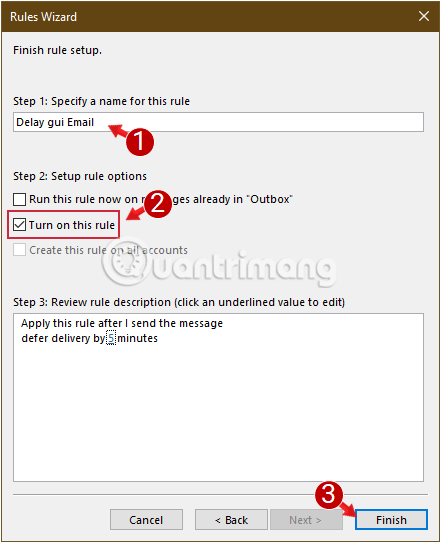
Step 9: Click OK on the Rules and Alerts window .
Finish! From now on, when you click the Send button to send the message, the email will be moved to the Outbox folder and be there for the period you specified in step 6.
The above is how to delay sending emails in Outlook. The steps are a bit confusing, but TipsMake.com believes it will not make it difficult for you. Give it a try!
Good luck!
Explore more:
- Instructions on how to Recall, recover mail sent in MS Outlook
- Summary of some common errors in Outlook and how to fix them
- List of Outlook 2016 keyboard shortcuts when working with Mail
You should read it
- ★ Instructions for pinning emails in Outlook
- ★ Email on Outlook is not synchronized on Windows 10, this is how to fix it
- ★ How to enable Outlook email spell checking before sending
- ★ Outlook on Android is about to add phishing email feature
- ★ Microsoft admits hackers may have read Outlook email and warned users to change their passwords