Configuring Exchange Client Access with ISA 2006 (Part 2)
In this article, we will look at configuring the Exchange CAS / Front-End and ISA Server with the authentication mechanism required to work..
 Configuring Exchange Client Access with ISA 2006 (Part 1)
Rui Silva
In this article, we will look at configuring the Exchange CAS / Front-End and ISA Server with the authentication mechanism required to work.
Configure Exchange 2003 Front-End
We have to make some changes in the Exchange 2003 configuration so that ISA Server Web client publishing works properly:
-
Confirmation of form-based authentication is not selected on the front-end Exchange server.
-
Enable RPC over HTTP on the front-end Exchange server
-
Request secure communication channels (SSL) with the Web site
-
To confirm that forms-based authentication is not selected on the Exchange front-end server, launch Exchange System Manager, expand Servers, and then expand your front-end server. Continue to expand Protocols , HTTP , right-click on Exchange Virtual Server , then select Properties . Click the Settings tab, then delete the Enable Forms Based Authentication check box. Click OK .

Figure 1
-
To create an Exchange Front-End server with an RPC proxy server, expand the Servers section, right-click the front-end server, and then click Properties . Select RPC-HTTP window, select RPC-HTTP front-end server , and click OK to close the properties of the selected server dialog. Click OK .
-
After a certificate is installed for the Web site, you need to request that the Web site only accept secure channel communications. In IIS Manager, expand the local computer, and then expand the Web Sites folder. Right-click the virtual / Exchange folder and click Properties . On the Directory Security tab, click Edit . Select Require secure channel (SSL) on the Secure Communication window and then click OK . Click OK again to close the Web site properties dialog box. Repeat this step for / Public , / Exchweb and / rpc .

Figure 2
Configure Exchange 2007 Client Access
With Exchange 2007, the necessary changes are:
-
Validation based on forms is not selected on the Exchange Client Access server
-
Enable Outlook Anywhere on the Exchange Client Access server
-
Request secure channel communications (SSL) for the Web site
-
To confirm that forms-based authentication is not selected on an Exchange CAS, in the Exchange Management Console, expand the Server Configuration section, and then click Client Access . Select your Client Access server and then select owa (Default Web Site) on the Outlook Web Access window. In this window, click Properties under owa (Default Web Site).
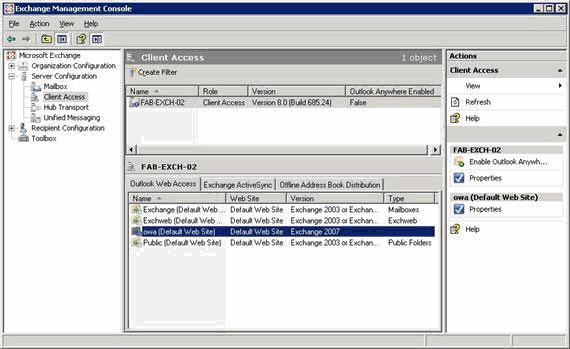
Figure 3
-
Select the Authentication window and confirm that the following line has been selected: Use one or more of the following standard authentication methods and Basic authentication (password is sent in clear text) . Click OK .
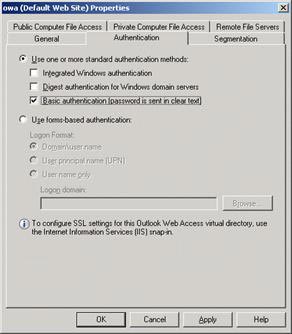
Figure 4
-
Review the Microsoft Exchange Warning dialog box and click OK . With the changes we just made, you must restart Internet Information Services (IIS). To restart IIS, run the following command: "iisreset / noforce".
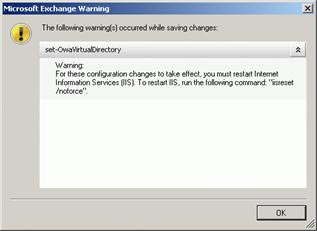
Figure 5
-
Repeat steps 1-3 for the following pages: Exchange (Default Web Site) , Exchweb (Default Web Site) , and Public (Default Web Site) .
-
To enable Outlook Anywhere on your Client Access server, in Exchange Management Console, expand Server Configuration , then click Client Access . Select your Client Access server. In this window, click Enable Outlook Anywhere under the server name you just selected. Enter the configuration name that the client will use to connect to the Client Access server in the male External Host field e . This name must match the generic name or FQDN used in the server certificate installed on the ISA server. Confirm that the extended authentication method is set to NTLM authentication and click Enable .
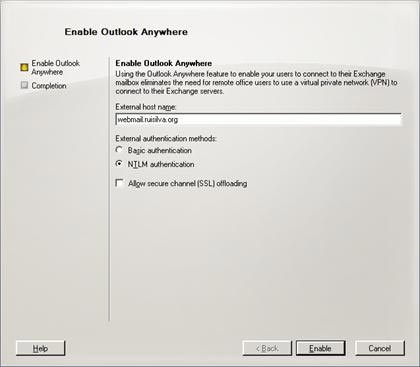
Figure 6
-
To request that the Web site only accepts secure channel communications, follow step 3 from the previous section ( Exchange 2003 Front-End Configuration ) for all virtual directories mentioned / owa .
Basics of ISA authentication
Before entering the rules section, let's see how the ISA Server pre-authenticates client requests.
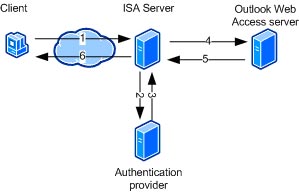
Figure 7
Step 1 , confirm the client information: the client sends a request to connect to the Outlook Web Access server in the internal network. The client also provides important information in the HTML form.
Steps 2 and 3 , send the information: ISA server sends information to the authentication provider such as a domain controller for Windows authentication integrated in Active Directory, or RADIUS server, to receive response from the provider Appraisal level that the user is assessed.
Step 4 , credential authentication: the ISA server forwards the server's request to the Outlook Web Access server, and authenticates itself with the Outlook Web Access server using the client information. The Outlook Web Access server will re-validate this information using the same authentication provider. The Web server must be configured to use authentication mechanisms in conjunction with the proxy method used by the ISA server.
Step 5 , respond to the server: Outlook Web Access server sends a response back to the client, this response is blocked by the ISA server.
Step 6 , the relay responds: the ISA server will forward the response to the client. You must remember that Active Directory validity can only occur when the ISA server is a domain member (the same domain as the domain controller or in a trusted domain). When our ISA server is in the workgroup configuration, we will have to use RADIUS or LDAP.
To use RADIUS, you can install the ISA service on the Windows 2003 member server on the internal network.
ISA server can connect to an LDAP server in the manner described in the following table:
Gate
Request Active Directory domain name
Support option to change password
LDAP
389
Yes
No
LDAPS
636
Yes
Yes
LDAP using global catalog
3268
No
No
LDAPS using global catalog
3269
No
No
Table 1
To use LDAPS or LDAPS using global catalog, the server certificate must be installed on the LDAP server and the root certificate from the issuing CA must be installed with the ISA server name.
Here we use LDAP so we will list the steps needed to configure this authentication method:
-
Open the ISA Firewall interface and expand the Arrays node, then open the array name. Expand the Configuration button and click Genera . In the middle window, click on the RADIUS and LDAP Servers link.
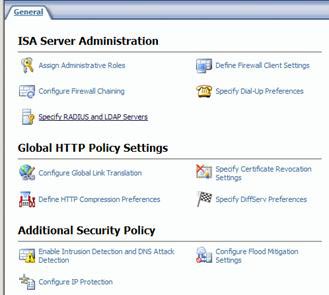
Figure 8
-
On the LDAP Servers Sets tab , click Add to open the Add LDAP Server Set dialog box. In LDAP Server Set , type the name of the domain.
-
Click Add , to add the LDAP server name or IP address. In the Server name, specify DC and click OK . We must also provide user information that has been used to access Active Directory. You do not need to use a domain admin account, a regular user account can also be used here. Click OK to close the Add LDAP Server Set dialog box.
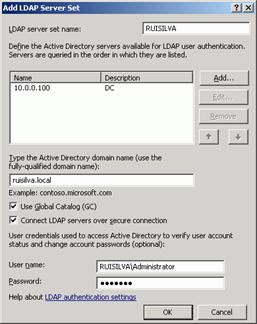
Figure 9
-
Click New to open the New LDAP Server Mapping dialog box. In Login expression , you type DOMAIN *. In LDAP server set , select the pre-defined domain name and then click OK .
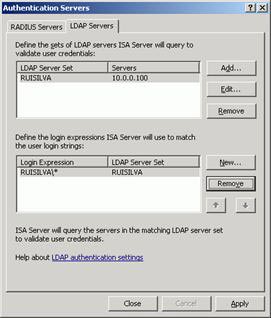
Figure 10
-
Click Close to close the Authentication Servers window
Conclude
Now that we have configured the Exchange CAS / Front-End and ISA Server has the required authentication mechanism working, we can switch to the configuration rules. This issue will be introduced to you in the next section.