Table of Contents
This guide explains how to set up DFS Namespaces in Windows Server 2016, with clear steps, practical tips, and important checks before you begin.
DFS lets you set up shared folders stored on different servers into one or more logical namespaces. Each namespace appears to the user as a shared folder with a series of subfolders. This setting increases the availability and automatically connects users to shared folders on the same Active Directory Domain Services page.
Install DFS Role
Log on to Windows Server 2016 and open the Server Manager control panel. Click on Add roles and features.
The Add roles and features wizard will appear:
 The Add roles and features wizard will appear
Click on Next. Select Role-based or feature-based installation on the next screen.
Click on Next. Select your server in the next screen and click Next again:
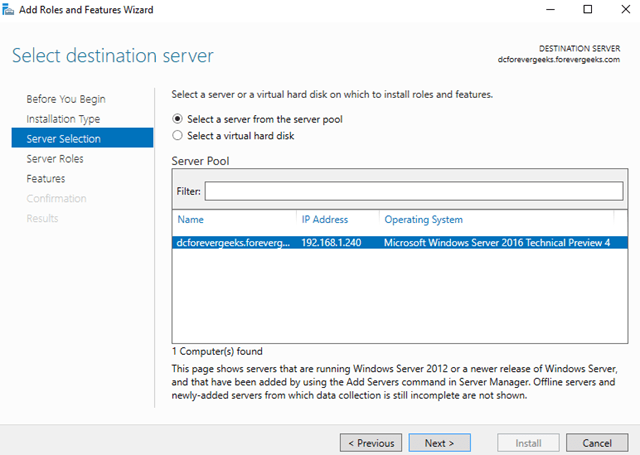 Select your server in the next screen
Expand File and Storage services and choose DFS Namespaces from the list:
 Expand File and Storage services and choose DFS Namespaces from the list
Click Add Features when prompted to install Management tools.
Click Next on the remaining screens. Then click on Install:
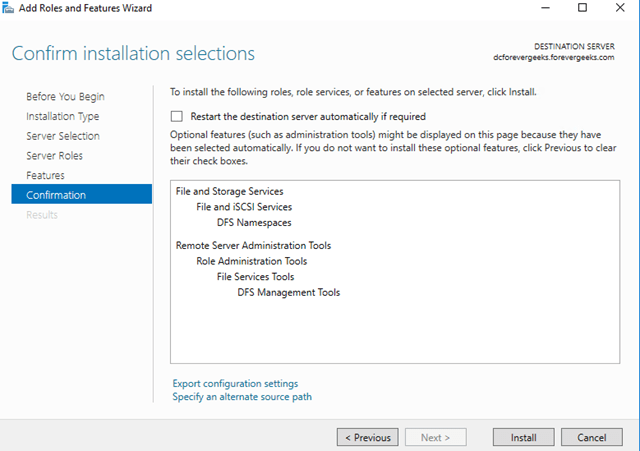 Click Next on the remaining screens
DFS configuration
After the DFS Role has been installed, open the DFS Management console and right-click Namespaces and select New Namespace.
Enter the name of the server that will host the namespace on the next screen:
 Enter the name of the server
Click on Next. Choose a name for the namespace in the following screen. This will be the name of the domain shared path. For example: evergeek. com/files.
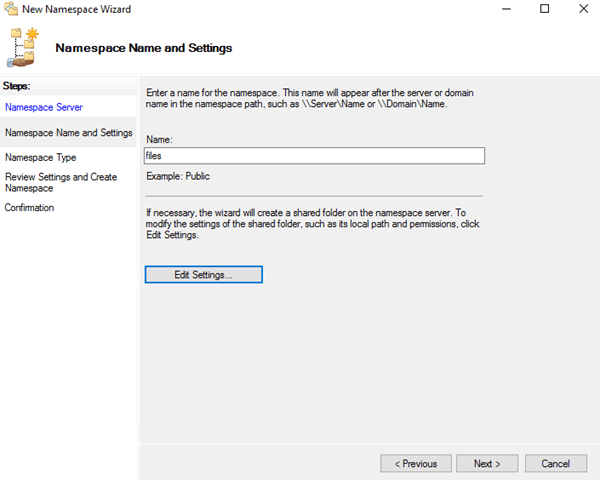 Choose a name for the namespace
Click Edit Settings to edit sharing permissions. By default, everyone can only read. Click on Next. On the following screen, select Namespace Type:
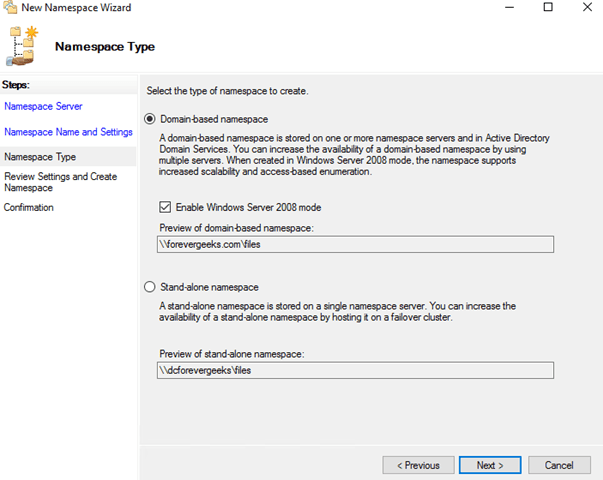 Choose Namespace Type
Select Domain-based namespace and click Next. Review the settings and then click Create:
Check if DFS Namespace is working by entering the network path in Explorer (e. g. evergeek. comfiles )
DFS Namespace works but nothing is there.
Create DFS directory
You will add the folders to DFS Namespace now. From the DFS Management console, right-click on the newly created namespace and select New Folder:
Enter the name of the folder, then click Add:
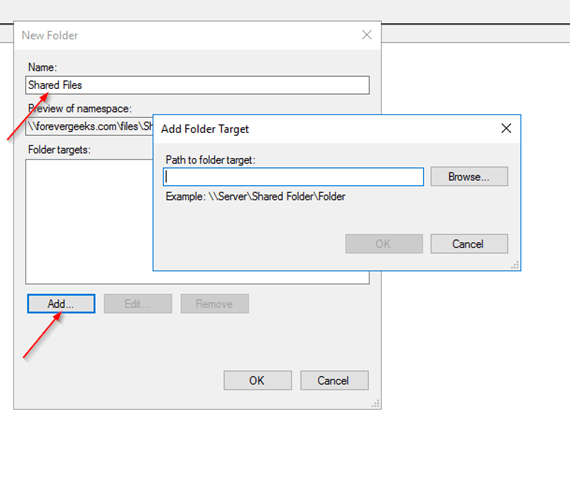 Enter the name of the folder, then click Add
Enter the path of the shared folder you want to add to the namespace.
Click on OK.
Go to the network link again (eg evergeek. comfiles ) and you will see the newly added folder:
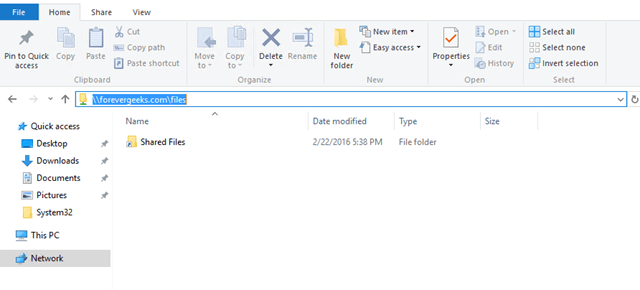 Please go to the internet link again
DFS Namespaces is a great feature in Windows Server to organize sharing over the network. When using DFS Namespaces, it doesn't matter where the shared folders are located, all of which are accessible from a link. This feature also makes it easier to move file servers without breaking access paths.
FAQ
What should I know about Set up DFS Namespaces in Windows Server 2016?
Focus on the key features, requirements, limitations, and practical use cases explained in this guide.
How do I get the best results with Set up DFS Namespaces in Windows Server 2016?
Follow the recommended steps, use current software or information, confirm compatibility, and review settings before major changes.
Are there any risks or limitations?
Potential limitations depend on compatibility, data quality, cost, privacy, support, and how the product or method is used.
Related Articles
 Namespace in C #: Tips and Examples5 minutes read
 Use Iis to Set up Ftp Server on Windows11 minutes read
 4 Basic Difference Between Windows Server and Windows Desktop7 minutes read
 Instructions for Setting Up and Managing FTP Server on Windows 109 minutes read
 Create VPN Server on Windows 8: A Practical Guide6 minutes read
 How to Create a VPN Server on Windows Without Using Software?4 minutes read
Reader Comments 0
Sign in with email or Google to join the discussion.