Instructions for fixing errors: 'You Have Been Denied Permission To Access This Folder' on Windows 10
On a beautiful day, when you access a folder on your Windows 10 computer and suddenly on the screen displays an error message: ' You have been denied permission to access this folder. Để lấy truy cập truy cập vào thư mục này, bạn cần phải sử dụng Tab lệnh security .
Lỗi ' Bạn đã được phép phép phép phép truy cập này folder. To gain access to this folder you will need to use the security tab 'appear when you try to access a protected system folder on Windows 10 or previous Windows operating systems. For example, if you try to access the WindowsApps folder, then you will receive an error message on the screen.
In order to access this folder you must perform additional steps to change the directory permissions. However, you must use Admin permissions, or you need to have an admin password to change the permissions of files and system folders on your Windows 10 computer.
In the following article, Network Administrator will guide you 3 ways to fix the error: ' You have been granted permission to access this folder. To gain access to this folder you will need to use the security tab 'and can access any folder on your Windows 10 computer.

Sửa lỗi bạn đã được phép phép truy cập này folder
1. Master file or folder
Step 1:
Open File Explorer. Navigate to the location of the folder you want to master.
Step 2:
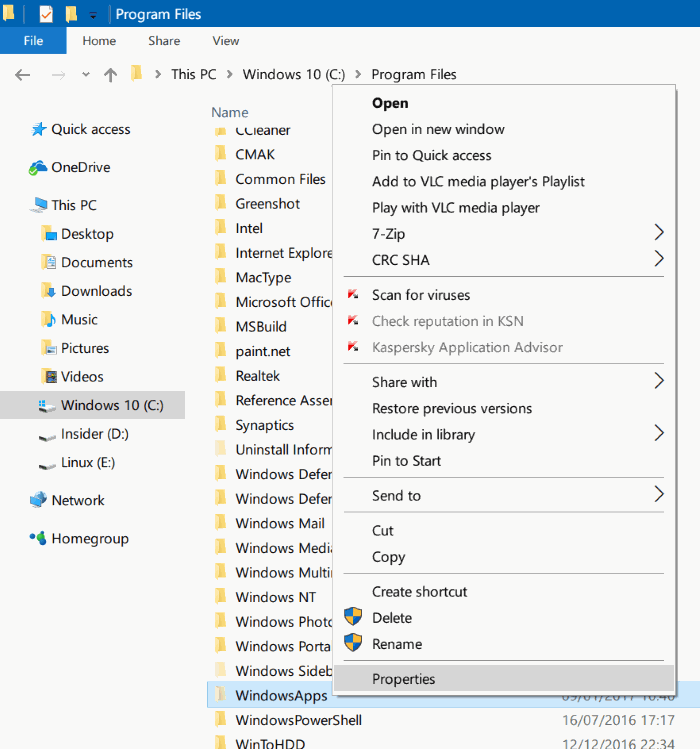
Right-click the folder and select Properties .

Step 3:
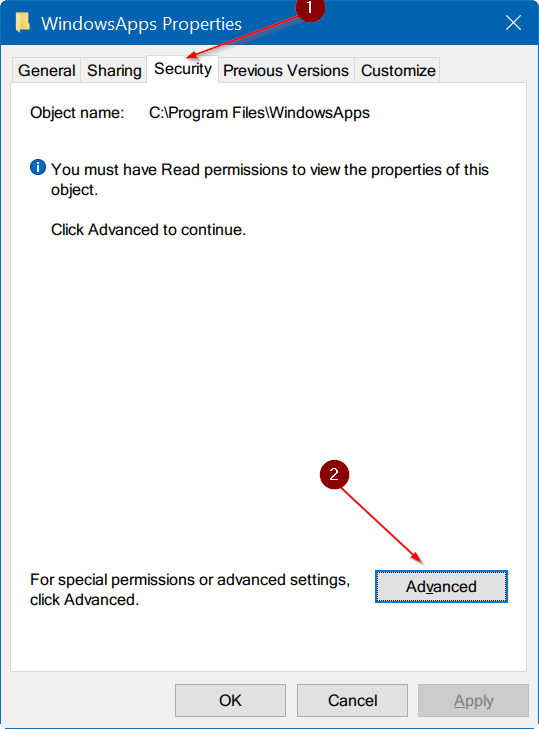
On the Properties window, scroll to the Security tab . Here you click the Advanced button to open the Advanced Security Settings window for the current directory.

Step 4:
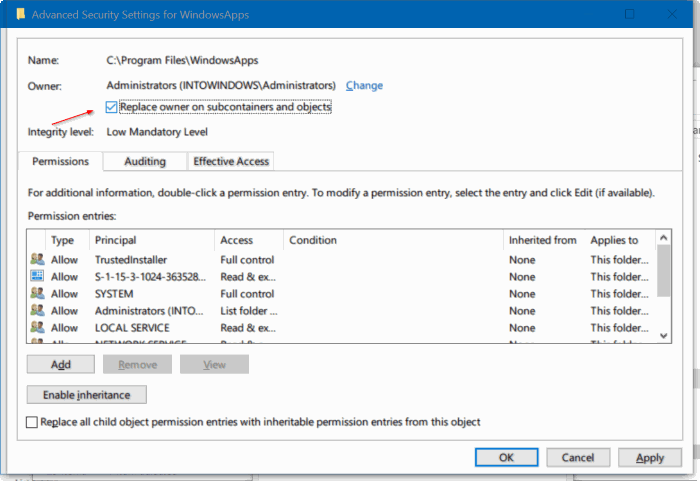
On the next window you will see the Change link next to the Owner pane. Click the link Change to open the Select this object type dialog box.

Step 5:
Here, in the Enter the object name to select box , enter Administrators , then click the Check Names button. Finally click OK to see Advanced Security Settings.

Step 6:
Finally, select the Replace owner option on subcontainers and objects . Click Apply to master your directory.

You can now access and open the folder without errors.
2. Add the Take ownership option to the context menu on Windows 10
The above is the steps to master files and folders on a Windows 10 computer. However, if you don't want to spend a lot of time on the process, you can add the Take ownership option to the context menu (click menu). right) to master files and folders on Windows 10 faster.
Follow the steps below:
Step 1:
Follow the steps in this article to add the Take Ownership option to the context menu.
Step 2:
Right-click the folder you want to master, then select the Take Ownership option.

From now on you can access or open the folder without error ' You have been granted permission to access this folder. Để lấy truy cập truy cập vào thư mục này, bạn cần phải dùng tab security
3. Using TakeOwnershipEx utility

There are many third-party utilities that allow you to enable mastering of files and folders on Windows operating systems. One of these utilities is TakeOwnershipEx.
Download TakeOwnershipEx to your device and install it here.
To master a file or folder, run TakeOwnershipEx , then click Take Ownership and select a file or folder you want to own.
Refer to some of the following articles:
- 5 ways to share files and folders from OneDrive in Windows 10
- Collection of the best free online data storage websites today
- Complete how to use all backup and restore tools on Windows 10
Good luck!