How to access WindowsApps folder on Windows 10 and Windows 8?
When downloading and installing an application from the Windows Store, by default Windows will use the WindowsApps folder located in "C: Program Files" to store all the installation files of the application you install. By default the WindowsApps folder is hidden and users cannot access and use it when needed. And whenever you open the folder, on the screen you will get an error message: "You don't currently have permission to access this folder" .
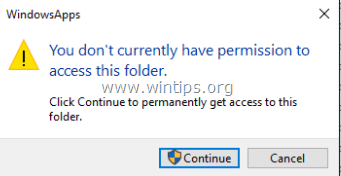
Also all installed Store app data and settings are stored on the computer at:
"% USERPROFILE% AppDataLocalPackagesPackageFullName"
However, the AppData folder is also hidden and you will have to activate it to be able to view the contents in the folder.
Overview:
- All Windows Store applications are stored under the following link on the computer:
% ProgramFiles% WindowsApps (usually: C: Program FilesWindowsApps)
- All Windows Store Apps Data files for each user account are stored at:
% USERPROFILE% AppDataLocalPackages (usually: C: Users% UserName% AppDataLocalPackages
In case, if you want to access the WindowsApps folder to view and edit some settings, you can refer to the steps in the following article of Network Administrator.
How to assign folder permissions "C: Program FilesWindowsApps"?
Step 1: Activate hidden folders and files on Windows
By default, the "C: Program FilesWindowsApps" folder is hidden, so the first step is to enable it to view hidden folders and files. To do this thing:
1. Right-click the Start button and select Control Panel.
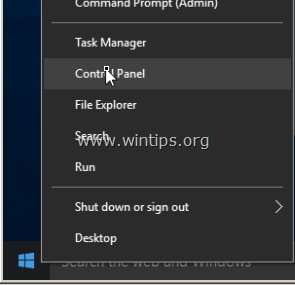
2. On the Control Panel window, set the View by item to Small icons .

3. Open the File Explorer Options window (on Windows 7 and 8 as Folder Options).

4. In the File Explorer Options window, at the View tab, select Show hidden files, folders and drives, then click OK .

Step 2: Backup permission to access current WindowsApps folder
Before performing the steps to change permissions to access the default WindowsApps folder, you will first have to back up the permissions to allow access to the default folder to avoid bad cases.
To backup folder access "C: Program FilesWindowsApps":
1. Right-click the Start button, then select Command Prompt (Admin) .

2. On the Control Panel window, enter the following command and press Enter:
icacls "% ProgramFiles% WindowsApps" / save WindowsApps.acl
The above command will save all permissions of the folder " C: ProgramsFilesWindowsApps " and the file named "WindowsApps.acl" will be stored in the C: WindowsSystem32 directory.
Note:
If an error occurs after changing the permissions of the directory, you can restore the original permissions by entering the following command into the Command Prompt window:
icacls "% ProgramFiles%" / restore WindowsApps.acl
Step 3: Assign folder permissions "C: Program FilesWindowsApps"
In the instructions below, Network Administrator will guide you how to assign Read Only permissions and how to assign Full Access permissions to the WindowsApps folder.
Part 1: Assign Read Only permissions on the WindowsApps folder
1. Open Windows Explorer, then double click to open the "C: Program Files" folder.
2. Next, double-click the WindowsApps folder and then click Continue.

3. On the next window, click the link security tab .
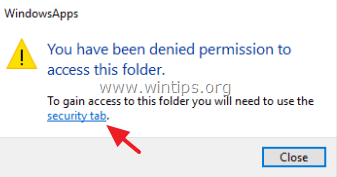
4. Select the Security tab , then click Advanced.
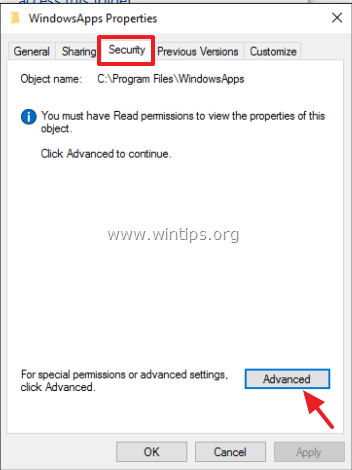
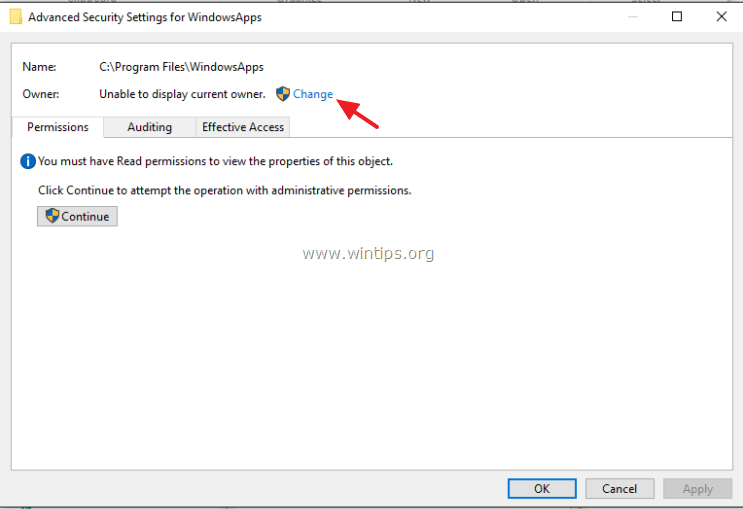
5. In the Owner section , click the link Change.
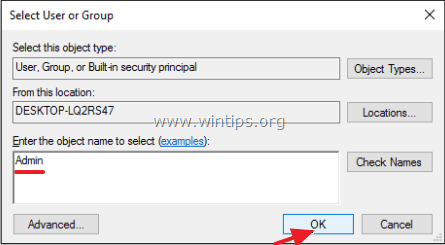
6. Add your user account (username) (such as Admin) or Microsoft account (such as yourusername@hotmail.com) to the Enter the object name to select box and then click OK .
7. Click OK => OK to exit the Security settings window.
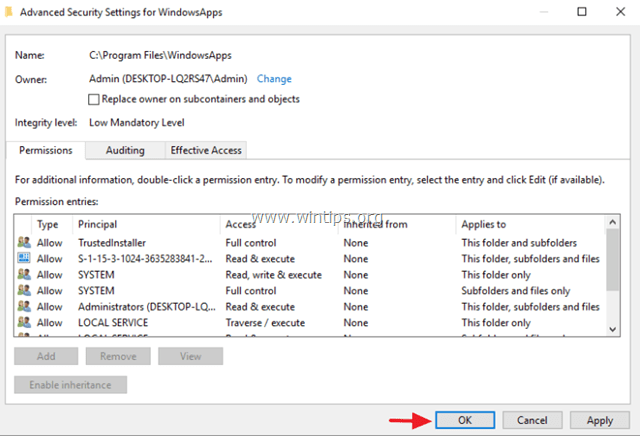
8. From now on you can access the WindowsApps folder, the next time you click Continue when notified.
Part 2: Assign Full Access permissions to folder C: Program FilesWindowsApps
1. Right-click the Start button => Command Prompt (Admin).
2. On the Command Prompt window enter the following command and press Enter:
takeown / F "% ProgramFiles% WindowsApps"
Note:
The above command will assign the ownership of the "C: ProgramFilesWindowsApps" directory to the current login user account.
3. Next enter the following statement into:
icacls "% ProgramFiles% WindowsApps" / grant "% username%": F
Note:
The above command will assign Full Control permission to the "C: ProgramFilesWindowsApps" directory for the current login user account.
4. Finally, assign the WindowsApps directory ownership, return to the TrustedInstaller account using the command:
icacls "% ProgramFiles% WindowsApps" / setowner "NT ServiceTrustedInstaller"
5. From now on you can have full access to the WindowsApps folder.
Refer to some of the following articles:
- What is the 'System Volume Information' folder, and can this folder be deleted?
- Instructions for fixing Access Denied errors during file or folder access on Windows
- How to enable / disable the Security tab of files and folders on Windows?
Good luck!
You should read it
- ★ How to add or remove a protected folder in Controlled Folder Access on Windows 10
- ★ How to Change File Permissions on Windows 7
- ★ Tips to change the default name of the newly created folder on Windows 10
- ★ Instructions for fixing Access Denied errors during file or folder access on Windows
- ★ Fixed 'Permission to access this folder' error when accessing a folder in Windows 10