3 ways to enable or disable Network Discovery on Windows 7/8/10
Network Discovery is a network setup on the Windows operating system, which can control other computers if the computer is on the same network as your computer. If Network Discovery is enabled, it is much easier to share files and computers via the network.
When you first connect to any network on your computer, you will be asked if the network is Private, Public or a domain (Domain). In the article below, Network Administrator will guide you 3 ways to enable or disable Network Discovery on Windows 7/8/10.
Enable or disable Network Discovery on Windows 7/8/10
If you are using your own computer and you want to disable Network Discovery because you do not want to use this setting anymore. You can then disable Network Discovery on the Settings window on Windows 10 or via Control Panel or Command Prompt on Windows 10/8/7.
1. Through the Settings window
First open the Settings window by pressing the Windows + I key combination or alternatively click the Start button, then find and click the Settings icon to open the Settings window.
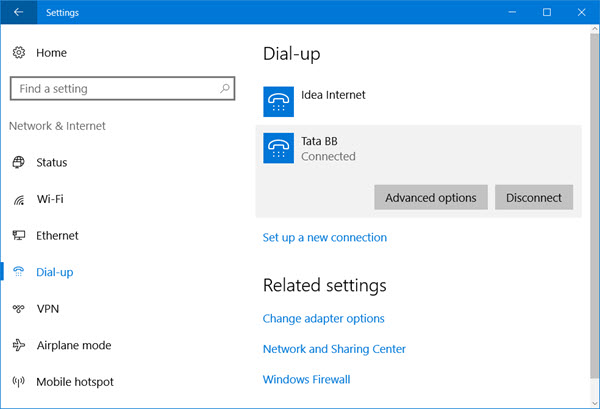
On the Settings window, find and click Network & Internet , then select Dial-Up (or Ethernet) .

Select your network connection, then click Properties . Now a new window appears on the screen, where you find the setting called Make this PC discoverable and switch the setting status to OFF .

In case if you want to re-enable Network Discovery, you can simply switch the Make this PC status to discover .
Follow the same steps as the Wifi network connection. Open Settings => Network & Internet => WiFi => Manage known networks => Select a Wifi connection => Properties => Switch setting status Make this PC discoverable to OFF .
2. Use Control Panel to enable, disable Network Discovery
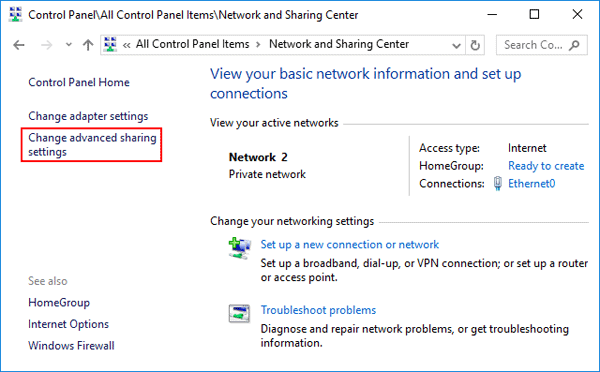
Open the Control Panel window on your Windows computer. On the Control Panel window, set the item View by to be Large icons . Then find and click on Network and Sharing Center on the Control Panel window.

Next on the Network and Sharing Center window, in the left pane, find and click the link Change advanced sharing settings .

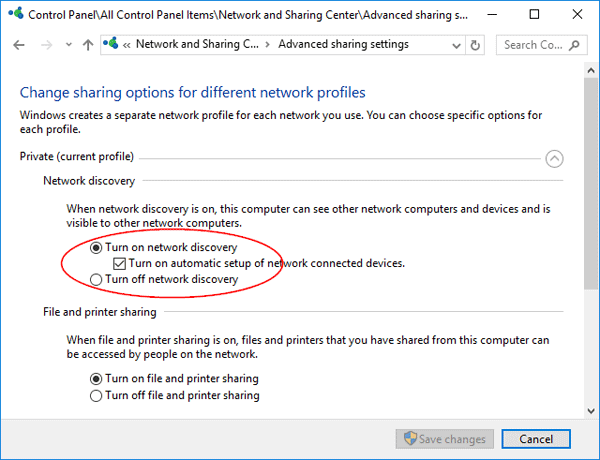
Now you will see 2 different profiles: Private and Guest or public . Expand the option of the network profile you want to change.
Then select Turn on network discovery to activate Network Discovery or select Turn off network discovery to disable Network Discovery.
Click Save changes to save the changes.

If the UAC window appears, click Yes to continue. If Network Discovery is disabled, your computer cannot view other connected devices.
3. Use CMD command
First open the Command Prompt window under Admin:
- On Windows 7:
Enter cmd in the Search box on the Start Menu.
On the search results list, right-click cmd and select Run as administrator .
- On Windows 8 and Windows 10:
Press Windows + X key combination to open Power User Menu, then click Command Prompt (Admin) .
To turn off Network Discovery, enter the following command into the Command Prompt window:
netsh advfirewall firewall set rule group = "Network Discovery" new enable = No
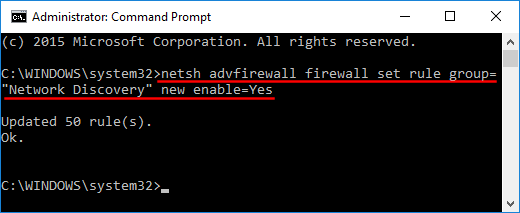
To open Network Discovery, enter the following command into the Command Prompt window:
netsh advfirewall firewall set rule group = "Network Discovery" new enable = Yes

If you cannot activate Network Discovery
In case if you cannot activate Network Discovery, then open the Run window by pressing Windows + R key combination, then enter services.msc in the Run window and press Enter to open the Services Manager window and check If the following services have been opened and set to Automatic, if you haven't already, reset:
- DNS Client
- Function Discovery Resource Publication
- SSDP Discovery
- UPnP Device Host
Refer to some of the following articles:
- Activate "God Mode" on Windows 10, 8 and 7
- Instructions to enable / disable Windows Firewall with Command Prompt
- What is Developer Mode on Windows 10? How to activate this mode?
Good luck!