Instructions for connecting a USB keyboard to an Android phone
Android devices have come a long way and are recorded with great success but it has not been able to replace computers in daily recording tasks. After many consecutive updates, Android still lacks an important update that is typing.
I have tried all kinds of alternative keyboards for Android, of which my favorite keyboard is Gboard with lots of typing speed (about 50 words per minute). However, it is still much slower than the speed of typing a computer keyboard (about 140 words / minute). When you need to type at a high speed, typing with your thumb cannot meet this need.
But luckily, you now have more choices. Bluetooth keyboard and NFC are very convenient and easy to install, besides, USB keyboard is also very useful. All you need is an easy-to-buy device on Amazon for no more than $ 5.
- Ultra-small Bluetooth keyboard for iPhone 4 / iPad
- How to find and send GIFs from the keyboard on Android 7
You need to use USB OTG
Interested readers will notice that Android devices are thinner than the USB connection bit. So how to connect the keyboard to the Android device? Only with an adapter. Specifically, this is a device that converts USB to Micro-USB (using the same port that most Android devices use to charge the battery, excluding new Type-C devices).
This adapter is called USB On-the-Go (OTG), it has many different shapes and sizes. You can also buy British Ksmile USB OTG instead of wired 6-inch UGREEN USB OTG. If you prefer to use wired type, you can refer to Cable Matters 6-inch L-Shaped USB OTG.
Any wired or wireless adapter works in the same way: plugging the Micro-USB adapter into an Android device, then plugging the keyboard into the USB head. Connection has been established. You can use it with other USB types such as connecting to a DSLR camera.
Install external keyboard
When the keyboard is connected, it will take about 2 minutes to install. The keyboard will work right outside so this step is not really necessary, but it doesn't take too much time. You can also adjust to preferences from the beginning.

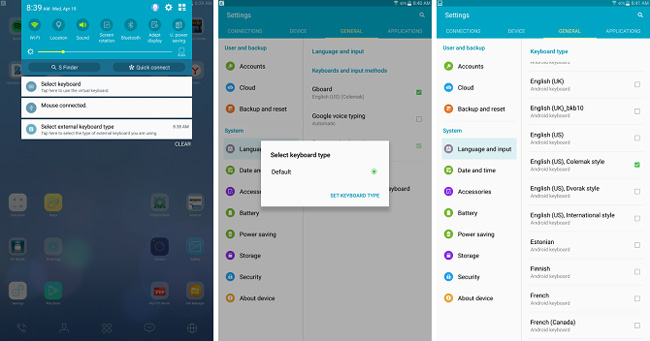
- Swipe down the notification bar at the top of the screen.
- Click on the new item in the notification bar Select keyboard layout.
- In the Choose keyboard layout section, you can select Default , but you should press Set up keyboard layouts to display more detailed items.
- Swipe through the list and select the types of layout you will use. If you type non-English languages, check the box next to that language.
If you don't see the notification on the bar, go to Settings> Personal> Language & Input> Keyboard & Input Methods , you can change the setting here.

The interface may vary depending on the device model, manufacturer and Android version, but generally the steps are similar. For example, on Samsung Galaxy Tab S, the items in the notification bar and the installation interface look very different, but their functions are similar.
Now open the application and start typing.
A few tips you should know
One thing that amazes me is that the Android device supports most special keys on the keyboard.
For example, the Home, End, Page Up, Page Down and Delete keys both work fine. This is useful when typing long text, such as taking notes, taking notes or writing on paper. The Enter key also works as expected, allowing you to insert new lines or submit contextual forms.
Print Screen is also very useful, helping to activate screen capture operations at the operating system level. When Android screen capture becomes a problem, this is the simplest solution.

Windows keys (if using a Windows keyboard) and the Command key (if using an Apple keyboard) will activate special functionality based on your Android version. On Moto E phones, this key will display the Google search icon. On Samsung Galaxy Tab S, this key will display the Google Now icon.
Why not use Laptop?
Users prefer to use Android devices with keyboards than laptops for a number of reasons below:
- Android devices and removable keyboards are often cheaper than buying a laptop computer.
- You can easily disassemble the keyboard from the device if you want and only use the Android device.
- You can save all the data on your Android device instead of syncing it to your laptop. This is also useful when you want to use certain Android applications that are not available on your laptop.
- Android devices have much longer battery life than laptops.
When operations are installed and the keyboard starts working, you can take one more step by projecting the Android screen to your computer. Of course, you only need to do this when you want to see it on a larger screen.
Do you want to use an external keyboard for your Android device? Any tip related to the keyboard that TipsMake.com has not mentioned in the post? Let us know your opinion by commenting below!