Installing Exchange 2007 (Part II)
Installing Exchange is not difficult. However, Exchange 2007 has some changes in the installation program that are a bit surprising. Part 2 of this series will take you to the installation options of the GUI and GUI
Installing Exchange is not difficult. However, Exchange 2007 has some changes in the installation program that are a bit surprising. Part 2 of this series will take you to the installation options of the GUI interface and the CLI command line interface.
If you have forgotten some of the content previously introduced in part one, please review here.
Introduce
Installing Exchange 2007 is as easy as its predecessor, after preparing AD, the rest is not difficult at all. But that doesn't mean you just need to insert the CD into the drive and keep clicking Next. Let's review the system requirements in the first part of this series to minimize errors that could cause errors or something worse.
Installing GUI user interface
If your system has met the requirements, you can start installing Exchange 2007. Installing the basic GUI user interface is quite easy. Insert the CD into the drive, run Setup.exe from the root directory of the disk. You will need certain permissions, depending on the current configuration and how you prepare the domain, at least Enterprise and Local Administrator privileges. If you have not prepared the domain name, you need to add the Schema Administrator privilege. If you already have an Exchange 2007 server in the domain, you must be a member of the Exchange Organization Administrator admin group.
Welcome screen appears. Without one of the three components .Net Framework 2.0, MMC 3.0 or Microsoft Shell (MSH), you will immediately be asked to install them first. Figure 1 illustrates below that the .NET Framework 2.0 and MMC 3.0 already exist and MSH is not yet. You must install it, simply by clicking on the item already on the screen.

Figure 1 : Request before installation
When the Install Wizard program starts, you can read through the introduction, then read and accept the terms in the EULA. Next you have the option to allow using Error Reporting function, select and click Next . You are provided with two installation methods: Typical (typical) and Custom (optional) (see Figure 2). The typical type will install all roles (roles), except the Edge Transport . If you want to customize the installation components, you should choose Custom . You can also change the installation location if you want here.

Figure 2: Installation Options (Install Options)
When choosing the Custom type and clicking Next , you are provided with a number of options and can choose one or more of the roles you want to install. You can choose to install Active, Passive Mailbox server clusters or Management Console (see Figure 3).
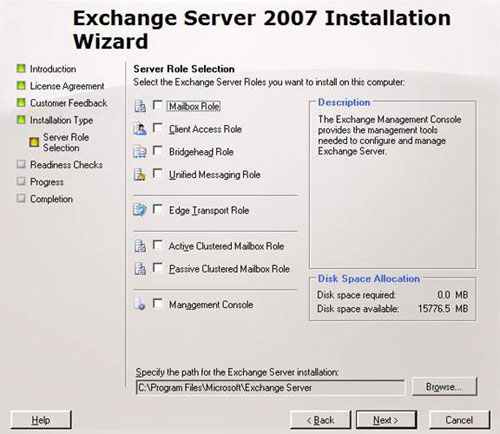
Figure 3 : Server Roles
Before continuing, you must provide the name of the Exchange Oranization organization and be asked if any computer is using Outlook 2003 or earlier Outlook versions (see Figure 4). If you select Yes , the public Folders public folder will be created. If you select No , nothing happens.
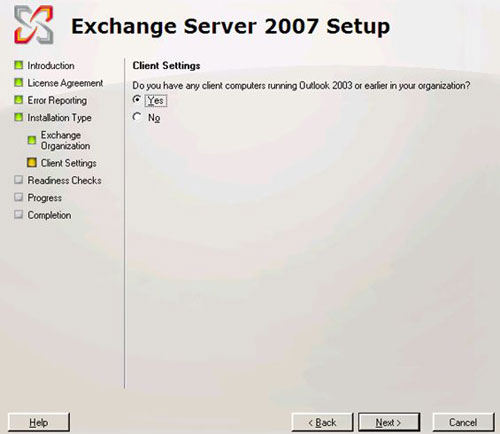
Figure 4 : Outlook versions
You need to be cautious when choosing roles to install. If you are running in a multi-site AD environment, you need to install a Hub Transport and Mailbox server in each AD Site. Client Access Server is also needed in each site with a Mailbox server. Finally, all roles can be installed in the same server (except the Edge Transport) or on each individual server.
Now the installer will run a set of test requests to determine if the domain and server are ready to receive Exchange 2007. Figure 5 illustrates an example of some common errors you will encounter if IIS is omitted or the domain is not at the required functional level. (Note the Install button is dimmed).
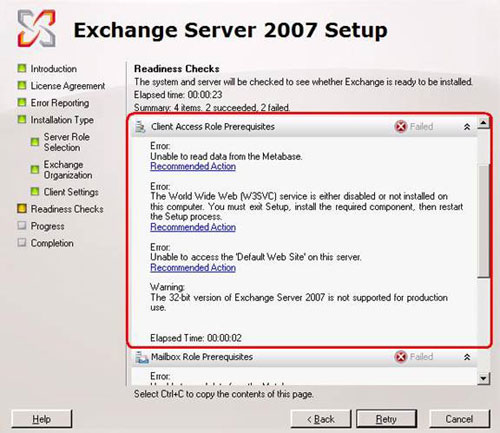
Figure 5 : Error checking availability level
When no errors appear, the Install button appears. You can click on it to start the installation program (see Figure 6).
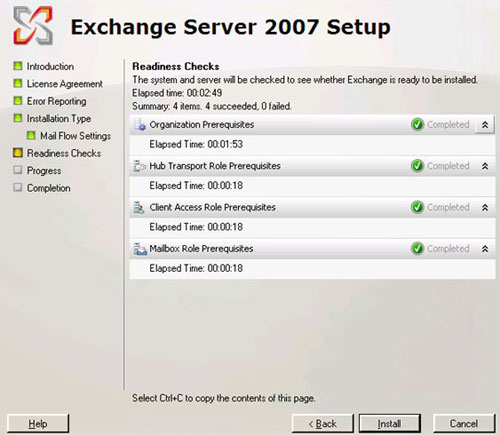
Figure 6 : Check the readiness level successfully
You can see the installation process, how long the installation takes depends on the role installed. Once finished, click the Finish button. The next job is to build the configuration for the Exchange 2007 server (See Figure 7).
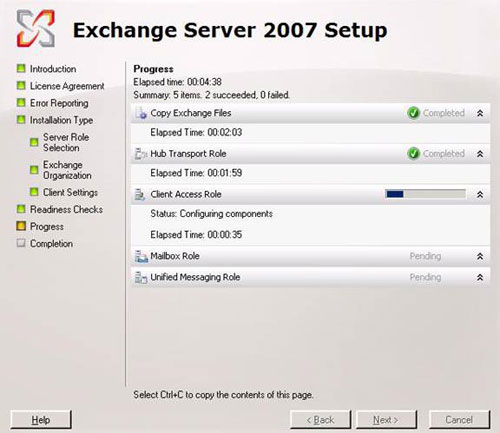
Figure 7 : Installation process
CLI and installation program are not monitored
Exchange 2007 also supports the Command Line Interface (CLI) installation, which can be used to perform unattended installations. There are some required changes depending on the type of Exchange 2007 installation you are working on.
/ roles - describes the server role to be installed. Can be replaced with / r
-
ET or E - Gateway Server
-
HT or H - Bridgehead Server
-
CA or C - Client Access Server
-
MB or M - Mailbox Server
-
UM or U - Unified Messaging
-
MT or T - Admin Tools
-
/ PrepareAD - used to prepare a "manual" Active Directory schema. This variation is optional because the schema is automatically expanded during the installation process. Can be replaced by / p
-
/ TargetDir - describes the directory for installing Exchange 2007. Can be replaced by / t
-
/ SourceDir - describes the location of the installation file
-
/ DomainController - allows you to specify which DC to use. Can be replaced with / dc
-
/ AnswerFile : filename
-
/ mode - determine whether the installation model is the default installation or recovery installation. Required if you want to use transform / RecoverServer
-
Install - this is the default model, used when no switch / mode command is provided
-
Upgrade - is the model used when upgrading the Exchange 2007 installation program
- Uninstall - used when you want to remove Exchange 2007 or its role
- RecoverServer - used when recovering a failed Exchange 2007 server
The basic syntax of CLI or unattended installation program is as follows:
Setup.exe / console / roles: / mode: [/ targetdir:] [/ prepareAD] [/ RecoverServer] [/?]
To install Exchange 2007 with Bridgehead, Client Access and Mailbox server roles, use the following command:
Setup.exe / roles: ET, MB, CA or
Setup.exe / r: E, M, CWhen you want to install the Gateway server, put the " Program files " program files into a folder in drive D named E2007 and read, write it from DC1, you need to use the following transformation command in Setup.exe:
Setup.exe / r: E / targetdir: D: E2007 /dc:dc1.thelazyadmin.lab
This final example explains which command you will use to install the new Exchange 2007 server during the "disaster" recovery process.
Setup.exe / mode: recoverserver
When this command is executed, the installation program determines whether .NET 2.0 Framework, MMC 3.0 and Microsoft Shell are installed. If any other checked software fails, the installation program will stop and give an error message.
Check the settings
After the installation process is complete, you should check that everything has been successfully completed. There are several ways you can do it. First open MSH and run the following command, which will give a list of installed roles (see Figure 8).
Get-ExchangeServer
Figure 8: MSH Get-ExchangeServerNext, consider the Application Log application log information in Event Viewer with events with ID numbers of 1003 and 1004. These two events provide information to see if the installation was successful. Finally interested in some log files created.
• % SystemDrive% ExchangeExchangeSetupLogsSetup.log : This file tells you whether the pre-installation request checks are okay and which roles are installed.
• % SystemDrive% ExchangeSetupLogsExchangeServerMSI.log : This file tells you whether the file decompression process is responsible for any errors.
• % SystemDrive% ExchangeSetupLogsExchange Server Setup Progress.log : This file tells you which system changes were made during the installation process.
• % SystemDrive% Program FilesMicrosoftExchange Server LoggingSetupLogssetup.log : This file keeps track of the activities during installation. You should see this file if the installation program fails.
Conclude
There are many configuration options and settings in Exchange 2007 for you to choose from. The command line interface provides powerful and scriptable options for deploying Exchange 2007 servers with the smallest administrative interaction. Both installation types perform some pre-installation system requirements checks to ensure that Exchange 2007 installation is started correctly from the original. -
Was this article helpful?
Your feedback helps us improve.
Related Articles
 Installing Exchange 2007 (Part I)9 minutes read
 Installing and configuring Exchange 2007 from the command line utility - Part 111 minutes read
 Installing, configuring, and testing Exchange 2007 CCR on Mailbox Server (Part 2)8 minutes read
 Additions for Exchange Server 2007 - Part 1: Introduction steps9 minutes read
 Replace Domino with Exchange 2007 (Part 3)8 minutes read
 Installing and configuring Exchange 2007 from the command line utility - Part 213 minutes read
Reader Comments 0
Sign in with email or Google to join the discussion.