Table of Contents
This updated guide examines How to Use Windows 8.1 and organizes the essential facts, background, and practical takeaways in clear American English.
Part 1of 11:
Updating to Windows 8.1
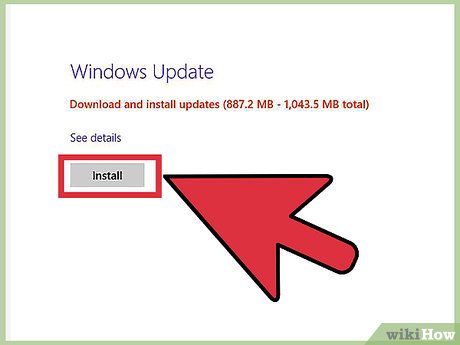 Install any available updates. Before you can install Windows 8.1, you must have all the available updates for Windows 8 installed.
- Open the Charms bar and select "Change PC settings".
- Select the "Update and recovery" option, and then Windows Update.
- Click "Check Now" to check for any available updates, and install any that appear.
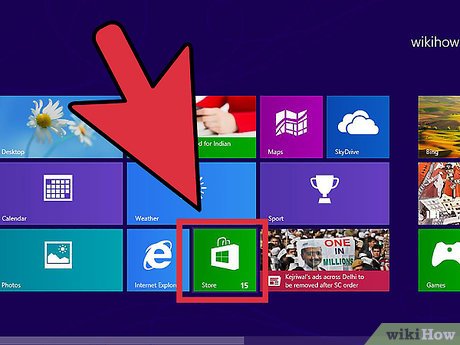 Open the Store app from the Start screen. You can only download Windows 8.1 through the Windows Store (not through Windows Update). You can access the Store from the Start screen.
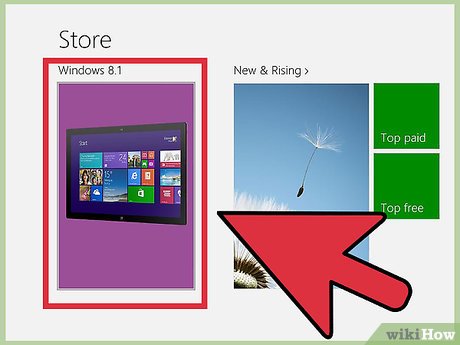 Select the "Windows 8.1 Update". It should be prominently displayed in the Store screen if you haven't updated yet.
 Click "Install" to download and install the update. Your computer will reboot after the installation is complete.
- Windows 8.1 actually lowers the amount of space that Windows takes up, so you may notice a slight increase in your free space after installing.
Part 2of 11:
Accessing Tutorials
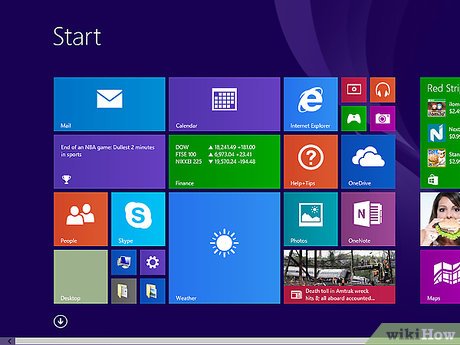 Open the Start screen. Windows 8.1 comes with a built-in tutorial program that can explain how to navigate and find your way around the Windows 8.1 interface. This is great for Windows 8 newcomers and old pros alike.
 Type "help+tips". Select the "Help+Tips" app from the list of search results. You can also open the Apps screen and select it from the "H" section.
 Work through each of the tutorials. Each category has some helpful text along with pictures and videos to show you how to get the most out of Windows 8.
 Follow the link sot learn more. At the end of each tutorial section, there will be links to the Windows Support website. You can use these links to learn more details about how to use Windows 8 effectively.
Part 3of 11:
Booting Directly to Desktop
 Open the Desktop mode. By default, Windows 8 boots to the Start screen, which is great for tablets but less useful for those looking for a standard Windows experience. Windows 8.1 allows you to set your computer to boot directly to Desktop mode, bypassing the Start screen.
- Windows 8.1 Update, an automatic update available to all Windows 8.1 users, handles this process automatically by detecting a keyboard and mouse.
 Right-click on the taskbar and select "Properties". Click theNavigationtab.
 Check the "When I sign in or close all apps on a screen, go to the desktop instead of Start" box. ClickApplyto save the changes.
 Log into your account to see the changes. Now that you've made the change, every time you log into your Windows account or close all full-screen apps, you will be taken to the Desktop mode.
Part 4of 11:
Using the Start Button
 Click the Start button in Desktop mode to open the Start screen. Windows 8.1 adds the Start button back to the Desktop interface. While it won't open a traditional Start menu, it will quickly open the Windows Start screen.[1]
 Right-click on the Start button to open a quick-access menu. This is one of the most useful features added to Windows 8.1, as it allows you to quickly open the Control Panel, the Command Prompt, the Power Options, Disk Management, and a host of other utilities. If you are a power-user, this menu will prove invaluable.
 Shut down or log out from the right-click menu. Besides quick access to utilities, right-clicking the Start button allows you to quickly log out of Windows, or shut down and restart the computer.
Part 5of 11:
Pinning Windows Apps in Taskbar
 Open the Start screen. If you switch back and forth between Desktop and Modern (the UI that Windows 8 uses), you may want to pin your most used Modern apps to your Desktop's taskbar. This will let you easily open them while in Desktop mode.
 Right-click on the app you want to pin. You can pin any of your Live Tiles, or move down to the All Apps screen and pin any of the apps listed.
 Select "Pin to taskbar". This will add a shortcut to the app on your Desktop taskbar.
 Right-click on pinned apps and select "Unpin this program from the taskbar" to remove it. This is especially useful if you want to get rid of the Store button that appears on the taskbar after updating to 8.1.
Part 6of 11:
Using the Improved Start Screen
 Use the Power button in the upper-right corner to access the power options. With the Power button added to the Start screen, you can quickly access the Shutdown, Sleep, and Restart commands.
 Click the "Search" button to open the Search tool. While you could always start typing when on the Start screen to search, the Search button makes the tool much more obvious.
 Resize the tiles on your Start screen. Live Tiles allow you to see important information at a glance, but the default sizes of some tiles can make it difficult to organize your Start screen to your liking. You can resize any tile so that it takes up more or less space.
- Right-click on the tile you want to resize and select "Resize". If you want to resize multiple tiles at once, hold downCtrlwhile selecting them.
- Select Small, Medium, Wide, or Large.
 Uninstall multiple apps at once. By selecting multiple apps from the Start screen, you can delete them all at once, saving you a lot of time.
- Hold downCtrland right-click on each app you want to delete.
- Select "Uninstall" to remove the selected apps.
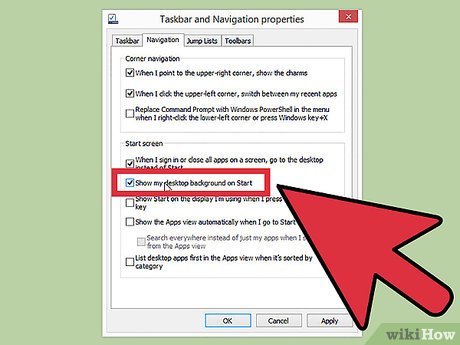 Set your Start screen's background to match your Desktop. If you move back and forth between your Desktop and the Start screen often, it can be jarring to have the background change each time. You can set your Start screen to share your Desktop background to help make switching between them a more seamless experience.[2]
- Right-click on the taskbar in Desktop mode and select "Properties".
- Click theNavigationtab.
- Check the "Show my desktop background on Start" box and clickApply. Your Start screen will now have the same background as your Desktop.
 Find your newly-installed apps. When you install apps in Windows 8.1, they are no longer added as tiles to your Start screen. This helps cut down on clutter, but can make them difficult to find at first.
- Click or tap the Down button at the bottom of the Start screen to open the "Apps" screen. Your newly installed apps will be displayed first, with all of your installed apps displayed alphabetically after that.
Part 7of 11:
Snapping Multiple Apps
 Drag an app to the side of the screen to "Snap" it. The Modern UI allows you to have multiple apps open on your screen at once by snapping them to the sides. Windows 8 only allowed two apps to be snapped side-by-side, but 8.1 allows you to snap up to four apps at once.
 Drag another app to the other side of the screen to split the screen. You can even snap the Desktop view to one side and a Modern app to the other.
 Drag the slider for each app so that there is space in the middle. This will allow you to place another app between them.
 Drag another open app to the space between the two snapped apps. Note that the number of apps that you can snap at once is dependent on your screen's resolution. Low resolution screens may not be able to snap more than two apps.
 Adjust the viewable area by using the sliders. Some apps will not work without enough screen space.
Part 8of 11:
Searching Your Computer and the internet
 Enable Bing web searches for your Windows Search function. Windows 8.1 can integrate the Bing search engine into your Windows Search utility, which can add a lot more functionality to your searches.
- Open the Charms bar and select "Settings".
- Click "Change PC settings".
- Select the "Search and apps" option.
- Toggle "Use Bing to search online" on.
- Determine whether or not you want Bing to use your location when searching. Enabling this will allow Bing to deliver location-specific search results.
 Search for something using the Windows search. You can click the "Search" button from the Start screen or simply start typing when the Start screen is open.
 Browse the search results. Windows will search for any files or documents that match your search terms, as well as pull information from online that relates. You may find videos, images, biographies, and similar search terms that you can pick from.
- The search function will also search any files that are stored on your OneDrive account.
Part 9of 11:
Adjusting Your Computer's Settings
 Open the Charms bar and click "Settings". Windows 8.1 adds lots of useful settings options that you can change without having to open the Control Panel. This is especially useful if you just have a touchscreen device.
 Select "Change PC settings" at the bottom of the Settings menu.
 Select one of the categories. The Settings menu has seen lots of additions since the Windows 8.1 update.
- PC and devices - You can adjust a lot of settings that were previously relegated to the Control Panel, including the display resolution, your connected devices, power options, and disk space.
- Accounts - Manage your Windows account, including connecting your account with your Microsoft Account.
- OneDrive - Adjust your OneDrive sync and storage settings. See the OneDrive section below for more details.
- Search and apps - Change your search preferences, manage your installed apps, and choose the default programs for types of files.
- Privacy - Set your privacy options, including location preferences and webcam permissions.
- Network - Connect to new networks, adjust your proxy settings, or join or create a HomeGroup.
- Time and language - Set your timezone and language settings. You can use this menu to add more keyboard languages.
- Ease of Access - You can change a variety of settings to make it easier to see, hear, and do things in Windows.
- Update and recovery - Check for Windows updates, recover lost files with File History, and perform system recovery and restore functions.
Part 10of 11:
Using OneDrive
 Understand how OneDrive is integrated with Windows 8. If you log into Windows 8.1 with your Microsoft Account, you'll link your OneDrive (formerly SkyDrive) storage with your Windows computer. Windows will automatically save all new files to your OneDrive storage, while keeping copies on your local storage as well.
 Adjust your OneDrive sync settings. You can change how your files are synced and whether or not you want to save documents to OneDrive by default.
- Open the Charms bar and select "Settings".
- Select "Change PC settings" and then "OneDrive".
- Click the "File storage" option. You will see your available OneDrive storage space, and you can toggle saving to OneDrive by default on or off.
- Click the "Sync settings" option to change your OneDrive sync settings. You can sync your PC's settings so that they are automatically applied to any computer you log into, as well as a variety of other settings such as web browsers and personalization.
 Use the OneDrive app to manage your OneDrive files. Windows 8.1 includes a OneDrive app that you can use to manage your OneDrive online storage. You can also use the app as a Modern UI File Explorer.[3]
- Open the Start screen and type "onedrive". Select "OneDrive" from the list of results.
- Right-click or swipe files to select them.
- Use the menu that appears at the bottom to manipulate the files. You can move, rename, copy, paste, delete, and perform other basic file management tasks.
- Click the "OneDrive" button at the top to switch to your local files. You can then perform the same actions on all of your local files and documents.
Part 11of 11:
Re-enabling Libraries
 Open the File Explorer in Desktop mode. Libraries were added in Windows 7, and they allow you to quickly locate your files that are spread out across a variety of folders. They were carried over into Windows 8, but the Windows 8.1 update hides them from view. They're not gone though; they just need to be re-enabled.[4]
- You can open the File Explorer by clicking the File Explorer icon in the taskbar, or by pressing⊞Win+E
 Click the "View" tab at the top of the window.
 Click the "Navigation pane" button and select "Show libraries". Your libraries will now appear beneath "This PC" in the sidebar.
 Add folders to your libraries to easily access different types of files. You can create as many custom libraries as you want, and add folders from your computer and even removable drives. Click here for tips on getting the most out of Windows libraries.
FAQ
What is How to Use Windows 8.1 about?
It provides a structured overview of windows, explains the main context, and highlights practical takeaways for readers.
Why does this topic matter?
Understanding the main concepts helps readers evaluate the issue, avoid common mistakes, and make better-informed decisions.
How should readers use this information?
Use the guidance as a practical starting point, confirm details that may have changed, and follow current product, safety, or security recommendations.
Related Articles
 Here's How to Uninstall Windows 10 to Return to Using Windows 74 minutes read
 The Chart for the 10 Most Amazing Versions of Windows11 minutes read
 Windows Revolution and Breakthrough Changes Through Each Version10 minutes read
 Summary of Several Logout Methods on Windows 8 and Windows 104 minutes read
 Looking Back at 27 Years of 'Evolution' of Windows3 minutes read
 Instructions on How to Upgrade from Windows XP to Windows 85 minutes read
Reader Comments 0
Sign in with email or Google to join the discussion.