Table of Contents
This practical guide explains how to Use Pictures as Excel Chart Columns through clear, ordered steps. It also covers useful settings, common mistakes, and checks that can improve the final result.
Excel provides a variety of chart types including column and bar charts to present your data. However, you don't have to use the preset column and bar layouts. Instead, you can swap them out for chart-themed images or icons to grab people's attention. Here's how to use pictures as Excel chart bars.
Instructions for Using Images as Excel Chart Columns
Step 1:
First you create a chart in Excel as usual.
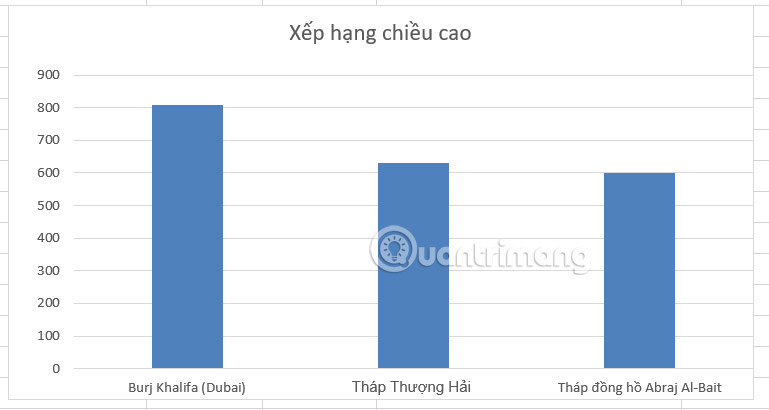
Next, you Download the image and remove the background of the image . You should use the PNG image you want to replace the column in Excel. Next, use the image background removal feature in Excel to remove the background around the image.

Step 2:
Click on the first image and Press Ctrl+C To copy the image. Next, Click on the first chart column twice , the first click will select all columns and the second click will isolate that column. Keep in mind that you do not double click. If you do it correctly, you will see the 4 sides of the column selected as shown below.

Step 3:
Now Simply Press Ctrl+V to paste the image to replace the column . The result is that you will see the image replace the Excel chart column.

We continue to paste the remaining images into the columns and get a new chart as shown below. The image automatically aligns to exactly match the height of each column in the Excel chart.

FAQ
How do I Use Pictures as Excel Chart Columns?
Follow the steps in this guide in order, verify each setting before continuing, and check the result after every major change.
What should I prepare before I Use Pictures as Excel Chart Columns?
Confirm compatibility, install current updates, save important work, and back up data before changing system or application settings.
What can I do if use Pictures as Excel Chart Columns does not work?
Review permissions and requirements, restart the relevant device or app, repeat the steps carefully, and use official support resources when the issue continues.
Related Articles
 Types of Data Hiding in Excel - Hide Pictures, Graphs, Rows5 minutes read
 8 Types of Excel Charts and When You Should Use Them9 minutes read
 How to Create a Chart Combining Columns and Lines in Excel5 minutes read
 Steps to Use Pareto Chart in Excel3 minutes read
 How to Convert Columns into Rows and Rows into Columns in Excel3 minutes read
 How to Fix Columns in Excel4 minutes read
Reader Comments 0
Sign in with email or Google to join the discussion.