Table of Contents
This updated guide examines How to Upgrade Oracle Java on Ubuntu Linux and organizes the essential facts, background, and practical takeaways in clear American English.
Method 1of 4:
32-bit Oracle Java instructions:
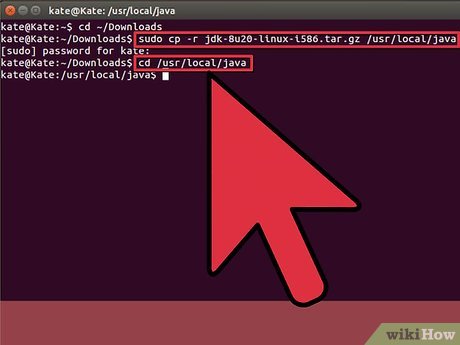 Become root user and copy the new compressed Oracle Java binaries from our download directory to /usr/local/java
- Type/Copy/Paste: cd /home/ "your_user_name" /Downloads
- Type/Copy/Paste: sudo cp -r jdk-7u40-linux-i586.tar.gz /usr/local/java
- Type/Copy/Paste: sudo cp -r jre-7u40-linux-i586.tar.gz /usr/local/java
- Type/Copy/Paste: cd /usr/local/java
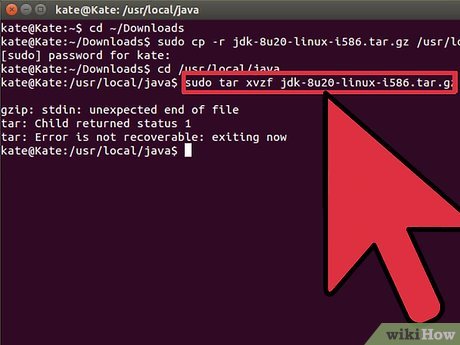 Next we are going to unpack our new version of Oracle Java binaries, in the directory /usr/local/java
- Type/Copy/Paste: sudo tar xvzf jdk-7u40-linux-i586.tar.gz
- Type/Copy/Paste: sudo tar xvzf jre-7u40-linux-i586.tar.gz
Method 2of 4:
64-bit Oracle Java instructions:
 Become root user and copy the new compressed Oracle Java binaries from our download directory to /usr/local/java
- Type/Copy/Paste: cd /home/ "your_user_name" /Downloads
- Type/Copy/Paste: sudo -s cp -r jdk-7u40-linux-x64.tar.gz /usr/local/java
- Type/Copy/Paste: sudo -s cp -r jre-7u40-linux-x64.tar.gz /usr/local/java
- Type/Copy/Paste: cd /usr/local/java
 Next we are going to unpack our new version of Oracle Java binaries, in the directory /usr/local/java
- Type/Copy/Paste: sudo tar xvzf jdk-7u40-linux-x64.tar.gz
- Type/Copy/Paste: sudo tar xvzf jre-7u40-linux-x64.tar.gz
 At this point you should have two new uncompressed binary directories in /usr/local/java for the Java JDK/JRE listed as: jdk1.7.0_40 jre1.7.0_40 Along with: jdk1.7.0_25 jre1.7.0_25
Method 3of 4:
Modify your Linux system PATH:
 Edit the system PATH file /etc/profile and add the following system variables to your system path. Use gedit, nano or any other text editor, as root, and open up /etc/profile
- Type/Copy/Paste: sudo gedit /etc/profile or
- Type/Copy/Paste: sudo nano /etc/profile
 Scroll down using your arrow keys to the end of the file and add the following lines below to the end of your /etc/profile file in Ubuntu Linux,at this point you are going to be changing the version numbers from the old Oracle Java to the new version of Java, you will change the versions numbers in the following system PATH file /etc/profile: Modify the /etc/profile file: JAVA_HOME=/usr/local/java/ jdk1.7.0_25 PATH=$PATH:$HOME/bin:$JAVA_HOME/bin JRE_HOME=/usr/local/java/ jre1.7.0_25 PATH=$PATH:$HOME/bin:$JRE_HOME/bin export JAVA_HOME export JRE_HOME export PATH Change to this: JAVA_HOME=/usr/local/java/ jdk1.7.0_40 PATH=$PATH:$HOME/bin:$JAVA_HOME/bin JRE_HOME=/usr/local/java/ jre1.7.0_40 PATH=$PATH:$HOME/bin:$JRE_HOME/bin export JAVA_HOME export JRE_HOME export PATH Save the file and exit
Method 4of 4:
Inform your system of the updated Oracle Java version:
 Inform your Ubuntu Linux system where your Oracle Java JRE/JDK is located, now you will want to update the system to use Oracle Java 1.7.0_40
- Type/Copy/Paste: sudo update-alternatives --install "/usr/bin/java" "java" "/usr/local/java/ jre1.7.0_40 /bin/java" 1
- Type/Copy/Paste: sudo update-alternatives --install "/usr/bin/javac" "javac" "/usr/local/java/ jdk1.7.0_40 /bin/javac" 1
- Type/Copy/Paste: sudo update-alternatives --install "/usr/bin/javaws" "javaws" "/usr/local/java/ jre1.7.0_40/bin /javaws" 1
 Inform your Ubuntu Linux system, that Oracle Java JRE 1.7.0_40 must be the new default Java
- Type/Copy/Paste: sudo update-alternatives --set java /usr/local/java/ jre1.7.0_40 /bin/java
- Type/Copy/Paste: sudo update-alternatives --set javac /usr/local/java/ jdk1.7.0_40 /bin/javac
- Type/Copy/Paste: sudo update-alternatives --set javaws /usr/local/java/ jre1.7.0_40 /bin/javaws
 Reload your system wide PATH /etc/profile by typing the following command:
- Type/Copy/Paste: . /etc/profile
- Note your system wide PATH /etc/profile file will reload after reboot of your Ubuntu Linux system
 Test to see if the new version of Oracle Java was installed correctly on your system by running the following commands and noting the version number of the new Java update.
- Type/Copy/Paste: java -version
- this command displays the version of Java running on your system
- Type/Copy/Paste: java -version
 You should receive a message which displays:
- java version "1.7.0_40" Java(TM) SE Runtime Environment (build 1.7.0_40-b08)Java HotSpot(TM) 64-Bit Server VM (build build 25.1-b02, mixed mode)
- Type/Copy/Paste: javac -version
- this command lets you know that you are now able to compile java programs from the terminal
- You should receive a message which displays:
- javac 1.7.0_40
 Afterwards, you have the option of removing the old Oracle Java JDK/JRE, by simply removing the directory's which hold the old Java JDK/JRE binaries.
- Type/Copy/Paste: cd /usr/local/java
- Type/Copy/Paste: sudo rm -rf jdk1.7.0_40
- Type/Copy/Paste: sudo rm -rf jre1.7.0_40
 Reboot your Ubuntu Linux system and your system will be fully configured for running and developing Java programs.
FAQ
What is How to Upgrade Oracle Java on Ubuntu Linux about?
It provides a structured overview of java, explains the main context, and highlights practical takeaways for readers.
Why does this topic matter?
Understanding the main concepts helps readers evaluate the issue, avoid common mistakes, and make better-informed decisions.
How should readers use this information?
Use the guidance as a practical starting point, confirm details that may have changed, and follow current product, safety, or security recommendations.
Related Articles
 How to Enable Oracle Java in Your Web Browsers on Ubuntu Linux5 minutes read
 How to Install Oracle Java on Ubuntu Linux6 minutes read
 Folder: How to Install Oracle Java Jre on Ubuntu Linux6 minutes read
 Oracle Wants to Turn Java EE into Fully Open Source5 minutes read
 How to Install Android on Ubuntu Linux with Eclipse Ide12 minutes read
 How to Install Java Runtime in Ubuntu5 minutes read
Reader Comments 0
Sign in with email or Google to join the discussion.