Tips and tricks after installing Ubuntu
Ubuntu is one of the completely free open source operating systems. This is a distribution (distro) of Linux with the second highest amount of traffic after Linux Mint.
Table of Contents
Ubuntu is one of the completely free open source operating systems.This is one of the top distribution ("distro") of Linux. If you have an Ubuntu system that comes with the default Gnome desktop environment installed on your PC, the following article will provide you with useful tips and tricks to work with your system.
Tips and tricks after installing Ubuntu 18.04
Change icon size on Launcher
Ubuntu has a Dock-style launcher (called Dock) on the left hand of the screen. If you don't like its location and the icon size on the launcher, you can easily adjust it via settings.
Step 1 . Click on the Application button and select Settings .
Step 2 . Select Dock on the left column.
Step 3 . On the right column, drag the Icon Size slider to the left if you want a smaller size or to the right if you want a larger size.
Move the Application button to the top or left

The Application button is displayed under the Dock's use by default, but you can move it to the top if it is set to the left or right of the screen; or move to the left if the Dock is at the bottom of the screen. Ubuntu does not provide the option to move the Application button, but you can do it easily via Terminal.
Step 1 . Press Ctrl + Alt + T to run Terminal.
Step 2 . Enter gsettings set org.gnome.shell.extensions.dash-to-dock show-apps-at-top true to move the Application button upwards.
Enter gsettings set org.gnome.shell.extensions.dash-to-dock show-apps-at-top false to move the Application button to the end.
Open the window in the center of the screen
When running an application but not in full screen mode, you can see that the system always places it near the left corner of the desktop. You can set the program window to open in the center of the screen by:
Step 1. Find and install Dconf Editor from Ubuntu Software if not on your system.
Step 2 . Launch Dconf Editor and access / org / gnome / mutter /.
Step 3 . Turn on " center-new-windows ".
Automatically change wallpaper
You can right-click the desktop, select Change Background and choose one of the pre-installed wallpapers, but you need to do it every time you want to change the wallpaper. However there is a simple way, which helps you to automatically change the wallpaper for a certain period of time using the Variety application.
Step 1 . Open the Terminal window.
Step 2 . Enter sudo add-apt-repository ppa: peterlevi / ppa.
Step 3 . Enter sudo apt-get update.
Step 4 . Enter sudo apt-get install variety.
With this application, you can change the wallpaper for a fixed period of time and can perform a number of other settings such as applying effects, colors and sizes, adjusting indicator icons, etc.
Change folder icon
When you run Files Manager, you will see the default icons. If you want to change the folder icon to another icon to highlight the icons on the whole system, follow the steps below:
Step 1 . In Files Manager, right-click on the folder icon, select Properties .
Step 2 . In the Basic tab, click on the icon image to open the Select Custom Icon window.
Step 3 . Browse to Other Locations> Computer> usr> share> icons to select the icon you want to use.
Step 4 . Click the Open button at the top right of the window to confirm.
Note : You can change your custom folder icon to default by clicking on the Revert button in the Select Custom Icon window in step 2 above.
Add or change shortcuts
Shortcuts are preinstalled in the system, but you can add new shortcuts or change them easily. For example, you can add shortcut Ctrl + Alt + S to access Settings with the following steps:
Step 1 . Go to Applications > Settings> Devices> Keyboard.
Step 2 . In the Launcher in the right column, click Settings .
Step 3 . Press Ctrl + Alt + S simultaneously, then click Set .
Step 4 . Close the window and try the new shortcut.
To turn off a shortcut, press the " x " button after step 3 above.
Shortcuts can also be set by changing keybinding values with Dconf Editor, which can be installed from Ubuntu Software. In Ubuntu, press Alt + F2 and access Dconf Editor, then navigate to org> gnome> desktop> wm> keybindings .
End of unresponsive programs
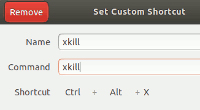
Xkill is part of the built-in X11 utilities in Ubuntu and a tool to end corrupted X clients or unresponsive programs. You can easily add a shortcut to launch xkill with the steps below.
Step 1 . Go to Applications> Settings> Devices> Keyboard.
Step 2 . In the Keyboard Shortcuts right column, scroll down to the end and press the " + " button to create a custom shortcut.
Step 3. Enter xkill in both the Name and Command boxes.
Step 4 . Click the Set Shortcut button, press the new key combination, for example Ctrl + Alt + X , then click Add to confirm.
Now you're ready to use Xkill. Press the upper key combination to turn the cursor into an X, move the X and drop it into the program interface to close the unresponsive programs or cancel the X by right-clicking.
Turn on media playback
Ubuntu only has completely free software by default and does not configure media formats such as mp3 and mp4. However, you can easily install these codecs for the default music player to play these files with these simple steps:
Step 1 . Open the Terminal window.
Step 2 . Enter sudo apt install libdvdnav4 libdvdread4 gstreamer1.0-plugins-bad gstreamer1.0-plugins-ugly libdvd-pkg .
Step 3 . Enter sudo apt install ubuntu-restricted-extras .
Install package Oracle Java
In addition to using OpenJDK, some web services require Oracle Java Runtime Environment (JRE) to be installed in the system to run the services properly. If you want to receive exclusive Oracle Java packages for your system, you can download and install them using the following steps:
Step 1 . Open Terminal.
Step 2 . Enter sudo add-apt-repository ppa: webupd8team / java to add the repository.
Step 3 . Enter sudo apt-get update to update the source list.
Step 4 . Enter sudo apt-get install oracle-java8-installer to download and install Oracle Java packages.
Step 5 . Enter sudo java -version to check the version of Java you are using in the system.
Step 6. Enter sudo update-alternatives --config java to select the default Java used in the system when needed.
Note: A new version of Oracle Java may not allow you to run unsigned or signed applications or services. If you trust the services you are using, you can configure the JRE security level or add services to the Exception Site List list using Java Control Panel. To run it, enter / usr / bin / jcontrol in Terminal, or press Alt + F2 , type jcontrol and run the Oracle Java 8 Plugin Control Panel.
Automatically mount the hard drive at system startup
Ubuntu is able to read and write files stored on Windows formatted partitions using the NTFS file system, but the partitions must be mounted before being accessed. With these steps, you can automatically mount the drive or partition without having to manually mount it to access it each time you start the system. Here are the steps to do by adding an item in the fstab file.
Step 1 . In Terminal, enter sudo blkid to get the UUID (Universal Unique Identifier) of the partition you want to mount.
Step 2 . Enter sudo mkdir / media / ntfs to create mount point.
Step 3 . Enter admin gedit: /// etc / fstab and add the following line to the fstab file: UUID = 1234567890123456 / media / ntfs ntfs rw, nosuid, nodev, noatime, allow_other 0 0 .
Step 4. Replace the 16-digit number above with the UUID you already have from Step 1, then click Save . Reboot the system and check if the partition is mounted.
To determine the volume partition by label, use sudo blkid or ls / dev / disk / by-label -g in Terminal. The Disks utility mentioned in " Name or Label a Partition " also gives you the device number, partition type, size and label.
Mount the USB drive manually
When a USB storage device is plugged into the system it is usually automatically mounted, but if for some reason it does not automatically mount, you can do it manually with the following steps.
Step 1 . Press Ctrl + Alt + T to run Terminal.
Step 2 . Enter sudo mkdir / media / usb to create a mount point called usb.
Step 3 . Enter sudo fdisk -l to find the inserted USB drive, assuming the drive you want to mount is / dev / sdb1 .
Step 4 . Enter sudo mount -t vfat / dev / sdb1 / media / usb -o uid = 1000, gid = 100, utf8, dmask = 027, fmask = 137 to mount the USB drive formatted with FAT16 or FAT32 system. Or enter sudo mount -t ntfs-3g / dev / sdb1 / media / usb to mount the USB drive formatted with NTFS. To disconnect, just enter sudo umount / media / usb in Terminal.
Name or label the partition
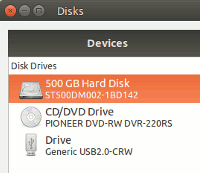
Files Manager displays the root folder Computer for the Ubuntu system partition. If you have other partitions (or volumes), it will display them as GB Volume xx if not named or labeled. Using the Disk tool is one of the most effective ways to name a partition.
Step 1 . Go to Applications> Utilities , then click Disks to run it.
Step 2 . Select Hard Disk .
Step 3 . In the Volumes section, click on the partition you want to label.
Step 4 . Click the Additional partition options button under the Volumes section, then select Edit filessystem .
Step 5 . In the Label box, enter a name, for example Data-Disk and click Change .
Files Manager will now display the partition label, the Data-Disk example as above instead of the GB Volume xx. This tip is used to name the partition using the utility, if using other advanced features such as formatting, editing or deleting partitions, it may cause data in the drive to be deleted.
Set clock time on dual boot system
If you dual-boot Ubuntu 18.04 and Windows 10, you may find that when changing the time on a system will affect the other system and the two systems will not display at the same time.
- 7 risks when booting dual operating systems Windows and Linux
This happens when Ubuntu interprets the real-time clock (RTC) hardware or clock (UTC) while Windows 10 keeps the clock in the local time. You can fix this problem by leaving the local RTC time in Ubuntu by running the following command in Terminal.
timedatectl set-local-rtc 1 --adjust-system-clock
To undo the installation, enter the following command
timedatectl set-local-rtc 0 --adjust-system-clock
- Fix Windows and Linux errors showing different time at dual boot
Add startup program with the system
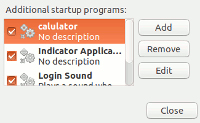
In Windows, you can set the program shortcut in the startup folder or run a startup program when the system starts. In Ubuntu you can do the same by:
Step 1 . Go to Applications , click on Startup Applications .
Step 2 . Click the Add button.
Step 3 . Name the program
Step 4. Click the Browse button and navigate to Other locations> Computer> usr> bin , where programs are usually launched.
Step 5 . Select a program, click the Open button> Add .
The above program will be added in startup programs, check to see if the program automatically starts by logging out and starting the system.
Delete old crash reports
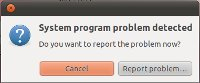
If the Ubuntu system usually displays the dialog box recording ' System program problem detected ' each time you log in even if you have just reported the problem, you need to delete the old crash report. by entering the following command in Terminal.
Step 1 . Open Terminal
Step 2 . Copy and paste sudo rm / var / crash / * in Terminal and press Enter .
Log out and log back in to the system, check if the message still appears.
Change the default boot option
After a full installation, Ubuntu is set as the default operating system to boot without pressing any key within a few seconds on a dual-boot system. You can set the boot operating system by default using Grub Customizer.
Open Terminal, copy the following code and paste (Ctrl + Shift + V) inside Terminal to install Grub Customizer.
1. sudo add-apt-repository ppa: danielrichter2007 / grub-customizer
2. sudo apt-get update
3. sudo apt-get install grub-customizer
After installing, run Grub Customizer to set the default boot options:
Step 1 . Press Alt + F2 , type grub-customizer in the box and press Enter to run it.
Step 2 . On the General Settings tab, select the default item you want to boot from the drop down menu.
Step 3 . Adjust the timeout value if necessary, then click the Close button and Save button.
Automatically turn off the system
You can use a simple command to schedule a system shutdown automatically.
Step 1 . Open Terminal .
Step 2 . Enter sudo shutdown -h + m (replace m with the number of minutes, for example +60)
Step 3 . Enter the password and minimize the Terminal window.
The system will turn off according to the number of minutes set or at a specific time. To cancel the automatic shutdown , enter sudo shutdown -c in Terminal.
Tips and tricks after installing Ubuntu 16.04.1
Adjust the size of Launcher icon
Ubuntu has a Launcher on the left side of the screen. If the icon size on Launcher is too big or too small, you can adjust this size by.
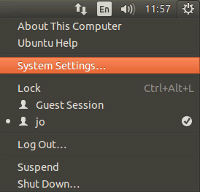
Step 1 . Click on the Control Gear and select System Settings .
Step 2 . Click on Appearance in Personal .
Step 3 . In the Look tab, drag the Launcher Icon Size slider to the left to minimize the icon and to the right to enlarge the icon.
Automatically hide Launcher
Launcher is set to always show on the left of the screen by default. You can change this default setting by hiding or unhiding the Launcher easily.
Step 1 . Click on the Control Gear and select System Settings.
Step 2 . Click on the Appearance in Personal button.
Step 3 . In the Behavior tab, turn on or off the Auto-hide the Launcher button .
To display the Launcher temporarily, simply press and hold the Super key (aka Windows) or move the mouse to the left of the screen. You can adjust the visibility with the slider in the Behavior tab.
Display Launcher easier
After automatically hiding the Launcher, you can display it by moving the cursor to the left side of the screen. However, there is an easy way to display the Launcher rather than using CompizConfig Settings Manager.
Step 1 . Install CompizConfig Settings Manager from Ubuntu Apps Directory if the application is not available on the system.
Step 2. Press Alt + F2 and type ccsm in the box, press Enter to run the program.
Step 3 . Select Desktop from the left pane.
Step 4. Click on Ubuntu Unity Plugin.
Step 5. In the Launcher tab, adjust the preset value of Launcher Reveal Pressure or Launcher Reveal Edge Responsiveness to make Launcher easier to appear, click Back and Close .
Move Launcher to the left or down
This Ubuntu version now allows you to move the Launcher from the left to the bottom of the screen by entering the following command in Terminal:
gsettings set com.canonical.Unity.Launcher launcher-position Bottom
And to return to the left side of the screen, use this command:
gsettings set com.canonical.Unity.Launcher launcher-position Left
Launcher location can also be set up using Dconf Editor , installed from Ubuntu Apps Directory. In Ubuntu, press Alt + F2 and enter dconf Editor, then navigate to com> canonical> unity> launcher> launcher-position .
Turn off or turn on the window menu
The Ubuntu system places the application menu (File / Edit / View) (also known as the AppMenu or Global Menu) on the top bar by default, but it also allows a local integrated menu (LIM). If you want to select a LIM to move the menu back to the application's window, follow these steps:
Step 1 . Click on the Control Gear and select System Settings .
Step 2 . Click on Appearance in Personal .
Step 3 . In the Behavior tab, select In the window's title bar to display the menus for the window.
The menu appears when you hover over the title bar of the window. To turn on the application menu, uncheck In the menu bar to display the windows of the window.
Open the window in the middle of the screen

When running an application that is not zoomed in, you can see that the system always places it in the top left corner of the screen, but you can set the program window to open in the middle of the screen by:
Step 1 . Install CompizConfig Settings Manager from Ubuntu Apps Directory if the application is not available on your system.
Step 2 . Press Alt + F2 and type ccsm in the box, press Enter to run the program (you can receive alerts when using this advanced tool).
Step 3 . Select Windows Management from the left panel.
Step 4 . Click Place Windows .
Step 5 . Change the Placement Mode from Smart to Centered , click Back and Close .
The window manager in Ubuntu will restore the last position of the application window, but it does not do so unless the application remembers the location of its own window.
Customize theme
You can change the theme in Ubuntu as you like. The default theme Ambiance has a menu (File, Edit, View, etc.) in white on a black background, but you can easily switch to another theme such as Radiance to a black menu on a white background. Here are the steps to customize the theme:
Step 1 . Click on the Control Gear and select System Settings .
Step 2 . Click on Appearance in Personal .
Step 3 . In the Look tab, select a theme from the drop-down menu.
Automatically change wallpaper
Do the same as in Ubuntu version 18.04.
Set the default view in Files Manager

Windows Explorer allows users to set the default view for all folders. Ubuntu Files Manager also performs the same function:
Step 1 . Click on the Files icon on Launcher.
Step 2 . From the menu, click Edit then select Preferences .
Step 3 . In Default View , change the View Icon to List View to see details in the columns.
Step 4 . Check Show hidden and backup files if you want.
You can adjust other settings such as clicking or double-clicking to open items, comment icons, list columns, and preview files in the Files Preferences window.
Change folder icon
Do the same as in Ubuntu version 18.04.
Create shortcut Files Manager advanced
In the Ubuntu file system, you can use Files Manager to browse most files and write files in the / home / your_name main directory and its subfolders like Desktop and Documents . However, you cannot rename a folder or write files outside the main directory using Files Manager, but you can create advanced shortcuts for Files Manager to perform these tasks.
Step 1 . Click on the Dash Home icon on Launcher (or click on Super ), then type the keyboard in the search box and press Enter .
Step 2 . On the Shortcuts tab, select Custom Shortcuts , then click the + sign to create a custom shortcut.
Step 3 . Enter the name as Advanced Files Manager in the Name box.
Step 4 . Enter gksu nautilus in the Command box, then click Apply .
Step 5 . Click Disabled in the Advanced Files Manager row in the Keyboard Shortcut window (Disable is changed to New accelerator .).
Step 6 . Press the new key combination, for example Ctrl + Alt + N (New accelerator . changed to Ctrl + Alt + N).
Now you can easily access Advanced Files Manager by pressing the shortcut assigned by the steps above. But be careful because you can use it to delete or change any file on the system.
Note: If gksu is not installed, you can install it to import sudo apt-get install gksu in Terminal.
Add or change shortcuts
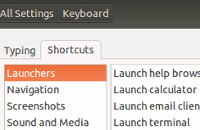
Shortcuts are preinstalled in the system, but you can add new shortcuts or change them easily. For example, you can add the shortcut Ctrl + Alt + C to run the Calculator:
Step 1 . Click on Dash Home icon (or touch Super ), type keyboard and press Enter .
Step 2 . On the Shortcuts tab, select Launchers in the left pane.
Step 3 . Click Launch calculator and it will display New accelerator .
Step 4 . Press Ctrl + Alt + C , it will display Ctrl + Alt + C.
Step 5 . Close the window and try the new shortcut.
Terminate unresponsive programs
Xkill is part of the built-in X11 utilities in Ubuntu and a tool to terminate corrupted X clients or unresponsive programs. You can easily add a shortcut to start xkill by following the steps in Create Advanced Files Manager shortcuts .
Install Oracle Java package
Do the same as on Ubuntu version 18.04.
Automatically mount the hard drive when booting the system
Done as in Ubuntu version 18.04.
Mount the USB drive manually
Do the same as on Ubuntu version 18.04
Name or label the partition
Using the Disk utility is one of the effective ways to change the partition name.
Step 1 . Click Dask Home or tap Super , type Disks to search for the utility and run it.
Step 2 . Select Hard Disk .
Step 3 . In the Volumes section, click on the partition you want to label.
Step 4 . Click the Additional partition options button under the Volumes section then select Edit Filesystem .
Step 5 . In the Label box, enter the name, Data-disk example and click Change .
Set the clock time on dual-boot system
Do the same as in Ubuntu version 18.04.
Add startup program with the system
Do the same as in Ubuntu version 18.04.
Delete old crash reports
Do the same as in Ubuntu version 18.04.
Turn on sound logging
Step 1 . Click on the Dash Home button and type Startup Applications to find the application and run it.
Step 2. Click the Add button.
Step 3 . In the Name , enter Login Sound field or any other name you like.
Step 4 . In the Command field, copy and paste this line: / usr / bin / canberra-gtk-play --id = "desktop-login" --description = "GNOME Login" .
Step 5 . Give your favorite comment, such as "Plays a sound when I log in".
Step 6 . Click the Add button.
Log out and log back in to check if the log sound is working.
Change the default boot option
Clean up the boot menu
Every time when Ubuntu updates to a new Linux kernel, the old update will be left and the boot menu will become overloaded. If your new Linux kernel works well, you can safely clean the boot menu. Follow the steps below carefully because hiding items incorrectly can cause your system to fail to boot. You can check which version of the Linux kernel is running by entering this command uname -r into Terminal.
To clean up the boot menu, you can do it with Grub Customizer.
Step 1 . Press Alt + F2, type Grub Customizer in the box and press Enter to run it.
Step 2 . Delete the items you want to hide from the boot menu.
Step 3 . Click the Save button.
Automatically turn off the system
Do the same as in Ubuntu version 18.04.
Tips and tricks after installation Ubuntu 11.04 (logged in with Ubuntu Classic), Ubuntu 10.10 and Ubuntu 10.04.
Customize Panel - control panel in Ubuntu
By default, Ubuntu includes a panel at the top and bottom. If you just want to keep a panel at the bottom of the screen like the Windows Taskbar , follow these steps:
- Xóa panel phía dưới: kích chuột phải vào nó và chọn " Delete This Panel ".
- Di chuyển panel ở trên xuống bên dưới: kích chuột phải vào nó và chọn " Properties ", thay đổi định hướng từ " Top " thành " Bottom ".
- Thêm các nút chạy chương trình: kích chuột phải vào panel, chọn " Add to Panel ", cuộn xuống dưới và chọn " Window List ", kích " Add ".
- Thay thế Menu Bar (" Applications-Places-System ") với " Main Menu " để tiết kiệm không gian trong bảng điều khiển:
- Kích chuột phải vào " Menu Bar " và chọn " Remove From Panel ".
- Kích chuột phải vào panel, chọn " Add to Panel " và lựa chọn " Main Menu ", kích " Add ".
- Kích chuột phải vào các mục (ví dụ Firefox) và bỏ dấu tích tại " Lock to Panel ".
- Kích chuột phải " Main Menu ", chọn " Move " để định vị nó ở phía bên trái.
Đây là những thay đổi cơ bản. Các panel linh hoạt hơn nhiều so với Windows Taskbar, nhiều mục có thể dễ dàng được thêm vào, loại bỏ hoặc cấu hình.
Main Menu sẽ cho thấy các mục " Lock Screen ", " Log Out " và " Shut Down " nếu bạn loại bỏ mục " Indicator Applet Session " (hiển thị tên đăng nhập và nút shutdown ở phía bên phải panel). Ba mục trên sẽ bị ẩn trong Main Menu nếu Indicator Applet Session được bật.
Nếu bạn cần khôi phục các panel gốc, chỉ cần nhập vào các lệnh sau vào Terminal và khởi động lại hệ thống:
 sudo gconftool-2 --shutdown
 sudo rm -rf .gconf/apps/panel
 sudo pkill gnome-panel
Tại bất kỳ thời điểm nào, nếu bạn tùy chỉnh thiết lập desktop gây ra sự cố và muốn thiết lập lại toàn bộ như mặc định, chỉ cần nhập vào lệnh: sudo rm -rf .gnome .gnome2 .gconf .gconfd .metacity trong Terminal, thoát ra và đăng nhập lại hệ thống để có hiệu lực.
Pin các chương trình vào Panel
Các chương trình người dùng thường sử dụng có thể dễ dàng được gắn vào panel:
- Duyệt tới chương trình cần thiết từ " Applications " hoặc " Main Menu ".
- Kéo và thả chúng vào một vùng không gian trống trong panel, hoặc kích chuột phải vào đó và chọn " Add this launcher to panel ".
- Kích chuột phải vào biểu tượng chương trình, chọn " Move " và thả nó vào một vùng mới trong panel.
- Kích tiếp chuột phải vào biểu tượng chương trình một lần nữa, chọn " Lock to Panel ".
Tương tự, xem tiếp phần ' Kích hoạt tính năng Superbar '.
Thiết lập panel hoàn toàn trong suốt
Khi bạn thiết lập các bảng điều khiển trong suốt trong theme Ambiance của Ubuntu, bạn sẽ tìm thấy một số background vẫn có màu nền, nhưng chúng ta có thể làm cho chúng trở nên trong suốt theo các bước sau:
- Vào Applications (hoặc Main Menu ) > Accessories > Terminal .
- Nhập vào cp -R /usr/share/themes/Ambiance ~/.themes/
- Nhập tiếp gedit ~/.themes/Ambiance/gtk-2.0/apps/gnome-panel.rc (cho Ubuntu 11.04 hoặc 10.10) hoặc gedit ~/.themes/Ambiance/gtk-2.0/gtkrc (cho Ubuntu 10.04), để mở tập tin với gedit.
- Tìm kiếm cho dòng bg_pixmap[NORMAL] = "img/panel.png" (cho Ubuntu 11.04 hoặc 10.10) hoặc bg_pixmap[NORMAL] = "panel_bg.png" (cho Ubuntu 10.04)
- Chú thích cho dòng lệnh bằng cách đặt một dấu # ở đầu dòng như: # bg_pixmap[NORMAL] = .
- Lưu lại tập tin.
- Vào System > Preferences > Appearance , chuyển sang theme khác sau đó trở lại theme Ambiance .
Nếu bạn muốn thay đổi theme New Wave , nhập vào cp -R /usr/share/themes/"New Wave" ~/.themes/ trong bước 2, nhập tiếp gedit ~/.themes/"New Wave"/gtk-2.0/gtkrc trong bước 3, tìm kiếm và chú thích cho dòng bg_pixmap[NORMAL] = "Images/Panel/PanelBarLong.png" tương ứng trong bước 4 và 5 .
Kích hoạt tính năng Superbar
Trong Windows 7, các chương trình thường xuyên sử dụng có thể pin vào taskbar (vì thế được gọi là Superbas ). Tương tự như vậy, DockBarX , một plugin Gnome panel có thể được thêm vào Ubuntu để pin và unpin hoặc khởi động ứng dụng từ panel.
- Vào Ubuntu Software Center > Edit > Software Source .
- Chọn " Other Software " kích " Add ".
- Tại dòng APT , nhập vào ppa:dockbar-main/ppa , kích " Add Source " và nhấn " Close ".
- Tại phần bên trái panel của Ubuntu Software Center, chọn " PPA for Dockbar Main Group ", được bổ sung sau các bước trên.
- Tại phần panel bên phải, chọn DockbarX và kích " Install ".
- Chờ cho bộ nhớ cache được cập nhật, sau đó kích chuột phải vào panel và kích ' Add to Panel '.
- Chọn DockBarX Applet và kích " Add ".
Một thumbnail (hình ảnh thu nhỏ) xem trước của chương trình đang chạy cũng có sẵn trong DockBarX. Để kích hoạt tính năng này, kích chuột phải vào DockBarX trên panel, chọn Properties > Window List và đánh dấu tích vào " Show Previews ". Các tùy chọn khác như appearance, window item và group button có thể được cấu hình bởi những user.
Thay đổi kiểu font chữ và màu của Panel Clock
Kiểu font và màu sắc của Panel Clock được thực hiện theo chủ đề mặc định. Đặc biệt, nếu màu chữ là màu đen và hiển thị trên một nền tối thông qua bảng điều khiển trong suốt, bạn không thể xem đồng hồ được rõ ràng. Tuy nhiên chúng ta có thể khắc phục điều này bằng cách tinh chỉnh để thay đổi màu chữ. Ngoài ra bạn cũng có thể xác định kiểu font cho bảng đồng hồ của mình.
Đoạn code trong bước 1 dưới đây sẽ thiết lập màu chữ thành trắng và áp dụng font DS-Digital in đậm, kích cỡ 16.
Mở trình soạn thảo văn bản Gedit và paste vào đoạn code sau:
style "my-panel-clock"
{
fg[NORMAL] = "#FFFFFF"
font_name = "DS-Digital Bold 16"
}
widget "*.clock-applet-button.*" style "my-panel-clock"
Lưu lại tập tin là .gtkrc-2.0 (bao gồm cả dấu chấm trước tên của file) bên trong thư mục home: /home/your_user_name .
Font DS-Digital có thể tải về tại đây. Sau khi tải về máy, giải nén và cài đặt vào hệ thống để sử dụng. Xem thêm tại mục ' Cài đặt các Font bổ sung '.
Các tập tin bắt đầu bằng dấu chấm (.) đại diện cho cho một tập tin ẩn và được nhìn thấy bởi phím Ctrl-H trong trình duyệt tập tin Nautilus (*) .
Di chuyển nút điều khiển cửa sổ sang bên phải
Nếu hệ thống Ubuntu của bạn được thiết lập các nút Minimize , Maximize , và Close ở bên trái của cửa sổ và bạn muốn thay đổi chúng sang bên phải, chỉ cần thực hiện theo các bước sau:
- Nhấn Alt+F2 để mở cửa sổ " Run Application ".
- Nhập vào gconf-editor trong hộp và kích ' Run ' để mở Configuration Editor.
- Duyệt tới apps > metacity > general , nhìn vào " button_layout " trên phía bên phải panel.
- Thay đổi giá trị trong " button_layout " từ close,minimize,maximize: thành menu:minimize,maximize,close và nhấn Enter .
Mở một cửa sổ ở phía trung tâm
Khi chạy một ứng dụng không phải chế độ maximized, Ubuntu luôn đặt nó ở góc trên cùng bên trái của desktop theo mặc định, nhưng bạn có thể thiết lập một cửa sổ được mở ở ngay trung tâm màn hình như sau:
- Vào System > Preferences > CompizConfig Settings Manager .
- Chọn " Windows Management " từ panel bên trái.
- Kích " Place Windows ".
- Thay đổi chế độ từ " Smart " sang " Centered ", kích " Back " và " Close ".
Một cách lý tưởng nhất, là người quản lý cửa sổ trong Ubuntu nên khôi phục lại vị trí cuối cùng của cửa sổ ứng dụng, nhưng nó không thực hiện điều đó trừ khi một ứng dụng ghi nhớ vị trí cửa sổ riêng của nó.
Cuộn một cửa sổ lên và xuống
Khi bạn kích đúp vào thanh tiêu đề của một cửa sổ, theo thiết lập mặc định sẽ phóng to cửa sổ đó ở mức cực đại. Kể từ khi có một nút để chúng ta sử dụng cho chức năng này, người dùng có thể thay đổi thiết lập để cuộn cửa sổ khi kích đúp vào thanh tiêu đề của nó.
- Vào System > Preferences > Windows .
- Trong " Titlebar Action " chọn " Roll up " (hoặc " Shade " nếu có) từ danh sách xổ xuống.
Bây giờ bạn có thể cuộn một cửa sổ khi kích đúp vào thanh tiêu đề, và cuộn nó xuống khi kích đúp lại.
Tùy chỉnh Theme
Các Theme trong Ubuntu có thể được tùy chỉnh để phù hợp với các ứng dụng hoặc nhu cầu của người dùng. Khi thử với theme New Wave và các menu (File, Edit, View…) hầu như không thể nhìn thấy trên nền tối của OpenOffice, nhưng khi tùy chỉnh New Wave với điều khiển Ambiance đã giải quyết được vấn đề. Sau đây là những bước đơn giản để tùy chỉnh một chủ đề, ví dụ như cho phép New Wave kết hợp với điều khiển Ambiance.
- Vào System > Preferences > Appearance .
- Dưới tab " Theme " kích nút " Customize " trong khi theme " New Wave " được chọn.
- Dưới tab " Controls " kích vào bất kỳ mục khác như " Ambiance " và nhấn " Close ".
- Bây giờ nó đã trở thành Custom theme và bạn có thể lưu lại như một theme mới, như " New Wave with Ambiance Controls ".
Thiết lập hiệu ứng Aero Glass
Trong Ubuntu bạn có thể thiết lập hiệu ứng tương tự như Aero Glass cho đường viền cửa sổ với alpha trong suốt như có sẵn trong Windows 7.
- Nhấn Alt+F2 để mở cửa sổ " Run Application ".
- Nhập gconf-editor trong hộp box, kích " Run " để mở Configuration Editor.
- Duyệt tới apps > gwd , nhìn vào " metacity_theme_active_opacity " ở panel bên phải.
- Thay đổi giá trị trong " metacity_theme_active_opacity " từ 1 thành 0.75 (hoặc nhỏ hơn như 0.5 để trong suốt hơn).
- Sau đó vào System > Preferences > CompizConfig Settings Manager .
- Chọn " Effects " từ panel bên trái.
- Đánh dấu vào " Blur Windows " và kích nút " Close " (lưu ý: giá trị mặc định trong Blur Windows có thể được áp dụng).
Nếu hiệu ứng aero glass không làm việc, kiểm tra lại xem bạn đã cập nhật driver hiển thị hay chưa. Vào System > Administration > Additional Drivers , kích hoạt trình điều khiển đồ họa được khuyến cáo và khởi động lại hệ thống.
Kích hoạt Aero Snap (chỉ dành cho Ubuntu 10.10 & 10.04)
Trong Windows 7, bạn có thể kích và kéo một cửa sổ sang bên trái hoặc phải vùng biên của desktop, nó sẽ được phóng to ở mức một nửa màn hình, hoặc snap một cửa sổ lên vùng biên trên cùng desktop để phóng to nó ở mức toàn màn hình. Trong Ubuntu 11.04 bạn cũng có thể làm tương tự, nhưng trong Ubuntu 10.10 hoặc 10.04 chúng ta muốn được như vậy cần tinh chỉnh lại một chút như sau:
- Cài đặt WmCtrl để quản lý thiết lập CompizConfig nếu chưa có:
- Vào Applications (hoặc Main Menu) > Accessories > Terminal .
- Nhập vào lệnh sudo apt-get install wmctrl
- Nhập vào password khi được yêu cầu.
- Vào System > Preferences > CompizConfig Settings Manager.
- Chọn " General " từ panel bên trái và kích " Commands ".
- Trong dòng lệnh 0 , 1 và 2 bạn paste vào dòng code sau:
Was this article helpful?
Your feedback helps us improve.
Related Articles
 5 things to do when installing Ubuntu on PC5 minutes read
 Ways to install Ubuntu on Windows, run in parallel or run separately12 minutes read
 Instructions for installing Windows Fonts on Ubuntu2 minutes read
 Instructions for installing Google Chrome on Ubuntu operating system6 minutes read
 How to install Ubuntu in VMWare, installing Ubuntu on a VMware virtual machine.4 minutes read
 5 things to do after upgrading to Ubuntu 22.04 LTS8 minutes read
Reader Comments 0
Sign in with email or Google to join the discussion.