Table of Contents
This updated guide examines Click: How to Install the Java Software Development Kit and organizes the essential facts, background, and practical takeaways in clear American English.
Part 1of 5:
Downloading the Java Software Development Kit
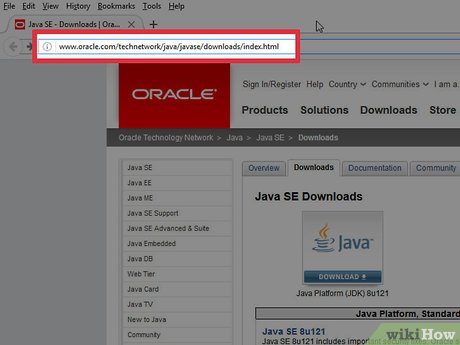 Navigate tohttp://www.oracle.com/technetwork/java/javase/downloads/index.html. You can download a simple Java Software Development Kit (JDK) installer for Windows, macOS, or Linux directly from Oracle.
 Click theDownloadbutton beneath 'JDK. ' This will open a new page containing several download options.[1]
 Scroll to the latest version of Java SE Development Kit. You should always use the latest stable version of the toolkit. There may be more than one version listed, so look closely at the release number.[2]
- For example, if you are presented with JDK 8u101 and 8u102, choose 8u102.
 Click the radio button next to "Accept License Agreement. ' Before you can click the download link, you must accept the license agreement. The option is just beneath the JDK version number.
- Sign in or register a new account. Before you can download the file, you must sign in an Oracle account. If you already have a account with Oracle, sign in with the email address and username associated with your account. If you do not have account, click Create account and fill out the form to create an account.
 Click the download link for your operating system. You can download Java SE JDK for Windows, macOS, or Linux. Once you click the link, follow the prompts to select a save location on your computer and start the download.
Part 2of 5:
Installing on Windows
 Double-click the JDK installer file. Once you've downloaded the Java Software Development Kit installer, navigate to the download location you chose earlier to launch the installer. By default, downloaded files can be found in your Downloads folder. You can also open the file from within your web browser.
- The file name for the Java Software Development Kit installer is "dk-13.0.2_windows-x64_bin.exe" or "jdk-13.0.2_windows-x64_bin.zip". If you download the ZIP file, you will need to extract the contents of the zip file.
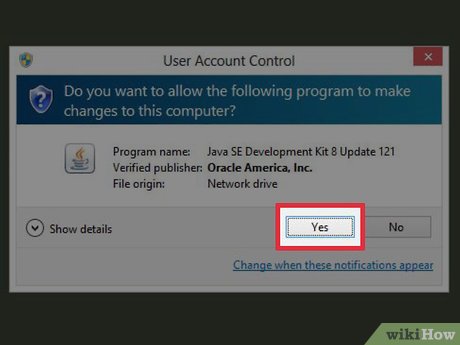 Allow the app to make changes to your computer. Depending on your version of Windows, you may be prompted to give permission for JDK to install. Click 'Yes' or 'OK' when prompted, and the installer's Welcome screen will appear.[3]
 ClickNextto continue. Now you'll move through a series of screens that will guide you through the JDK installation.
 ClickNextto accept the default installation settings. This will begin the installation, which may take a few minutes depending on your computer. The green progress bar will show the progress of the installation.[4]
 ClickClosewhen the installation is complete. This button will not appear until the installer has finished.
- Open the Windows Advanced System Settings in the Control Panel. Use the following steps to navigate to the Advanced System Settings in the Control Panel:
- Click the Windows Start menu and typeControl Panel.
- Click the Control Panel.
- Click System and Security .
- Click System .
- Click Advanced System Settings in the panel to the left.
 Navigate to theAdvancedtab. You'll see a few different areas where you can adjust various system settings.
 Click theEnvironment Variablesbutton. This new dialog box displays two separate areas—one for User Variables (settings specific to your user account) and another for system-wide settings (System Variables).[5]
 Double-click thePathvariable under 'System Variables. ' Now you'll add a new variable. Follow these instructions exactly, as there is no 'undo' option.[6]
 Edit the environment variables (Windows 10 only). This step only applies to Windows 10. Use the following steps to edit the environment variables:
- Click New
- Typec:Program FilesJavajdk1.8.0_xxbin(but replace the '8.0_xx' part with the version number you installed).
- Click the Move Up button until the path you typed appears at the top of the list.
- Click OK .
 Set the variable (Older versions of Windows only). Skip this step if you're using Windows 10. You should see the 'Edit System Variable' window. Make the following changes to the 'Variable value' field only (don't delete what's there though):
- TypeC:Program FilesJavajdk1.8.0_xxbin(but replace the '8.0_xx' with the correct version number) in FRONT of the other directories.
- Add a semicolon (;) to the very end of what you just typed, just like this:C:Program FilesJavajdk1.8.0_xxbin;
- There should be no space before or after the semicolon, so the entire line should look something like this:C:Program FilesJavajdk1.8.0_2bin;C:Program FilesIntelxxx
- Click OK.
- Click OK until you've closed all open windows.
 Open the Command Prompt
 . Use the following steps to open the Command Prompt:[7]
- Right-click the windows start menu and typecmd.
- Click the Command Prompt icon.
 Typepathand press↵Enter. You should see the full path to the JDK that you entered earlier.
 Typejava –versionand press↵Enter. The version of JDK you installed will now appear on the screen.
- If either part of this command-prompt test does not produce results, you may need to load the new environment variables by rebooting the computer.
Part 3of 5:
Installing on macOS
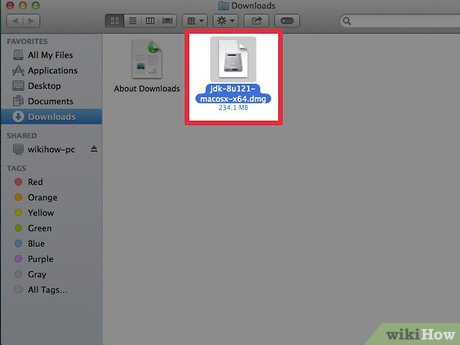 Double-click the installer file you downloaded. After downloading the Java Software Development Kit installer, double-click the downloaded file in the Downloads window of your web browser or in Finder.[8]
- Open the downloaded file. You can find downloaded files inside the "Downloads" folder or inside your web browser. The file name should be "jdk-13.0.2_osx-x64_bin.dmg" or something similar.
 Double-click the package icon to start the installer. This icon looks like an open box. The JDK installer will launch.
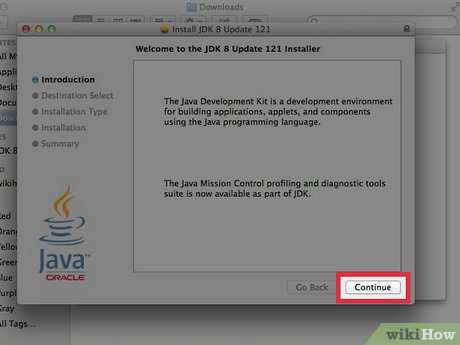 ClickContinueon the Introduction window. You'll now see the Installation Type window.
- If you see a window that says 'Destination Select' after clicking continue, click 'Install for all users of this computer.' Not all users will see this window. Then click Continue .[9]
 ClickInstall. ' You will see a window that says 'Installer is trying to install new software. Type your password to allow this.'
 Sign in as an administrator. Type your administrator username and password into the provided blanks.
 Click 'Install Software. ' This may take a few minutes, depending on the speed of your computer. When the confirmation window appears, you can close it.
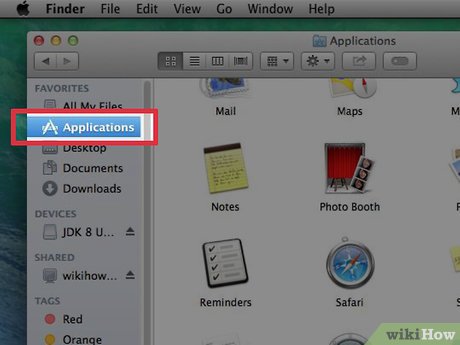 Open the 'Applications' folder on your Mac. Now you'll run a quick test from a terminal window to make sure the installation was successful. You can get to this folder by clicking 'Go' and selecting 'Applications.'
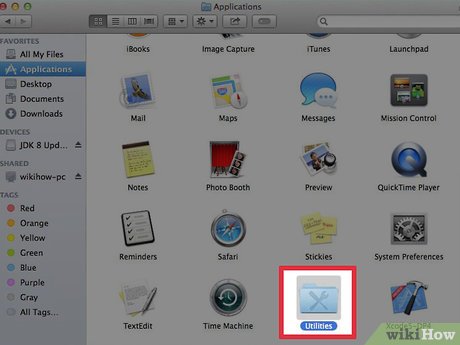 Open the 'Utilities' folder. Here you'll see a list of system utilities.
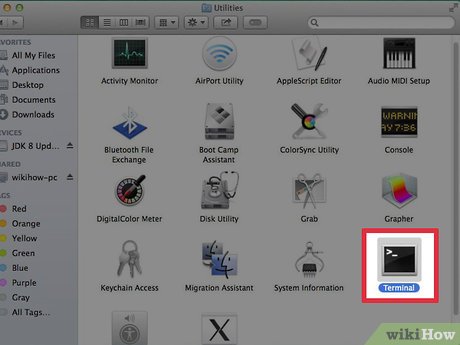 Double-click the 'Terminal' app. Now you'll see the command prompt.
 Typejavac -versionand press⏎Return. Just beneath the command you ran, you should see the JDK version number you installed (e.g. '1.8.0.1'). This means the installation was successful and you can get to your coding.
- Once you've made sure the installation is successful, you can delete the DMG installer file you downloaded to conserve hard drive space.
Part 4of 5:
Installing from an Archive on Linux or Solaris
 Open a terminal window. If you downloaded an archived tarball of the JDK ("jdk-13.0.2_linux-x64_bin.tar.gz" or similar), use this method to complete the installation.
- This method assumes you know how to use basic Unix shell commands.
- If you downloaded a.rpm package file instead of a tarball, see Installing the JDK from a Package on Linux.
 Navigate to the directory where you'd like to install the JDK. You can install the JDK in any directory for which you have 'write' permissions. Note that only the root user can install the JDK to a system directory.[10]
 Use themvcommand to get the archive into the current directory. This allows you to move the file into the current folder.
 Unzip and install the JDK. The command is different depending on your operating system (and in the case of Solaris, the processor type). Once installed, a new directory called "jdk' will be created in the current directory. In these examples, replace the name of the *.tar.gz file with the name of the one you downloaded.[11]
- Linux:tar zxvf jdk-7u-linux-i586.tar.gz
- Solaris (SPARC):tar xf -
- Solaris (x64/EM64T):tar xf -
 Delete the *.tar.gz file. Use thermcommand to delete the archive file if you want to conserve disk space.
Part 5of 5:
Installing from a Package on Linux
 Become root. If you're using an RPM-based Linux system (such as SuSE or RedHat), you can install the Java Development Kit from an RPM package. Make sure you've downloaded the You'll need to su to root (su root) so that you have the correct permission to install the package.[12]
- The file you downloaded should end with ".rpm"
- This method assumes you know how to use basic Unix shell commands.
 Remove earlier JDK package installations. The command isrpm -e
 Install the new package. You'll be using the "rpm" command again, but this time with different flags:
- rpm -ivh jdk-7u-linux-x64.rpm(replace "jdk-7u-linux-x64.rpm" with the actual package name)
 Delete the.rpm file. When the package is finished installing, you'll be returned to the command line. If you want to conserve disk space, you can delete the downloaded package file with thermcommand.
FAQ
What is Click: How to Install the Java Software Development Kit about?
It provides a structured overview of click, explains the main context, and highlights practical takeaways for readers.
Why does this topic matter?
Understanding the main concepts helps readers evaluate the issue, avoid common mistakes, and make better-informed decisions.
How should readers use this information?
Use the guidance as a practical starting point, confirm details that may have changed, and follow current product, safety, or security recommendations.
Related Articles
 Download Java Development Kit 8-update-2814 minutes read
 How to Install the Jdk (Java Development Kit) on a Mac4 minutes read
 Folder: How to Install Oracle Java Jre on Ubuntu Linux6 minutes read
 Download and Install Java on the Computer6 minutes read
 How to Install Java on a Raspberry Pi5 minutes read
 How to Fix the Error Does Not Install Java15 minutes read
Reader Comments 0
Sign in with email or Google to join the discussion.