How to turn on suggestions for finding files on Windows 10
When we search for data on File Explorer or the Run dialog, you need to remember the entire folder name or path of the file. We can't just enter the Device Manager type or some specific name in the File Explorer address bar to open this application. If remembering directory paths is not easy for you, you can turn on the Autocomplete feature for File Explorer on Windows 10.
Autocomplete for File Explorer will automatically complete the proposal for users to choose to click and access. Thus, you can immediately open the application even if you do not remember the full directory path, but only remember the application name. The following article will guide you how to enable or disable the Autocomplete feature for File Explorer on Windows 10.
- How to fix Working On It on File Explorer Windows 10
- Wipe Recent Files search history on File Explorer Windows 10
- Restore lost File Explorer icons on Windows 10 Start Menu
How to use Autocomplete for File Explorer Windows 10
Step 1:
Press the Windows + R key combination to open the Run dialog box and enter the regedit keyword and access.

Step 2:
In the Registry Editor interface, users access the directory according to the path below.
- HKEY_CURRENT_USERSOFTWAREMicrosoftWindowsCurrentVersionExplorerAutoComplete
Step 3:
In case the computer does not have an AutoComplete entry , create it by right-clicking a few Explorer select New> Key .
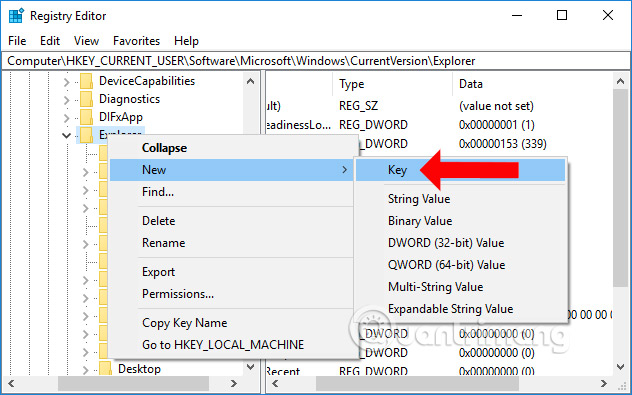
Then name the newly created folder AutoComplete .

Step 4:
Click AutoComplete then look to the right, right-click and select New> String Value .
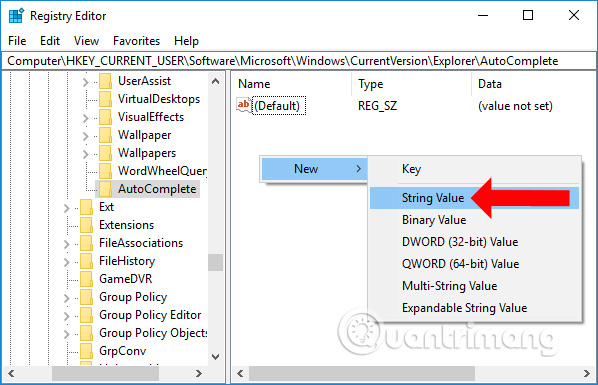
Also rename the newly created AutoSuggest value .
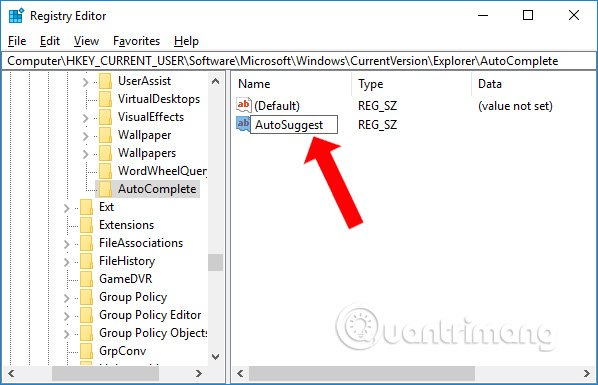
Step 5:
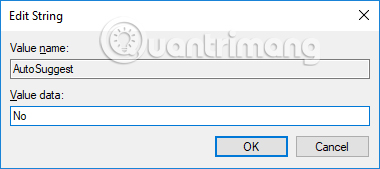
Continue to double-click AutoSuggest and change the data value in the Edit String dialog interface. If you want to turn on Autocomplete when searching for files in Explorer, enter Yes in the Value data bar and click OK.
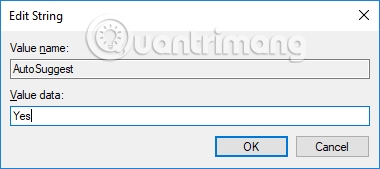
If you no longer want to use this search feature, transfer Value data to No, or you can right-click AutoSuggest and press Delete to delete. However, you should choose No instead of deleting the value completely.
Now go back to File Explorer on your computer, at the address bar, enter any application name and get a hint like the one below. Just click on the right application you need and then we will be moved to the right place to store the application, or that folder.
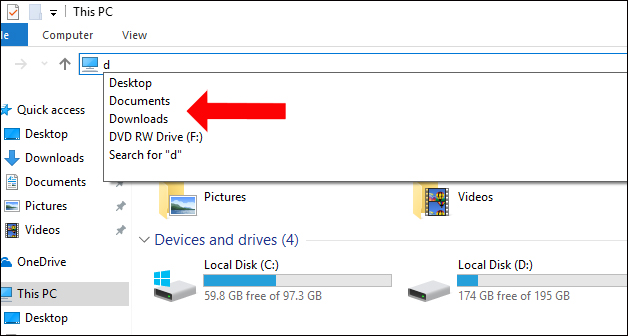
A simple trick that helps you find files quickly on File Explorer Windows 10. Enabling the Autocomplete feature not only offers complete suggestions, but also gives you quick access to the data you need even if you don't remember. Please specify the path of the archive directory.
See more:
- Unlock and improve Windows 10 features with 5 Registry tricks
- Fix Windows 10 error with just one click with FixWin
- Activate Dark Theme on Windows 10
I wish you all success!