How to create a list of installed programs on Windows
Reinstalling the Windows operating system is one of the great solutions to troubleshoot problems on your computer. However, before reinstalling Windows, you should save the list of programs and applications you have installed to reinstall the applications and programs on the new operating system.
Create a list of applications, installation programs on Windows that help users to reinstall those applications on new operating systems or new computers.
In the article below, Network Administrator will show you how to create a list of installed programs on Windows 7/8 / 8.1 / 10.
Ways to create a list of installed programs on Windows
- 1. Use the PowerShell command
- 2. Use CCleaner
- Convert the list of installed programs into a table in Word
- Convert the list of installed programs into an Excel spreadsheet
- 3. Use Command Prompt
- 4. Use Control Panel
- 5. Use Geek Uninstaller

1. Use the PowerShell command
PowerShell is one of the most useful commands built into the Windows operating system. To create a list of applications and programs installed on Windows operating systems using the PowerShell command, follow the steps below:
First open PowerShell by typing powershell in the Search box on the Start Menu, then choose PowerShell.
On the PowerShell window, enter the following command and press Enter:
Get-ItemProperty HKLM: SoftwareWow6432NodeMicrosoftWindowsCurrentVersionUninstall * | Select-Object DisplayName, DisplayVersion, Publisher, InstallDate | Format-Table - AutoSize
Now PowerShell will display a list of all applications, the program you installed, including the version, app developer name, and even the application installation date.

If you want to export a file, you can send the output using the > icon and add the path to the new text file you want to create.
Such as:
Get-ItemProperty HKLM: SoftwareWow6432NodeMicrosoftWindowsCurrentVersionUninstall * | Select-Object DisplayName, DisplayVersion, Publisher, InstallDate | Format-Table –AutoSize> C: UsersLoriDocumentsInstalledPrograms-PS.txt

2. Use CCleaner
Previously known users of CCleaner are applications to free up computer space, delete temporary files, files that users don't use, personal data on the browser, download history and lists. programs on some other applications.
Many users do not know that CCleaner is also an application used to create lists of programs and applications installed on Windows operating systems.
To use to create a list of applications, installation programs on Windows using CCleaner, first double-click the CCleaner application icon on the Desktop or right-click the Recycle Bin icon, select Open CCleaner. .

Next on the CCleaner interface, click Tools in the left pane.
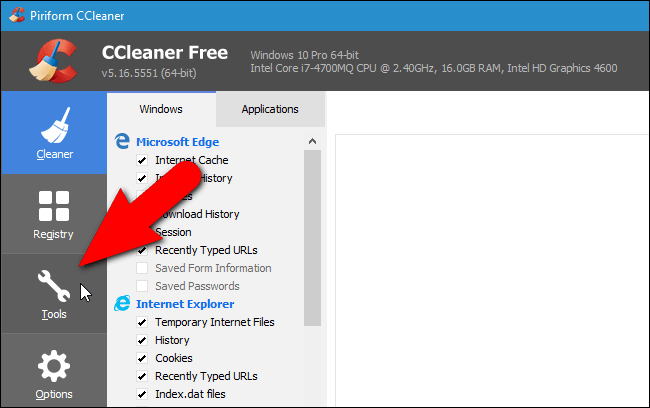
Here you select Uninstall. On the Uninstall interface, you will see a list of applications and programs installed on your computer. You can use CCleaner to remove, repair, rename or delete these programs.
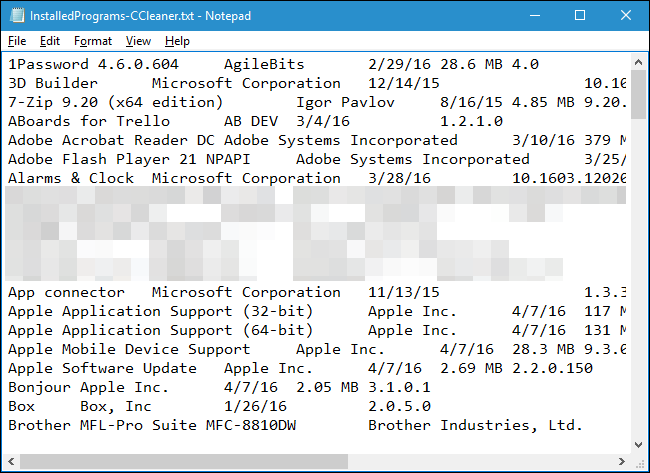
Also you can save the list of installed programs on the Text file by clicking Save to text file in the lower right corner of the interface.

On the Save As dialog window, navigate to the location where you want to save the text file containing the list of applications, installed programs on your computer, then name the file in the File name box and then click Save .
After completing:

List of installed programs on your Windows computer including application installation date, application size, program, application version .
Convert the list of installed programs into a table in Word
To convert the list into a table in Word, open the saved text file in Word. A dialog box called File Conversion is displayed before the file is opened, to let you preview the text in the Preview box, accept the default settings and click OK .

Select the text you want to convert into a table, then, on the Insert tab, click Table and select Convert Text to Table .

Make sure the column number is 5 and select Tabs in Separate text at , then click OK to continue the conversion.

You can format the table the way you want, but remember to save this Word file on an external hard drive or network drive so you can use it when installing or resetting Windows.
- 4 ways to reset the Windows computer to its original state

Convert the list of installed programs into an Excel spreadsheet
If you want to convert the list of installed programs in Excel, here's how. First, you should create a copy of the original text file so that in the event of an error, you still have the original file to use. Next step is to convert this copy from .txt to .cvs and open the .cvs file with Excel.
- How to open CSV file when Microsoft Excel is not installed
On the first screen of the Text Import Wizard dialog box, make sure to select Delimited in Choose the file type that best Print your data . The rest, you can leave the default settings and click Next .

On the second screen, select Tab in Delimiters , you can skip the third step because we only need to convert the file into a spreadsheet in Excel so click Finish here.

Now, the list of installed programs in columns on Excel spreadsheets is easier to read. Be sure to save the Excel file to an external hard drive or to a network drive to be accessible when reinstalling or resetting Windows.

3. Use Command Prompt
If you are more familiar with using traditional Command Prompt than PowerShell, you can use the Windows Management Instrumentation Command command line (WMIC) in the Command Prompt window.
- 21 Command Prompt tricks you may not know
Press Win + R key combination to open the Run dialog box, then type " cmd.exe " in the Open box and click OK or press Enter . If the User Account Control dialog box is displayed, click Yes to continue.

At Command Prompt, type " wmic " and press Enter . Enter the following line at the prompt pmic: rootcli and press Enter . Replace the path and filename part (' C: UsersLoriDocumentsInstalledProgramsInstalledProgramsWMIC.txt ') with the path and file name you want to use:
/output:C:UsersLoriDocumentsInstalledProgramsInstalledProgramsWMIC.txt product get name, version
When receiving the WMIC prompt : rootcli , type ' exit ' and press Enter to return to the normal command prompt. Type ' exit ' again and press Enter to close the Command Prompt window.

The text file has the name and version of the programs installed on the computer created and saved in the location you specified.

4. Use Control Panel
If you do not want to type the command to create a list of installed programs, there is another method you can use to see all the installation programs on the Programs and Features screen in Control Panel.
Type ' control panel ' into the Search box next to the Start menu, then click Control Panel under Best match .

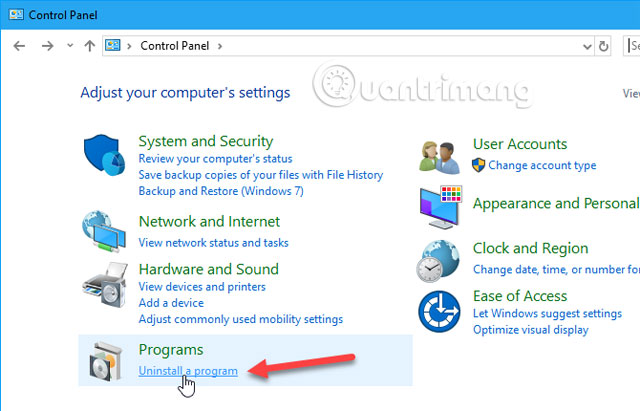
On the Control Panel window, click Uninstall a program in Programs . If you are viewing small or large icon mode, click item Programs and Features .
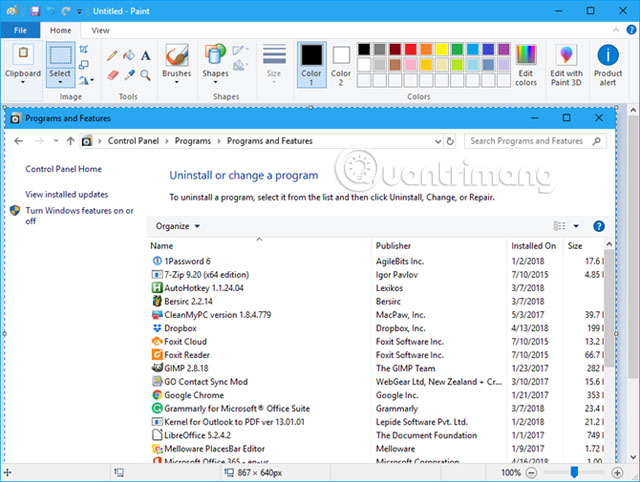
To view the details of each program in the list on the Uninstall or change a program screen , click the More options arrow on the Change Your View button and select Details .
Click on the title bar of the Control Panel window to make sure it works, then press Alt + Print Screen (or Alt + Fn + Print Screen on some laptops or other devices) to take screen shots picture of the window.
- Computer screen capture software without software, super fast for Win 10, Win 8 / 8.1, Win 7

Paste a screenshot into another program like Paint and save the image. In Paint, you can save screenshots in PNG, JPEG, BMP, GIF or other formats.
Depending on the number of programs installed, you may receive a number of different shots. Scroll down each section to capture the next part of the list. If there are multiple photos, you can paste each image directly into a word processor like Word to save them in a file.
5. Use Geek Uninstaller
Geek Uninstaller is a free Windows portable program used to completely remove programs. The program also strongly removes stubborn and corrupted software. You can use Geek Uninstaller to create and save a list of installed programs on your computer.
After downloading Geek Uninstaller, you just need to extract the downloaded file into a folder on your computer and run the exe file. On the main window of Geek Uninstaller, you will see a list of installed programs. To save this list to an HTML file, open Geek Unistaller and go to File> Export to HTML or press Ctrl + S.
- How to export Chrome browsing history to HTML, CSV or TXT file
On the Save As dialog box, navigate to the folder you want to save and enter the name and then click Save .
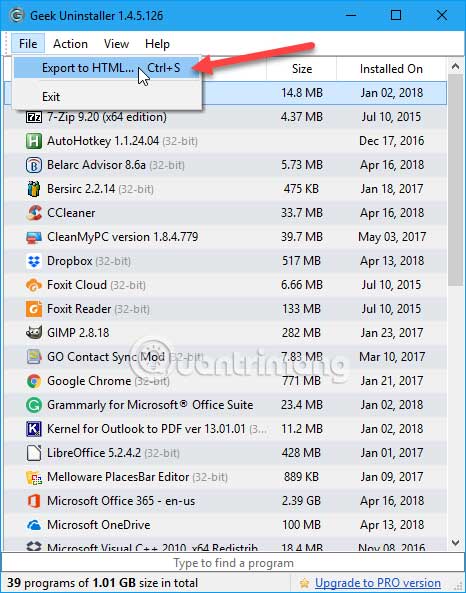
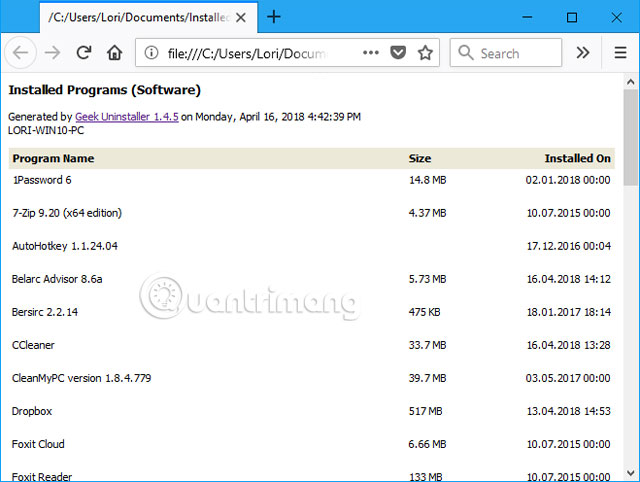
The HTML file will automatically open in the default browser. The list includes the name and capacity of each program and the date it was installed.
If you use a browser like Firefox, Chrome or Vivaldi, press Ctrl + S to save the HTML Instaled Programs page to the location you choose with the optional file name. You can save it on your computer's hard drive but remember to transfer this file to an external hard drive or to a network drive before reinstalling Windows. Each browser will have a shortcut or a different option to save the HTML file, so be aware.
Geek Uninstaller also allows you to display a list of applications installed from the Windows Store by going to View> Windows Store Apps .

All applications installed on your computer from the Windows Store screen can be exported to HTML files in the same way, as with normal Windows programs.

Store the list of applications created on external media
You may have noticed that the above methods create different program lists, so you can use one or more methods and keep separate lists.
However, one thing to keep in mind is to save this list on an external hard drive or network drive so that it can be used after reinstalling Windows. When you reset instead of reinstalling Windows 10, the programs will be deleted but its data remains. However, you should still back up your list when backing up your data.
- How to use the Reset feature on Windows 10
Refer to some of the following articles:
- Instructions for setting up and managing FTP Server on Windows 10
- Instructions for setting up and managing Network Bridge on Windows 10
- How to use Cortana to turn off or restart Windows 10?
Good luck!