Table of Contents
This practical guide walks through how to take Screenshots of Computers and Laptops 2024. It organizes the required steps, settings, and checks so you can complete the task with fewer mistakes.
For people who do not regularly use computers and are not tech-savvy, taking a Screenshot of a computer screen Is difficult. And if you are wondering how to take a screenshot of your computer screen quickly and simply without installing 3rd party software, follow TipsMake.
Why Take a Screenshot of the Computer Screen in 2024?
- Allows you to save all or part of the image displayed on the computer screen. - Save important information and data to review when needed - Share with other users. - Serves work and personal purposes.
The Fastest Way to Take a Screenshot of Your Computer in 2024
Take a Screenshot of the Entire Computer or Laptop Screen
This method allows you to capture everything displayed on your computer screen as quickly as possible, saving images in many different formats such as JPEG so that the image size is not too heavy. - Step 1: Select the PrtScn (Print Screen) hard key on the computer keyboard.

- Step 2: Next, launch Paint On your computer + Quick opening tip: select theWindows + R Key combination, enter Mspaint => select OK .

- Step 3: Then choose Ctrl + V To Paste .
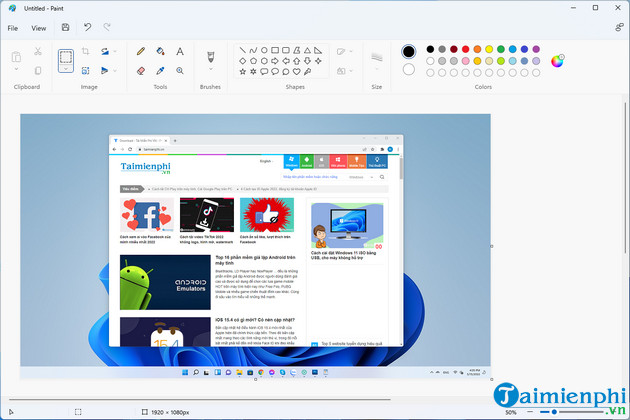
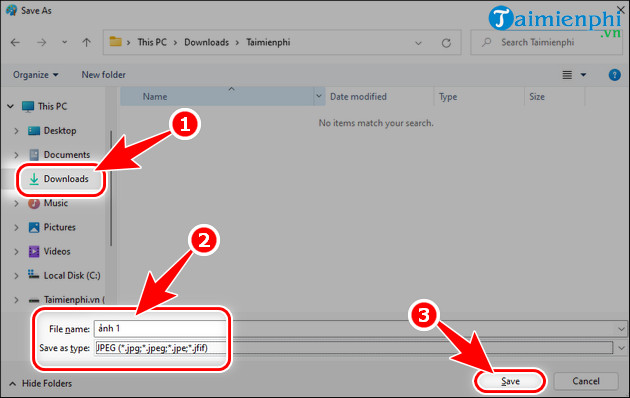
- Step 4: Select the key combination Ctrl + S => select The save location , Image file format And select Save . + For example: TipsMake saves images in the Download Folder, named Image 1 andJPEG Format. TipsMake recommends that you choose the JPEG image format so that the image size is not too heavy and can be shared with others more quickly.
Take a Part of the Computer or Laptop Screen
With this method, you can capture the necessary partition without having to capture your entire computer screen, without having to remove the excess parts. How to capture a specific partition or part of the computer screen as follows: - Step 1: Select the key combination Windows + Shift + S On the computer keyboard. - Step 2: Left Select and Drag and drop The area of the screen you want to capture.
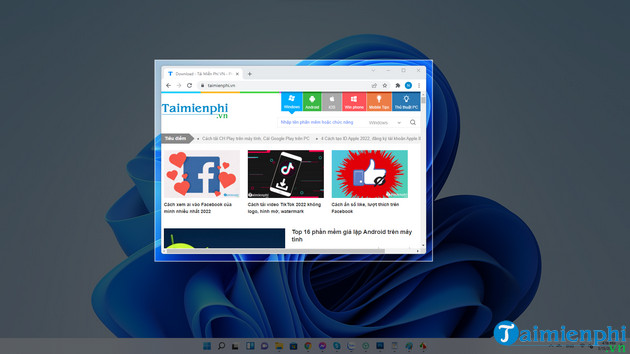
- Step 3: Open Paint On the computer, select Ctrl + V => Ctrl + S => select The save location , Image file format And select Save .
Take a Screenshot of Your Computer and Save It Yourself
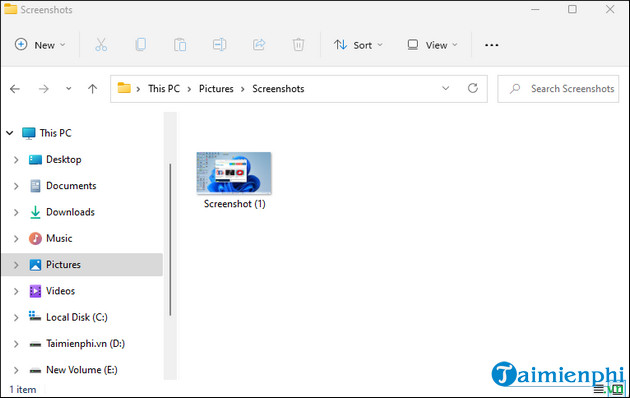
With this method of taking self-saved computer screen shots, you will have another option in taking computer screen shots without having to waste time on Paint, Paste and Edit as in the 2 steps above. However, the weakness of this method is that the saved image size is too heavy with the PNG extension. - Step 1: Select the key combination Windows + PrtScn , the photo will automatically save on the computer. - Step 2: Open My Computer (This PC) => Pictures => Screenshots . + Automatically saved computer screenshots are called Screenshots
Above is an article on how to Take screenshots of computers in 2024 On Windows 7/8/10 and Windows 11 operating systems. Hopefully the article provides useful information for you to take screenshots of computers quickly and conveniently. most convenient.
FAQ
What do I need before I take Screenshots of Computers and Laptops 2024?
Prepare the required device, software, account access, and any files mentioned in the steps. Back up important data before changing system settings.
Why does the process look different on my device?
Menus and options can vary by operating system, app version, device model, or region. Use the closest matching setting and check the official documentation when needed.
What should I do if a step does not work?
Restart the app or device, confirm permissions and connectivity, update the software, and repeat the step carefully. Avoid unofficial downloads or tools.
Related Articles
 How to Take Screenshots on HP Laptop Computers7 minutes read
 Summary of 9+ Ways to Take Screenshots of HP Computers: What to Know13 minutes read
 3 Simplest Ways to Take Screenshots of Acer Computers: Top Picks and Buying11 minutes read
 5 Ways to Take Screenshots on a Dell Computer Without6 minutes read
 The Quickest and Simplest Way to Take a Screenshot on a Computer or Laptop18 minutes read
 The Easiest and Fastest Steps to Take Screenshots of Windows10 minutes read
Reader Comments 0
Sign in with email or Google to join the discussion.