How to take screenshots, annotate images with Snip & Sketch on Windows 10
Detailed instructions on how to take screenshots, annotate images with Snip & Sketch on Windows 10. Detailed instructions on how to use the Snip & Sketch tool from AZ.
Table of Contents
Microsoft has introduced a new application called Snip & Sketch, replacing the popular Snipping Tool. This tool helps users to take pictures on the computer screen , use tools like pen or pencil to draw on it and share it anywhere. Let's learn how to use the Snip & Sketch application in this article!
1. How to take a screenshot with Snip & Sketch
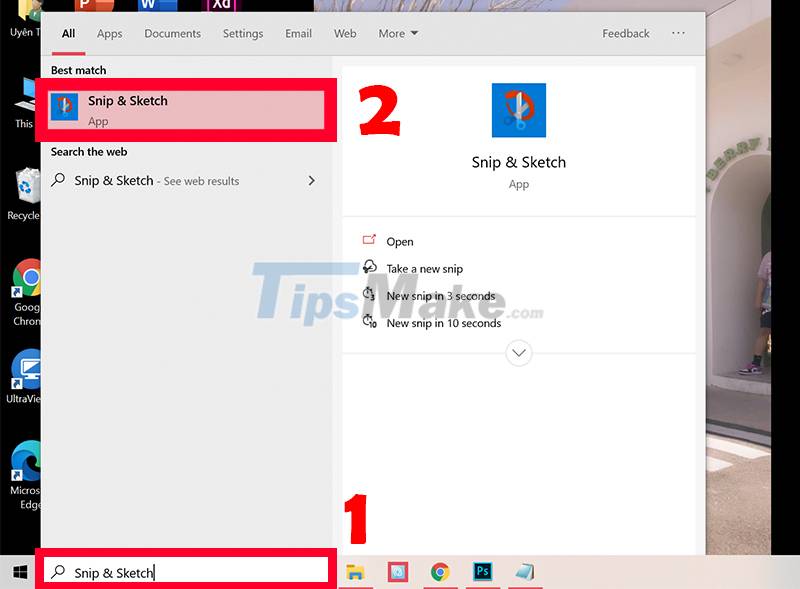
Step 1: Instructions to open Snip & Sketch in 2 ways: search on the Taskbar and use the shortcut Windows logo + Shift + S.
Method 1: Search for the name Snip & Sketch in Windows Search on your computer's Taskbar.
- Method 2: Use the keyboard shortcut Windows + Shift + S on the keyboard.
Step 2: Click the New button in the top right corner to start taking a new screenshot.

Step 3: Click the down arrow button to select the screen capture timer.

Step 4: Select a mode you want to start shooting.
When you're ready to take a new screenshot, a Snip bar will appear at the top of the screen with five specialized option buttons, allowing you to select screenshot modes, including:
- Rectangle: Use the mouse pointer to drag an array of rectangular objects.
- Freeform: Creates an array of freeform shapes around an object.
- Window capture: Take a screenshot of one of the application windows found on your desktop.
- Full screen form: Take a picture of the entire computer screen.
- Closed mode: Closes the screenshot mode.

2. How to Annotate Shapes with Snip & Sketch
After taking a screenshot in part 1 or opening the image you want in the Snip & Sketch window, you can annotate and write anything on it.
Snip & Sketch software has many annotation support features for users, including:
- Touch Writing: Take notes freely on computer screenshots.
- Ballpoint Pen: Large pen.
- Pencil: Pen with small strokes.
- Highlighter: Pen to write notes.
- Eraser: Eraser.
- Ruler: Ruler.
- Image Crop: Crop the image.
- Zoom: Zoom in/Zoom out the image.
- Save as: Save the image.
- Copy: Copy the image.
- Share: Share.
Here are specific instructions for annotating images with Snip & Sketch:
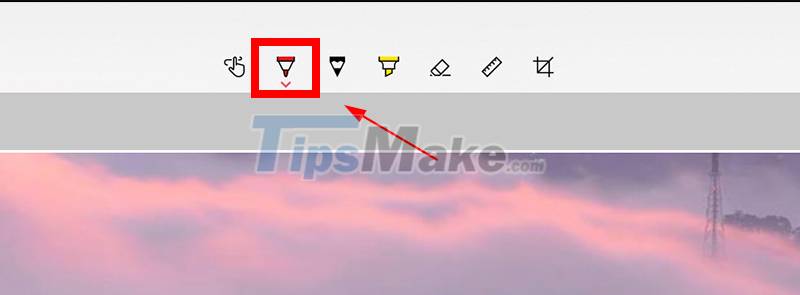
2.1. How to use the Ballpoint Pen
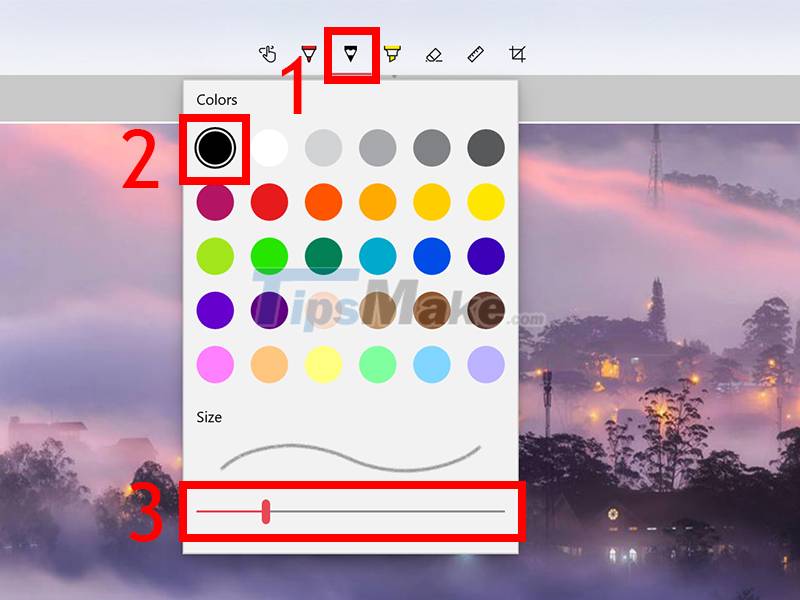
Step 1: Click on the ballpoint Pen icon at the top to draw or write manually on the screenshot.
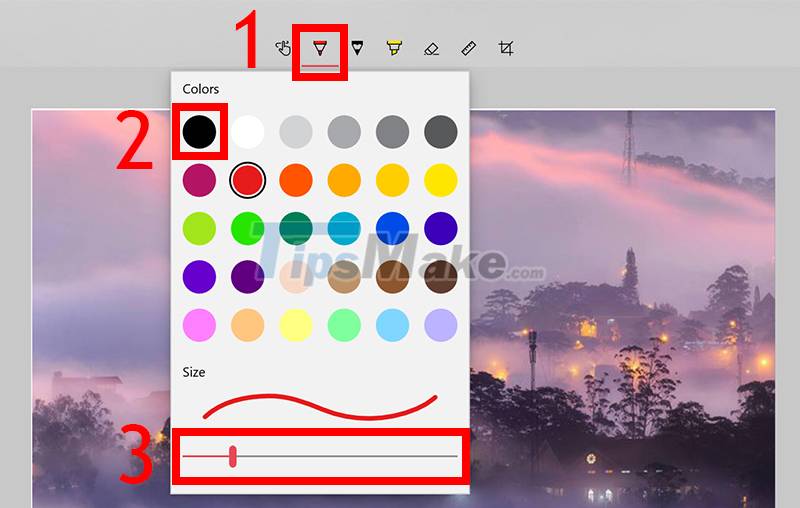
Step 2: Click the Ballpoint Pen icon again to open the settings menu and change the color of the stroke.
In addition, you can also adjust the slider to increase or decrease the thickness of the stroke.
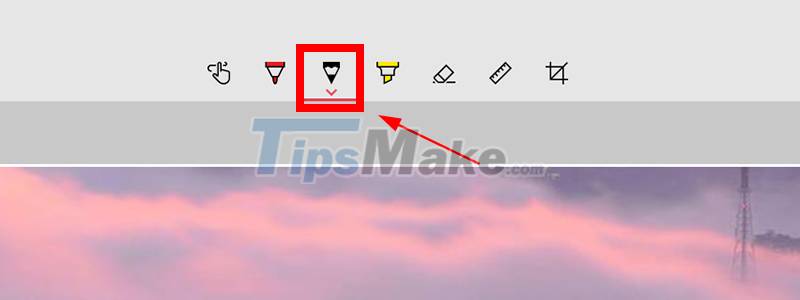
2.2. How to use Pencil
Step 1: If you want a pencil-like stroke, tap the pencil icon.
Step 2: Click the pencil icon (Pencil) again to change the stroke color or to adjust the slider for stroke thickness.
2.3. How to use Highlighter
Step 1: Click the highlighter icon to highlight, highlight text or specific areas with the highlighter.

Step 2: Click the marker icon (Highlighter) again to choose a color, including 6 available colors and use the slider to adjust the stroke thickness.

2.4. How to use Ruler
Step 1: Select the ruler icon (Ruler) if you want to draw a perfect line on the image. You can rotate the ruler with the mouse wheel or with two fingers on the trackpad.

Step 2: You can change the protractor by left-clicking on the ruler icon (Ruler) > Select Protractor.

2.5. How to use Eraser
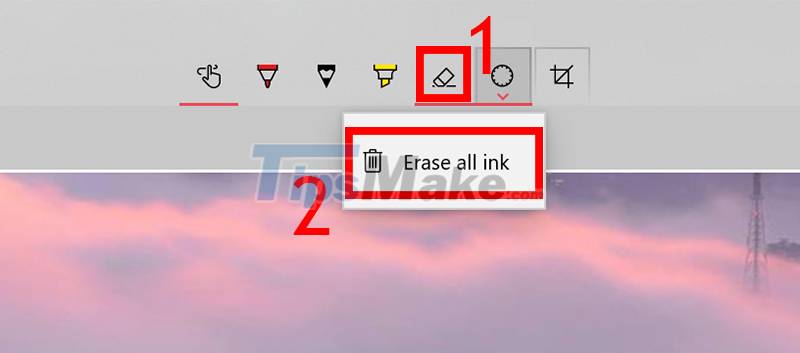
Step 1: Click the eraser icon (Eraser) if you want to remove any annotation > Right click and select the stroke you want to remove from the image.

Step 2: To delete all annotations, press the eraser icon again > Select Erase all ink.
2.6. How to use Image Crop
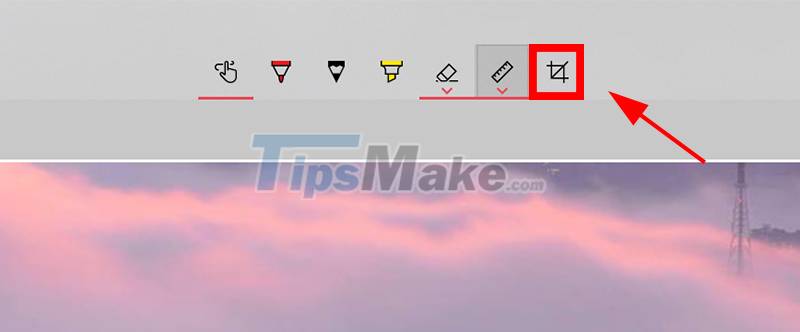
Step 1: Click the crop icon (Image Crop) if you want to resize the image.
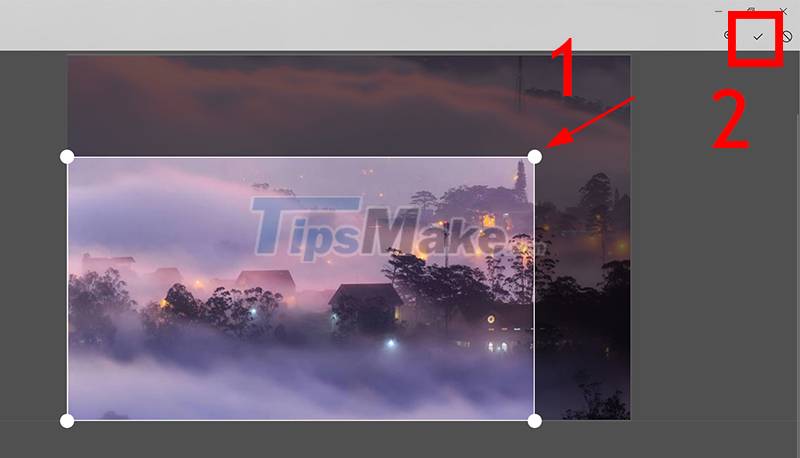
Step 2: Adjust the 4 corners of the image to resize the image > Select the tick mark.
2.6. How to use Zoom
Step 1: Click the magnifying glass icon (Zoom) if you want to zoom in/out the image > Move the slider to zoom in/out the image.

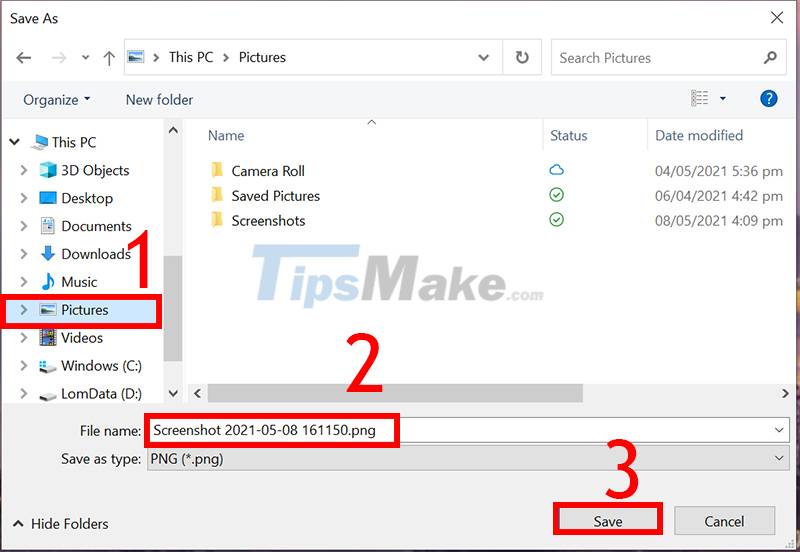
2.7. How to use Save As
Step 1: Click the save icon (Save as).
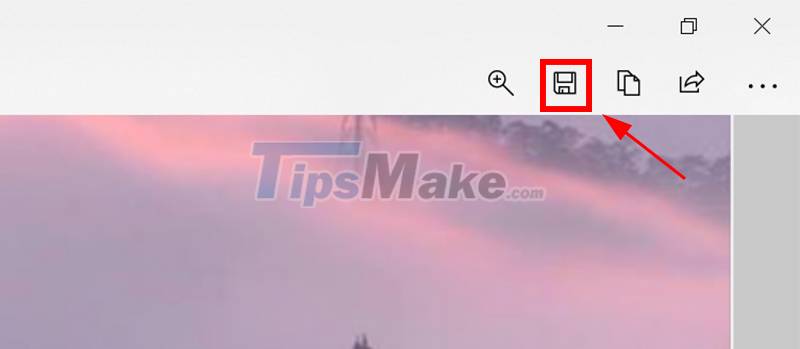
Step 2: Select the folder you want to save > Rename the image > Click Save.
2.8. How to use Copy
Step 1: Click the copy icon (Copy) to copy the image.
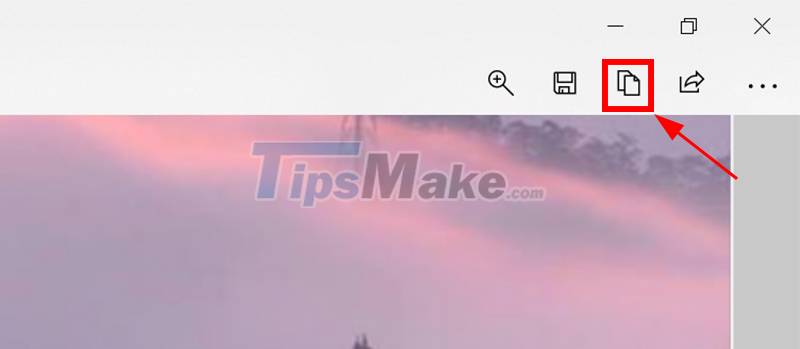
Step 2: Paste anywhere you want by pressing Ctrl + V on the keyboard.
2.9. How to use Share
Step 1: Click the share icon (Share) at the top of the screen.
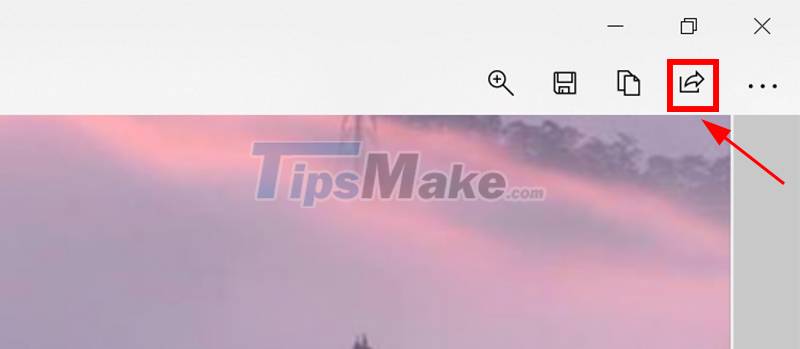
Step 2: Select the app or user you want to share.
3. Synthesize the keyboard shortcuts in Snip & Sketch
|
Shortcut keys |
Manipulation |
|
Ctrl + FEMALE |
Create a new crop photo |
|
Ctrl + O |
Open file |
|
Shift + arrow keys |
Move the cursor to select a rectangular crop area vùng |
|
Ctrl + E |
Choose eraser |
|
Ctrl + P |
Print captions |
|
Ctrl + Z |
Undo a comment |
4. How to launch Snip & Sketch with the Print Screen key
Although the Print Screen key can keep the screenshot in the clipboard or save it to OneDrive or Dropbox when configured, it is more convenient if you can launch this application using Print Screen.
However, you will have to disable the configuration of Print Screen with any other applications and restart your Windows 10 computer for this button to take effect.
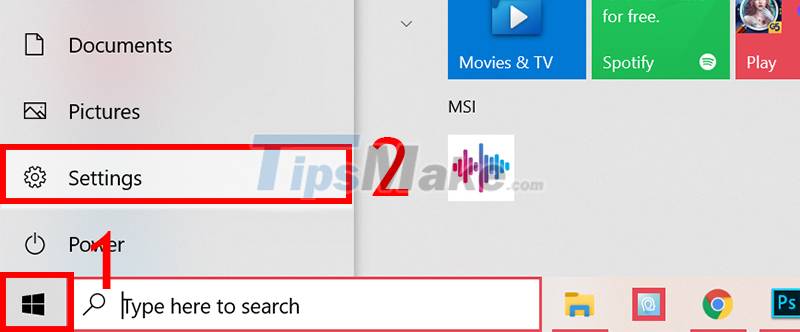
Step 1: Select the Start icon on the Taskbar > Select the gear icon to open Settings.
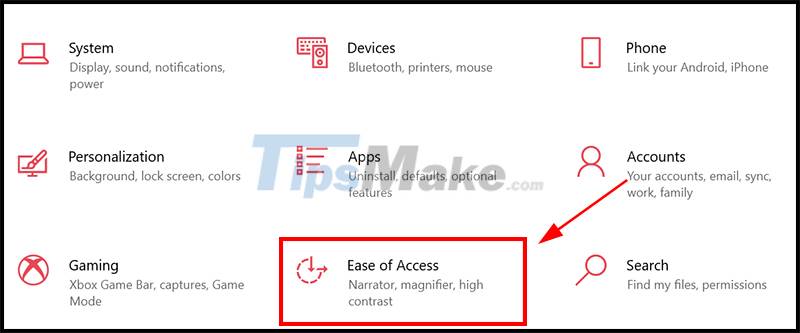
Step 2: Select Ease of Access.
Step 3: Scroll down in the Interaction section, select Keyboard > In the Print Screen shortcut section, switch the Use the PrtScn button to open screen snipping button to the right to activate the On mode.

Hopefully after reading this article you can know how to take screenshots, annotate images with Snip & Sketch on Windows 10. Thank you for following the article, see you in the next articles. according to the!
Was this article helpful?
Your feedback helps us improve.
Related Articles
 How to use Snip & Sketch on Windows 105 minutes read
 Snip and Sketch tool Windows 10 has been updated to the new version with many noticeable changes2 minutes read
 The fastest way to take long, scrolling screenshots on Windows 112 minutes read
 How to use Screen Snip, a new screen capture feature on Windows 104 minutes read
 How to create Screen Snip shortcut in Windows 103 minutes read
 6 Ways to take screenshots of Windows 11 with extremely easy keyboard shortcuts11 minutes read
Reader Comments 0
Sign in with email or Google to join the discussion.