Instructions for taking screenshots with Snagit
Snagit is a useful software that you can take screenshots and edit images after taking them. Support multiple choice of photographic features, helping you to take screenshots as you like..
Snagit is a useful software that you can take screenshots and edit images after taking them. Support multiple choice of photographic features, helping you to take screenshots as you like.
The following article shows how to use the features to take screenshots and edit images.
Step 1: If Snagit has not been installed, you can download and install Snagit here.
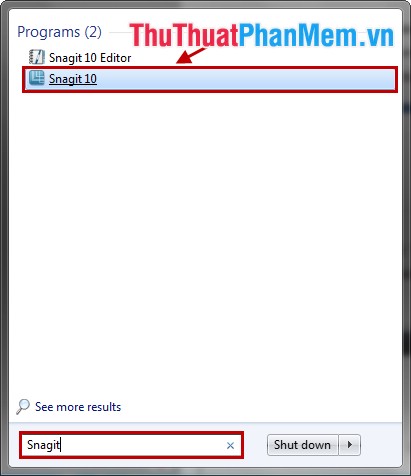
Step 2: Start the Snagit program, select Start and enter the keyword Snagit in Search program and files and then select Snagit .
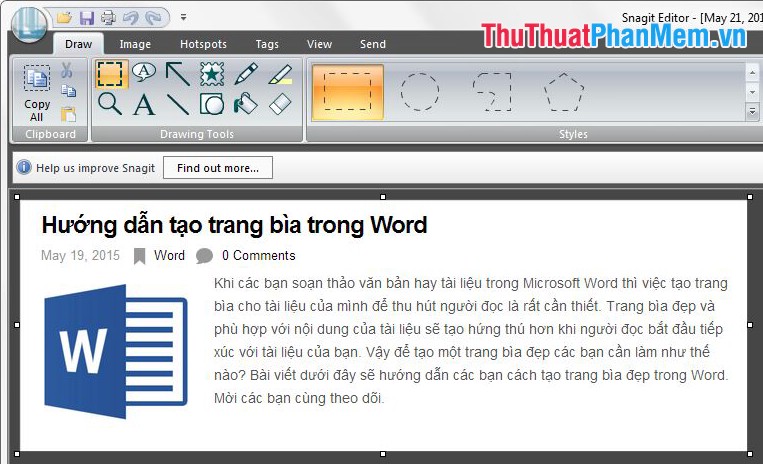
The interface of the program is as follows:
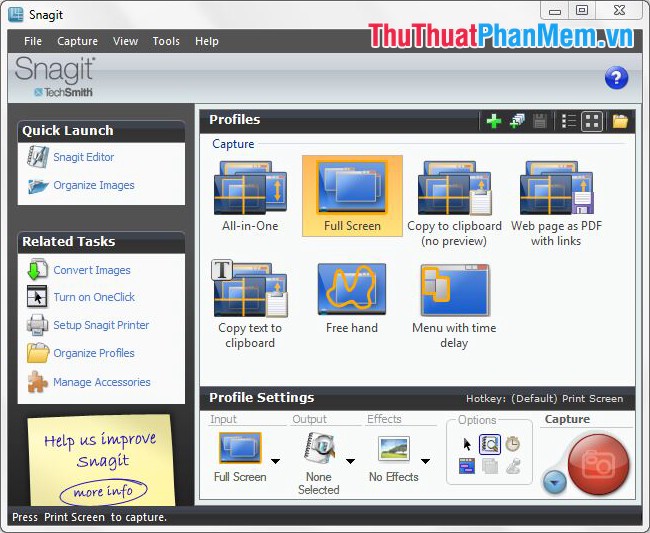
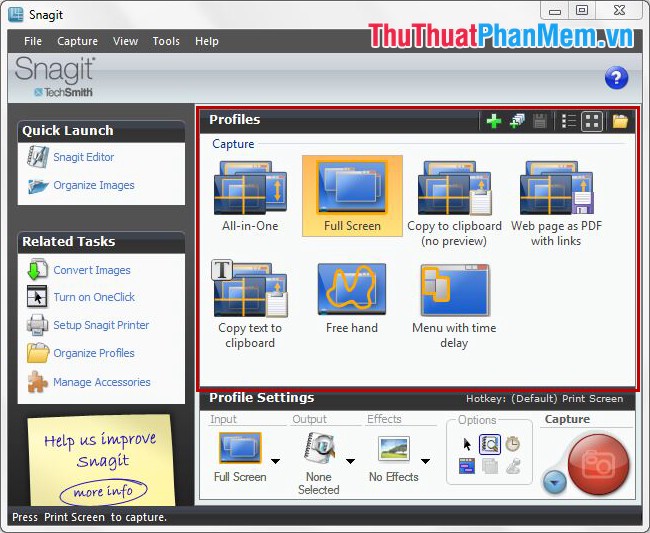
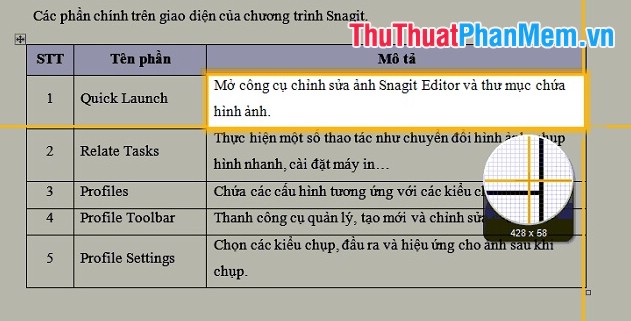
The main sections on the interface of the Snagit program.
No.
Part name
Description
first
Quick Launch Open Snagit Editor and the image folder.2
Relate Tasks Do a number of operations such as converting images, taking snapshots, setting the printer, etc.3
Profiles Contains profiles corresponding to shooting styles.4
Profile Toolbar The toolbar for managing, creating and editing profiles.5
Profile Settings Choose the shooting styles, output and effects for photos after taking them.6
Options Some other options such as capture the mouse, timer shooting .7
Capture Mode Select a screen capture mode with different options.8
Capture Button Screen capture button, you can use the Print Screen key on the keyboard instead.Step 3: Use Snagit to take screenshots.
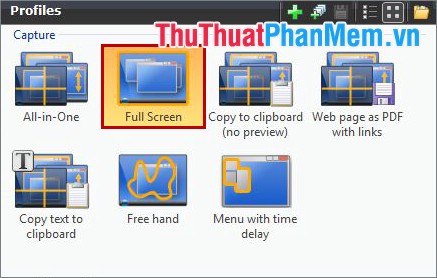
Types of shooting in Profiles
On the interface of Snagit 10, the Profiles section includes 7 default configurations, corresponding to the screen capture types. Depending on the purpose, you can choose the appropriate screen shot type.
1. All-in-One - take screenshots to your liking.
You select All-in-One in Profiles and select the Capture icon (can press the Print Screen key on the keyboard) to start shooting.

The computer screen will dim, appear two orange coordinates, you use the mouse to select the area to be captured by holding down the left mouse button from the starting point to capture and move to the end of the area to capture.
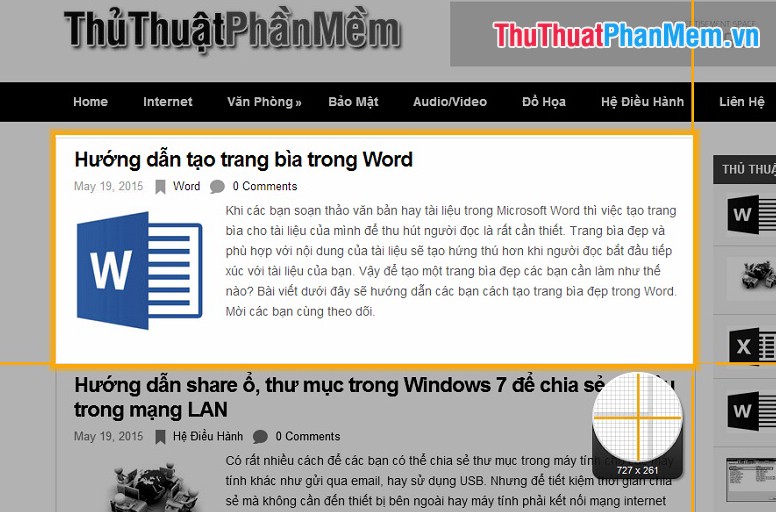
The selected area is highlighted, after you release the mouse pointer, the area you selected will be captured and displayed in Snagit Editor 10. You can easily save it.
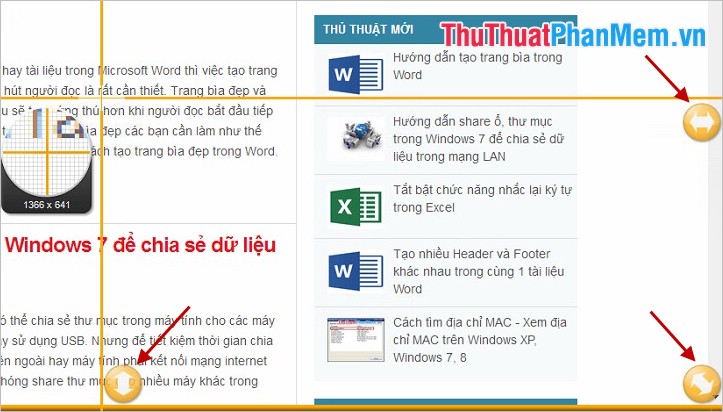
In addition, All-in-One shooting can help you to capture web pages or pages with content longer than the screen. When choosing to shoot, this type of shooting appears 2-way arrow buttons at the necessary positions, to expand the shooting content, click the 2-way arrow button at the appropriate position.
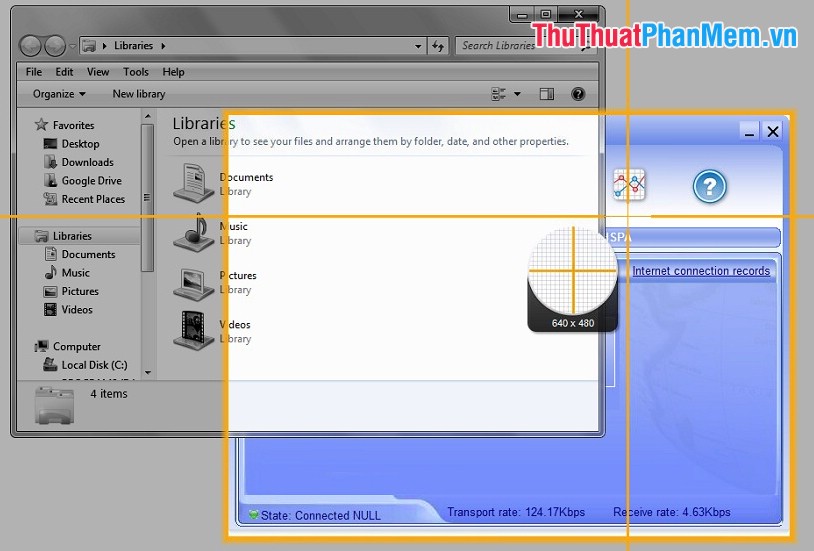
Usually when you take a screenshot, you will need the application to be displayed on the top of the computer screen. But with All-in-One shooting, you can capture the app under another overlay application. You just need to drag the mouse on the application below to make the selection lighted up, it will automatically capture the application you choose without being affected.
2. Full Screen - capture full screen.
Select Full Screen in Profiles and select the Capture icon (can press the Print Screen key on the keyboard) to start shooting.
Snagit will automatically take a screenshot of your computer screen and display it in Snagit Editor .
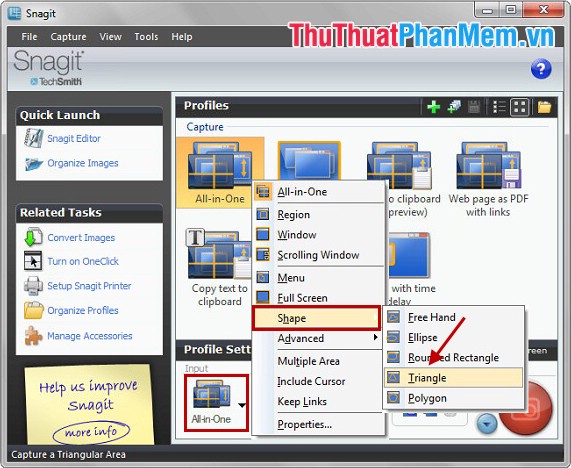
3. Shape - take photos according to certain shapes.
You can take pictures in certain shapes such as triangles, squares, ovals . and two techniques of cutting in multi-edges (Pylygon), free-cutting (Free Hand).
In Profile Settings you choose in Input -> Shape -> select the shape you want to capture. Then press the Capture button (or the Print Screen key ) to take a picture.
Then you select the area to capture.
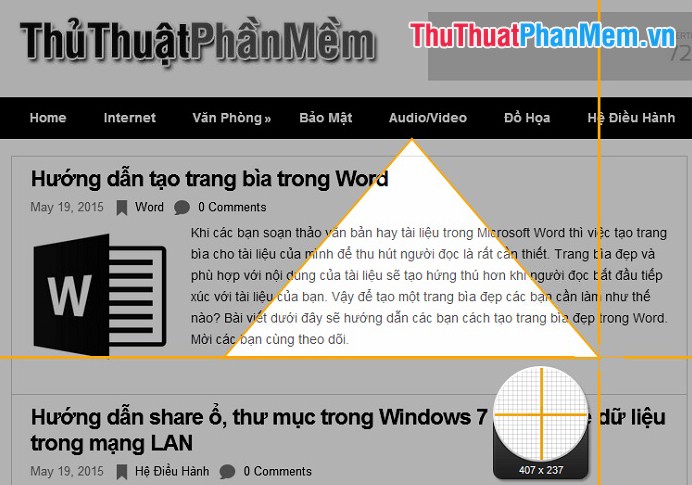
After you have finished selecting the mouse cursor, Snagit will automatically capture the part you choose and display the image in Snagit Editor .
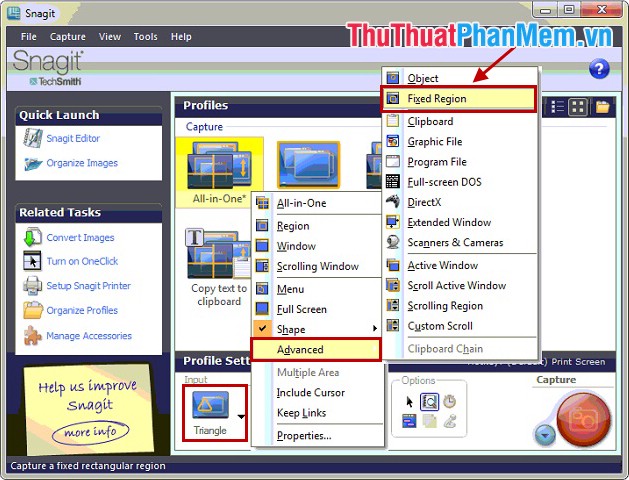
4. Fixed Region - take photos at a predetermined size.
You want to take photos according to the size you set, in Profile Settings in the Input section, select the shooting style icon -> Advanced -> Fixed Region .
Then you choose in the Input section and select Properties .
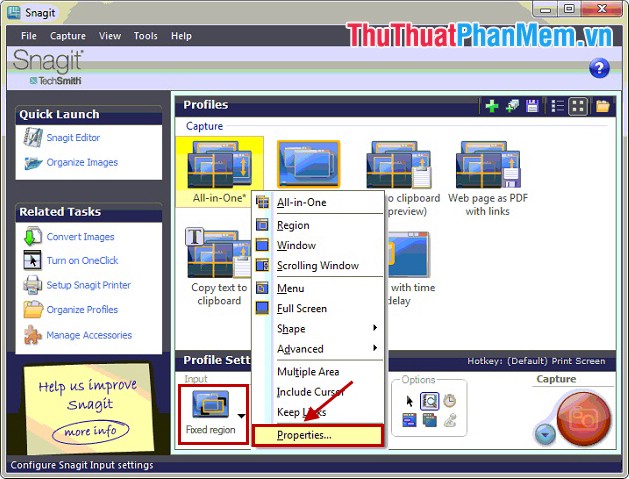
In the dialog box Input Properties you edit the Width, Height and click OK .
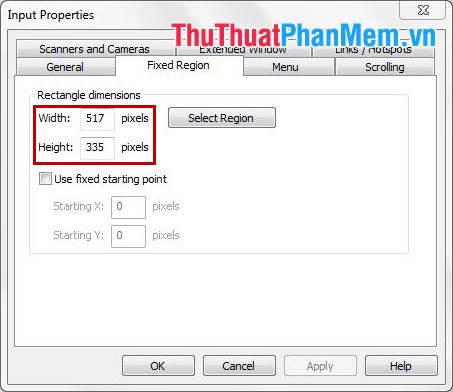
Then you press Capture to capture.
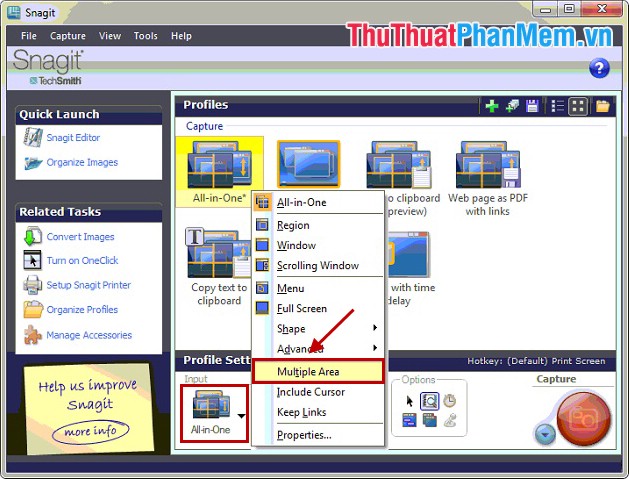
5. Multiple Area - capture multiple locations on one screen.
To capture multiple locations on one screen, select the All-in-One shooting mode in Input . Then select the arrow icon next to shooting mode and select Multiple Area .
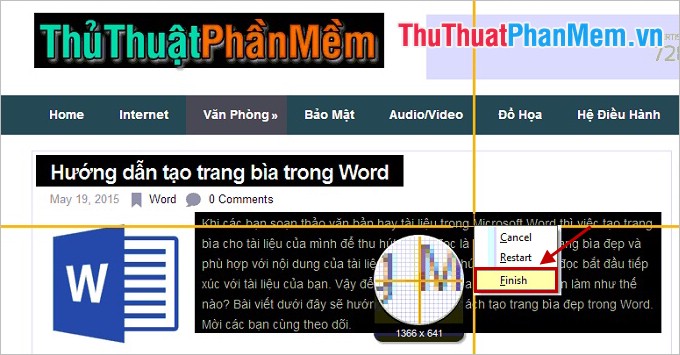
Then you press Capture to capture, you select the area to take a shot, the selection will display in black. When you have selected the areas to capture, right-click and choose Finish .
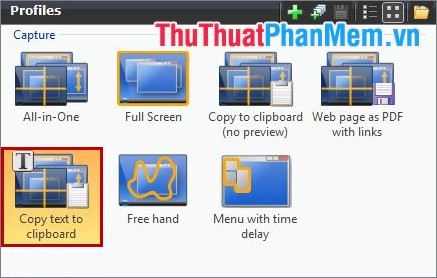
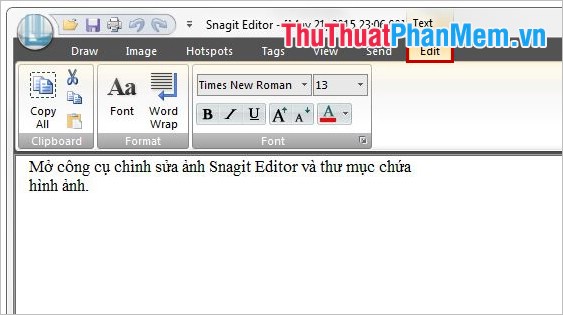
6. Copy text to clipboard - capture text content contained in the image.
This type of capture will help you capture the text content of the image, which you can then format the font and color for the text.
You choose Copy text to clipboard in Profiles and select the Capture icon (can press the Print Screen key on the keyboard) to start shooting.
There appear 2 orange coordinate lines, hold down the left mouse button and select the text that you want to capture.
Then you release the mouse pointer, the text will be displayed in Snagit Editor , you can format the text as you like in the Edit section of Text .
7. Menu with time delay - capture a menu.
When you need to capture a program or application on your computer screen, you can use the capture feature Menu with time delay .
You just need to select Menu with time delay in Profiles and press Capture button to capture. You can set the timer for shooting in Time Capture of the Options section .
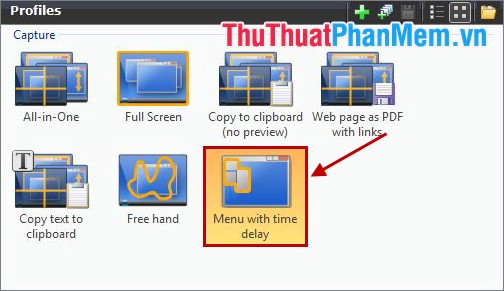
Then you click on the program, the application needs to be captured for Snagit to capture (the application to be captured must be displayed on the computer screen). After the timer you capture, Snagit will capture the application itself and display the image in Snagit Editor .
Some customizations for Snagit:
- To take a photo containing your mouse pointer, click the Cursor icon in Options .

- Self-timer photographed you click Timed Capture in Options .

Then customize the time in the Timer Setup dialog box , the time in seconds.

- Insert subtitles (Caption) into pictures after shooting.
First you choose the shooting style and choose the arrow in the Effect -> Caption .

In the Caption dialog box, enter text in the Caption Text section , if you want to create subtitles outside the image, select the Place caption outside of image box .
Click Caption settings if you want to set the font, font style, font size for Caption text .
You can also get subtitles as Computer name (computer name), User name (username), Time / date (time and date) by checking the corresponding section in System caption .

Then you take a picture, the image will contain the caption that you have set.
- Watermark on the image after taking it.
You choose photography style and choose the arrow in the Effects -> Watermark .

In the Watermark dialog box, select the open folder icon in the File section to find the image you want to make a watermark. Select the display type in Display effect: Underlay and Overlay . You can edit the display position for the watermark in the Advanced settings section .
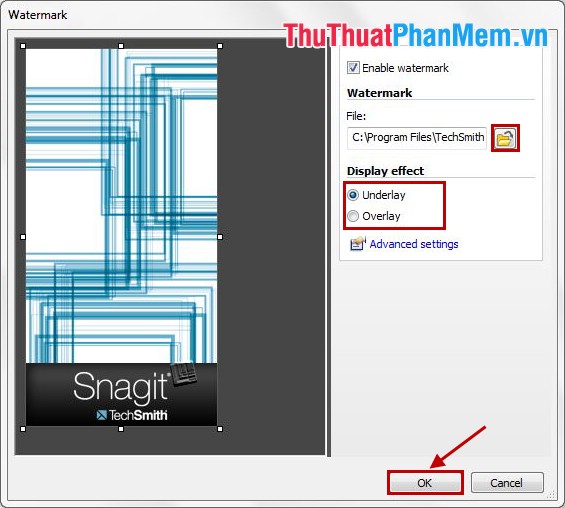
So you just press capture, Snagit will capture images and automatically insert the watermark that you have just set.
Edit photos with Snagit Editor
Snagit Editor is Snagit 's photo editing tool. The image after you take it with Snagit will be displayed by default in this tool. Snagit Editor is a fairly complete photo editing tool to help you edit photos as you like.
1. Cut a part of the image.
In the Draw tab of Snagit Editor, select the Selection icon and use your mouse to select the area of the image you want to crop. Then right click and select Crop to crop.
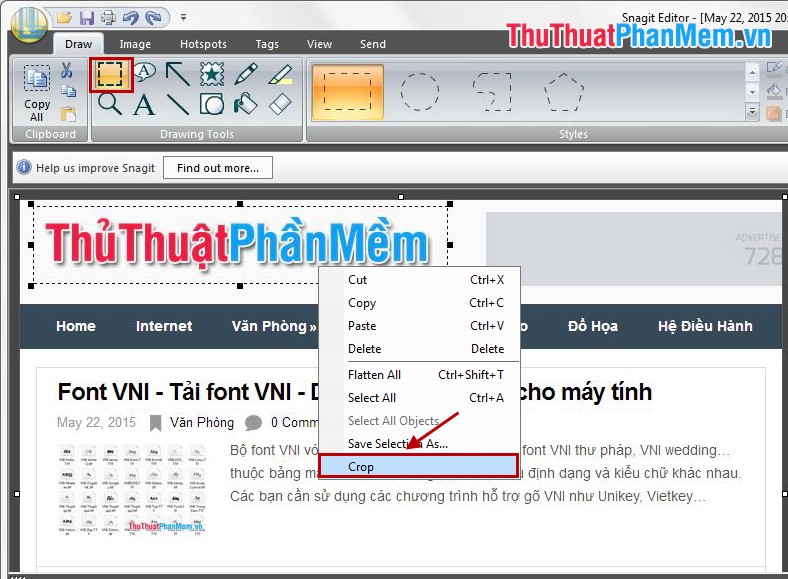
The image you have chosen has been launched, you just need to save that image.
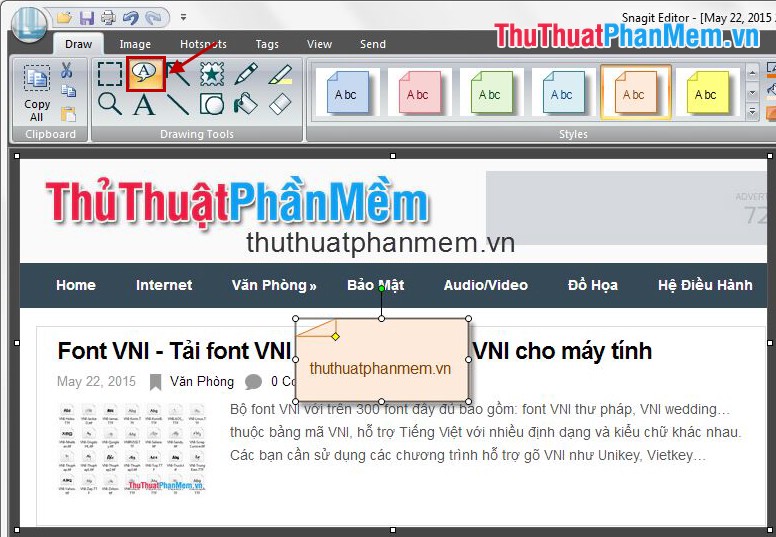
2. Add text to the image.
You can use Text or Callout in the Draw tab .
- To use Text, click the Text icon (A) and use the mouse to select the writing area then write the text in the selected area.
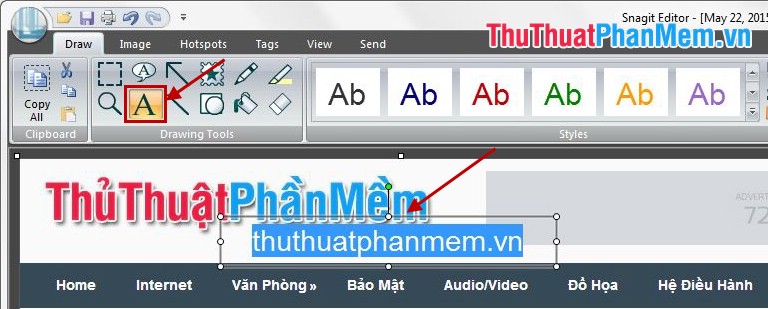
You format the font, font . in the toolbar when right-clicking and choosing effects in the Styles section .
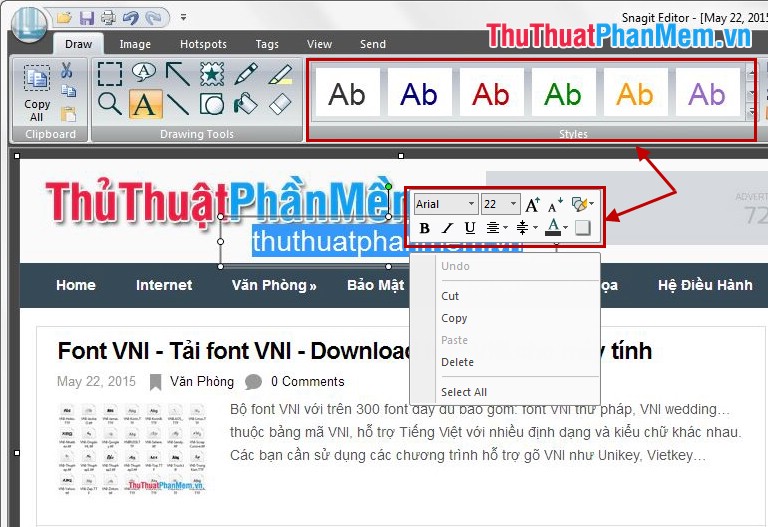
- If using Callout , in Draw you select the Callout icon then select the area to be written and enter the text in the selected part. You can choose different styles in the Styles section .
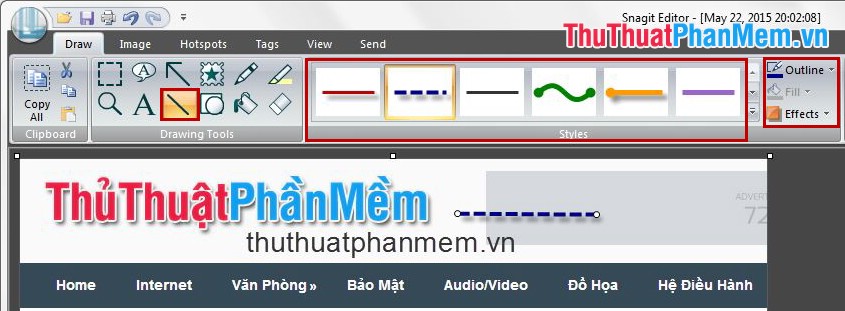
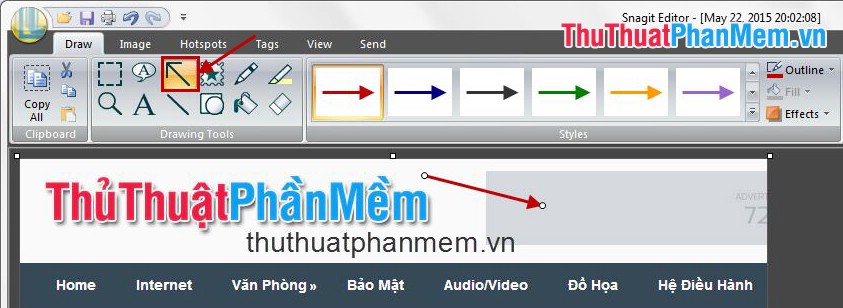
3. Add lines and arrows to the image.
Insert straight lines, curved sections, broken lines . you select the diagonal icon in the Draw section. Choose the style in the Styles section , choose the color, the thickness of the stroke in the Outline section , choose the effect in the Effect section .
To insert arrows, select the arrow symbol in the Draw tab, choose the type, color, line thickness, effects similar to inserting a straight line.
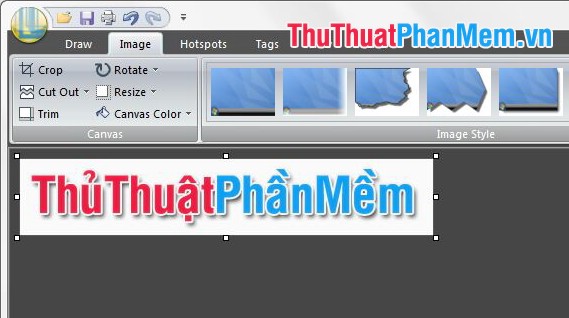
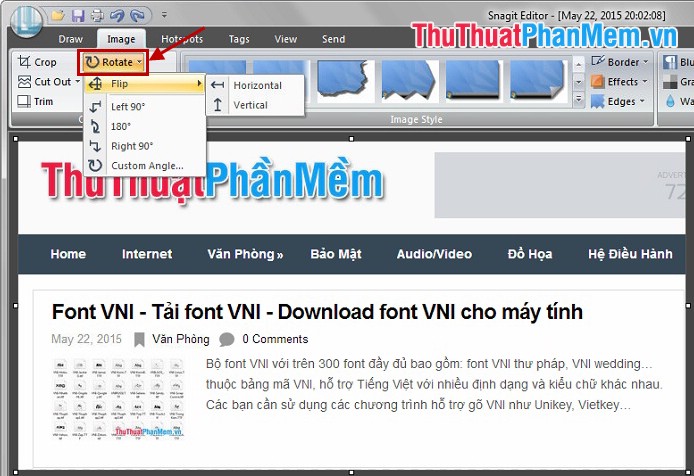
4. Resize and rotate images.
When you want to resize the image, select the Image tab -> Resize -> Resize Image .
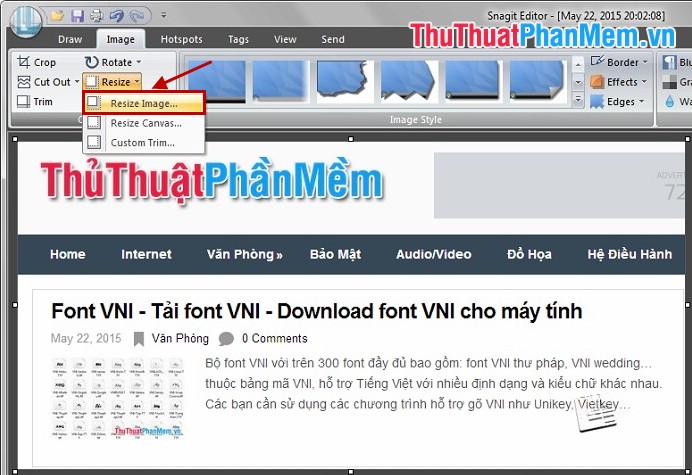
The Resize Image dialog box appears, select Scale to specific size (pixels) and enter the width in the Width and the height in the Height. Then click Close to close the dialog box.

If you want to rotate the image in different directions, select the Image tab -> Rotate and select the corresponding rotation angle. Also you can choose Flip in Rotate to rotate the image symmetrically in a vertical (Vertical) or horizontal (Horizontal).
5. Add effects to images.
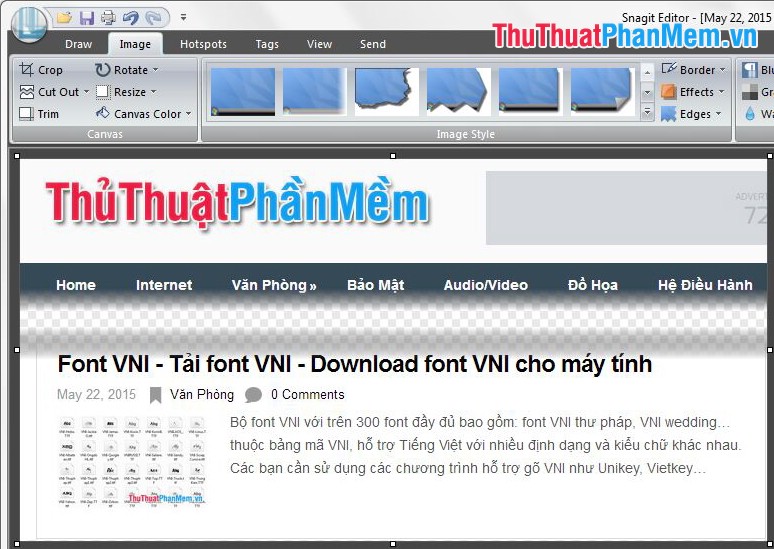
- The effect of creating a cropped area on the image.
You choose tab Image -> Cut Out -> select the type of cut (vertical, horizontal).
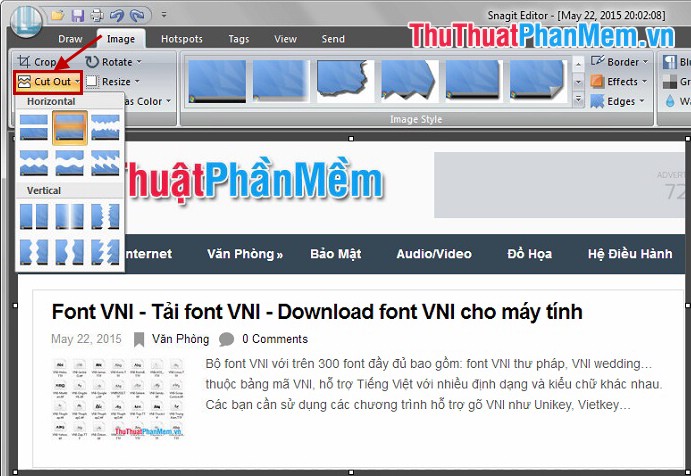
Appears the cut line in the direction you have chosen, you move the mouse to the position to cut and left click to cut. The image will be cropped according to the type of crop you choose.
- Also you can choose many other effects in the Image Style section .
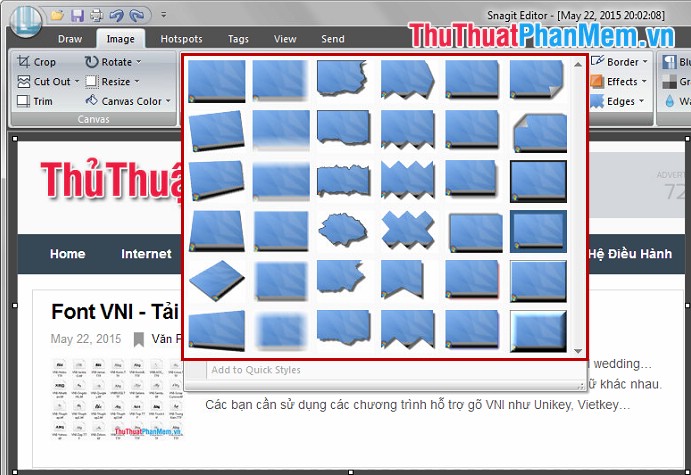
- You can choose Effects and choose effects for photos.
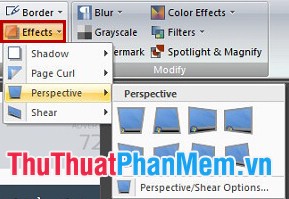
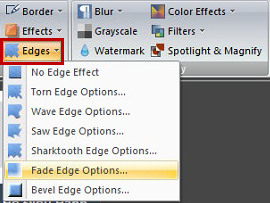
- In Edges there are also many effects you can choose for your images.
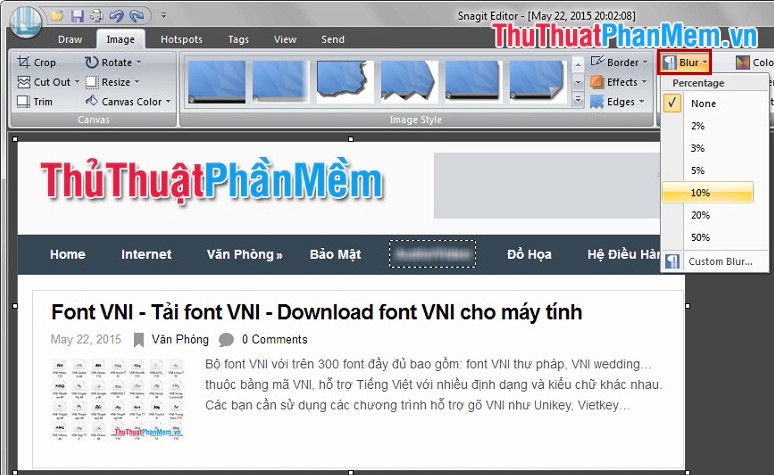
- Blur any part of the image: you select the area to be blurred, then click Blur -> select the amount of blur, the larger the percentage, the more blurred.
6. Create a watermark for images.
Snagit Editor helps you copyright the image by inserting watermark on the image.
In the Image tab, select Watermark , a Watermark dialog box appears, select the open folder icon and select the image to be watermarked. Then choose the effect shown in the Display effect: Underlay (below image), Overlay (above image). You can also choose Advanced settings to set the position for displaying the watermark and some other advanced settings.

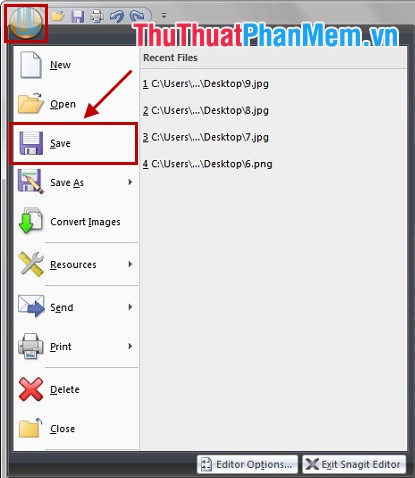
7. Save the image after editing is complete.
After you have edited the image as you like, you can copy the image or save the image. To save the image you select Snagit Button -> Save (or you press Ctrl + S ).
The Save As dialog box appears, select the folder to save the image, name the image in the File name section , select the image format in the Save as type section . Finally click Save to save.

The above article has shown you how to take screenshots with Snagit and edit images with Snagit Editor. In the framework of the article can not introduce all the features of Snagit and Snagit Editor, so you can learn more in the process of use. Good luck!