Table of Contents
This practical guide explains how to share a Printer via Lan Network - So That 2 or More in a clear sequence, including preparation, key settings, common mistakes, and troubleshooting steps.
What This Guide Covers
- Step 1: Share the printer via LAN with another computer
- Step 2: Access the shared printer on the LAN
In the daily work of office workers, they often have to print many different documents for meetings or customer contact, but each office usually only has 1 printer. Therefore, each printing will take a lot of time, especially if you have to print in large quantities. Therefore, today, TipsMake.com will guide you how to share a printer via a local LAN so that multiple computers can print documents. The article has 2 steps, 1 is to share the printer with another device and 2 is to connect to the shared printer, please refer to it.
Note: First, you need to connect 2 computers together via Lan network and the printer will be plugged into one of the 2 computers. TipsMake.com recommends that you plug the printer into the computer used for printing the most, with the other machine only printing when the main machine is activated. At the same time, install printer drivers for computers on the network.
Step 1: Share the printer via LAN with another computer
This operation will be performed on the computer that is connected to the printer.
1. Go to Control Panel and select Devices and Printers

2. Next, check the Set as default printer line and click Printer properties

3. In the new dialog box that opens, select the Sharing tab and then check the Share this printer line . Then click OK

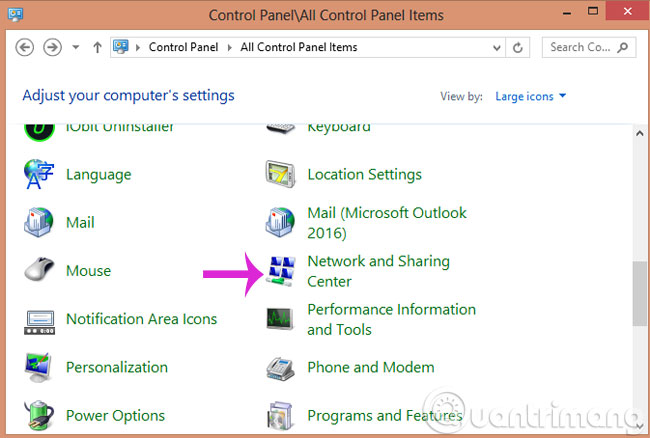
4. Return to Control Panel , click Network and Sharing Center
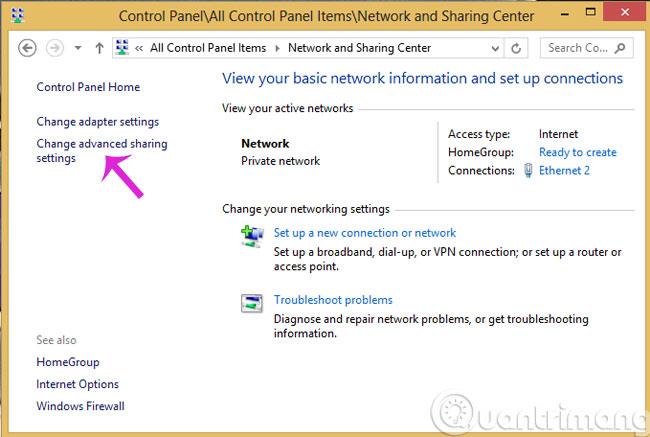
5. Click Change advanced sharing settings
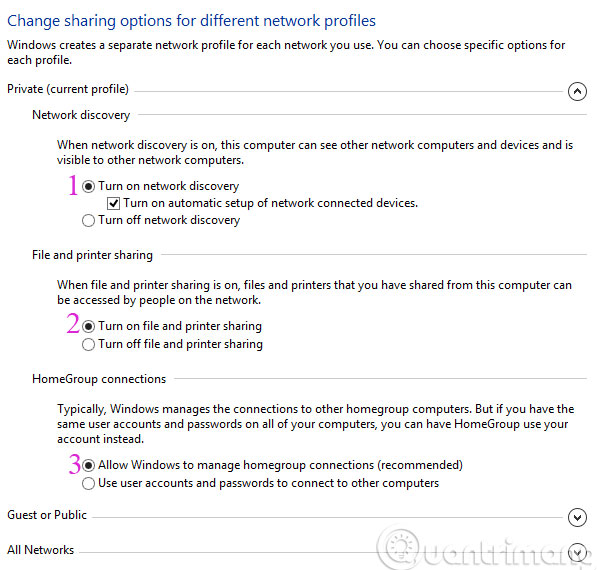
6. Check the numbered options below
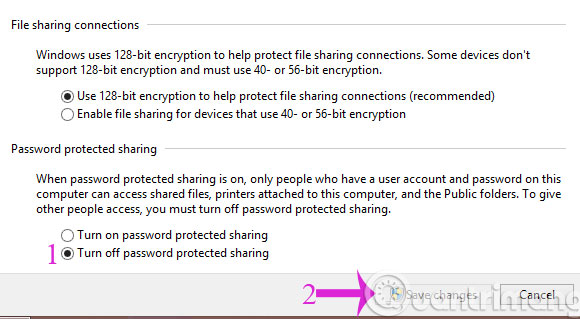
7. Scroll down to the Password protecting sharing section and then check the Turn off password protected sharing option . Then, click Save changes
Step 2: Access the shared printer on the LAN
This operation will be performed on the computer where the document needs to be printed.
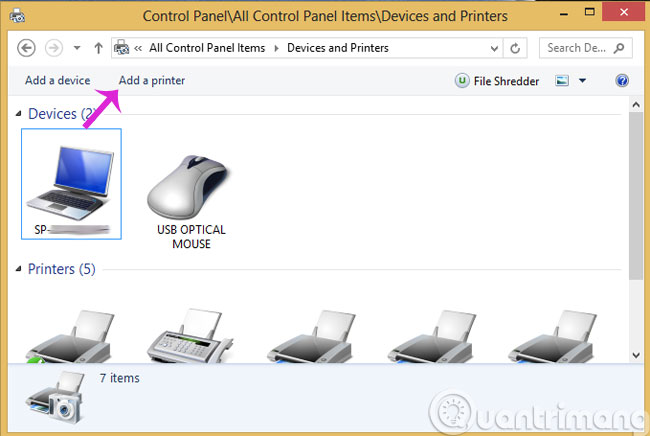
Go to Control Panel > Devices and Printers and click Add a Printer
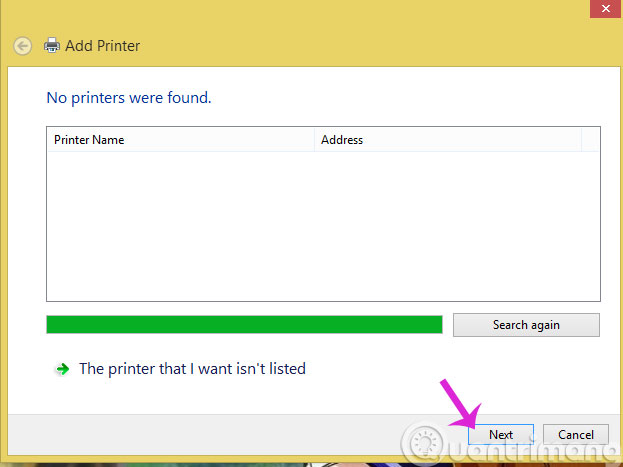
In the window that appears, select Add a network, Wireless or Bluetooth printer . When the following window appears, select The printer that I want isn't listed .
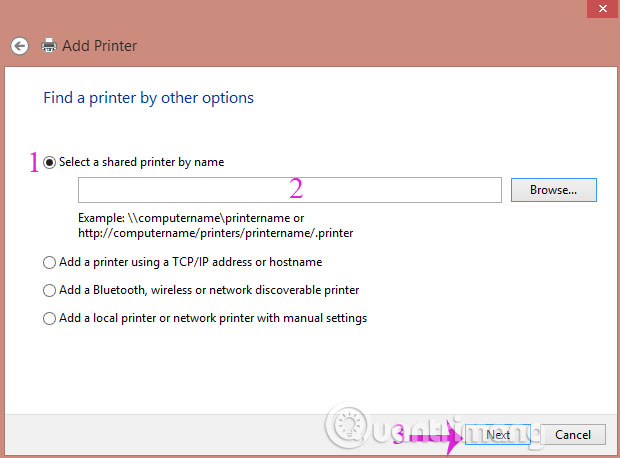
Please check the Select a shared printer by name option and select the correct computer name that shared the printer and then click Next to finish.
In addition to adding a printer above, if you know the IP address of the computer sharing the printer, you can do the following, press Windows + R key to open the RUN window, enter the IP address of the computer connecting to the printer. Go to > OK .
A window appears with a list of devices shared by the other computer. Select the correct printer you need, double-click the left mouse button (or right-click and select Connect) to connect to the printer.
Above is how to share a printer on a LAN and how to connect to a shared printer. Hopefully this article will help you in connecting the printer to the computer.
Good luck!
Final Thoughts
Use the instructions and checks above in order, verify the result after each major step, and keep a backup whenever the process changes important files or system settings.
FAQ
What should I check before starting?
Confirm that your device or software version matches the instructions, save important data, and note the original settings before making changes.
What should I do if the steps do not work?
Restart the app or device, install available updates, review any error message, and repeat the steps carefully in the same order.
Can I undo the changes?
Many changes can be reversed, but the exact method depends on the feature. A backup or restore point gives you the safest way to recover.
Related Articles
 How to Share a Printer via LAN5 minutes read
 Why the Printer Cannot Print and How to Fix It9 minutes read
 Network Printer Solution with Repotec Print Server.11 minutes read
 How to Share a Printer: Step-by-Step Guide7 minutes read
 How to Set Up a Laptop to Print Wirelessly: Complete Guide11 minutes read
 How to Share Printer in Windows Network System?5 minutes read
Reader Comments 0
Sign in with email or Google to join the discussion.