Instructions for renaming the printer on Windows 10
When working with multiple printers on your computer, you can rename those printers to facilitate connecting and using the printer to print data.
Table of Contents
When connecting the printer to the computer, by default the system will display the full name of all printers connected to the computer as well as previously connected. In case the user uses multiple printers on one computer, it is easier to change the name of the printer during use. We can name each machine separately so that we can not misuse the machines. The following article will guide you how to rename the printer on Windows 10.
- Fix simple errors on the printer
- Common printer errors and how to fix them
- How to fix Windows errors not connected to the printer
Instructions for renaming Windows 10 printers
Method 1: Change the printer name via Settings
Step 1:
We click the Settings button on the interface and then click on the Devices section . Or you can press Windows + I to open the Windows Settings interface.

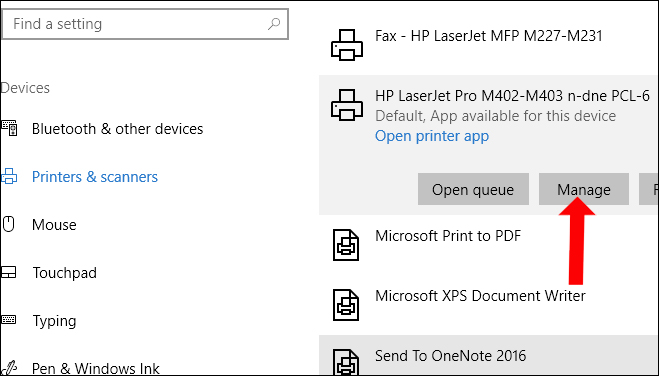
Step 2:
A new look appears in the Printers & scanners section , and then to the right, we will see all the printers connected to the computer. Click on the printer you want to rename, then click the Manage button .
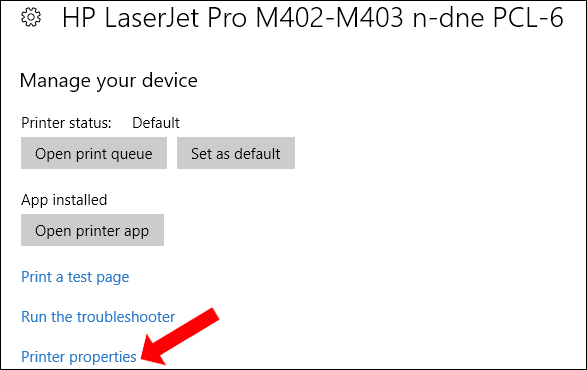
Step 3:
Switch to the new interface and click on Printer Properties .
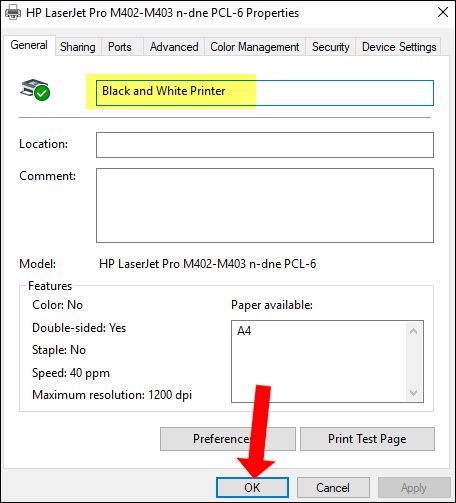
Click on Genetal tab to proceed to edit the printer name right at the top line. Finally click OK to save the changes.
Method 2: Change the computer name via Control Panel
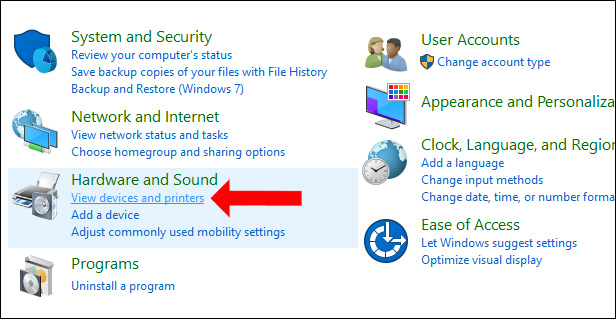
Step 1:
Open the Control Panel interface and then in Hardware and Sound , click on View devices and printers .
Step 2:
At the new interface, right-click on the printer you want to rename and click the Printer Properties option in the right-click menu.
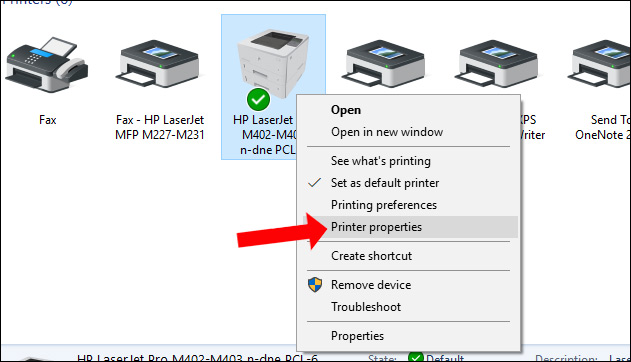
Step 3:
Also appears a dialog box similar to Method 1. In the General Tab, users just need to change the printer name to the new name you want to set and click OK to save the new name and finish.

By changing the printer name extremely easily, we can link to the printer that needs to work quickly, avoiding the wrong connection with another printer. 2 ways to rename the printer on you can apply to different operating system versions.
See more:
- Instructions for installing the printer in Windows 8
- 2 ways to share printers via LAN
- Tips for sharing printers in the network
I wish you all success!
Was this article helpful?
Your feedback helps us improve.
Related Articles
 How to add a printer on Windows 113 minutes read
 5 software to rename files in batch12 minutes read
 Instructions on how to check and install the IP address for the printer3 minutes read
 How to fix Windows errors not connected to the printer8 minutes read
 Instructions on how to replace printer ink at home in the simplest way6 minutes read
 How to fix offline errors of printers on Windows 1010 minutes read
Reader Comments 0
Sign in with email or Google to join the discussion.