Print text file
You want to print your own text file with a printer already available at home, but don't know how to install and use it? TipsMake.com will guide you how to install the printer directly with the current computer, how to print in MS Word and cancel the print job.
Table of Contents
You want to print your own text file with a printer already available at home, but don't know how to install and use it? TipsMake.com will guide you how to install the printer directly with the current computer, how to print in Word and cancel the print job.
Install the printer directly to the current computer
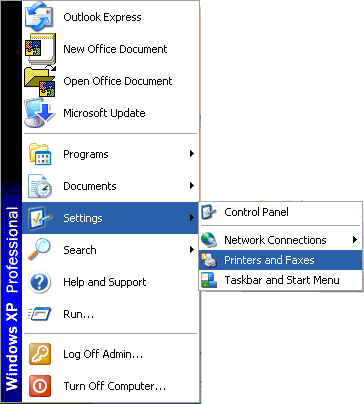
Click the left mouse button on the Start button. Select Settings> Printers and Faxes
The Printers and Faxes window appears:
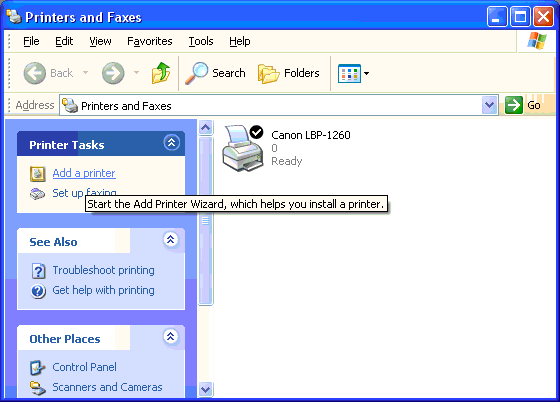
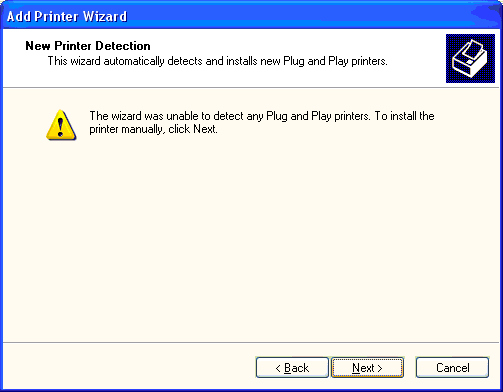
Select Add a printer> The Add Printer Wizard dialog box appears

Select Next button > Appearance screen:

Select the type of connection to the printer:
- Local printer attached to this computer: The printer is directly connected to the computer.
- Printer network, hoặc máy tính Attached to computer: The printer is connected via the local network or connected to another computer that has the printer installed.
Select Next button > Appearance screen:
SelectNext button > Appearance screen:
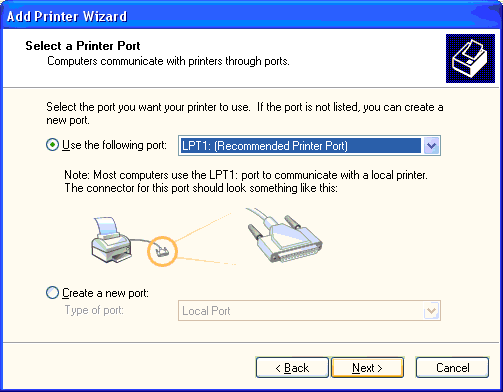
Select the plug port connected to the printer, the default is LPT1 port
SelectNext button > Appearance screen:
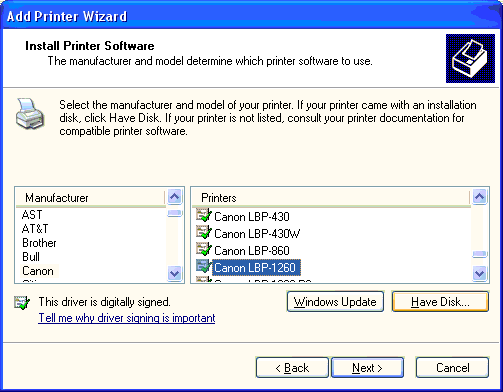
- Select the name of the printer manufacturer on the Manufacturer column.
- Then select Name of the computer type in the Printers column.
- In case there is a disc of the right type of printer, you put the disk into the CD drive and select the button Have Disk . => Appear the Install From Disk dialog box, select the path to the drive containing the printer installation software:
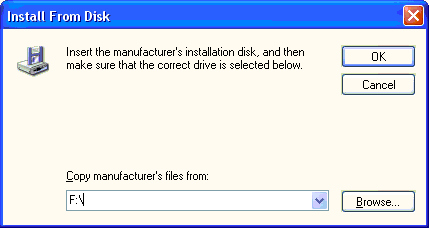
Select the OK button.
C Next button > Display screen:

Do you want to choose this printer as the default when printing? Select Yes: Agree or No: No
Select Next button > Appearance screen:

Do you want to print always try a page? Yes: Yes, No: No
SelectNext button > Appears the screen showing the parameters set when installing the printer:
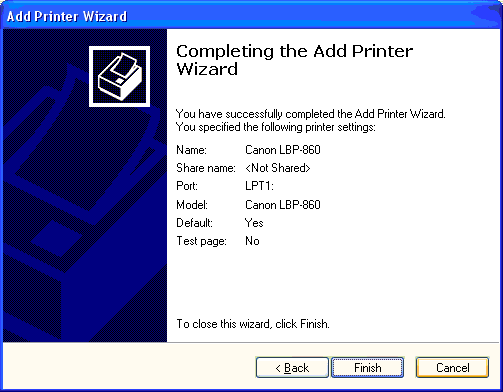
Select the Finish button to complete the printer installation.
In some cases, you cannot execute the View command before printing ( Pre Preview ) for reasons of not installing the printer. At that time, you just need to perform the operation one by one to install the printer, you do not need to worry about no installation disc or need to install the correct new printer type because you only need to see the image file in advance. when printing, not installing to print.
Printing in MS word
Go to File > select Print . or press ( Ctrl + P ), the Print dialog box appears:
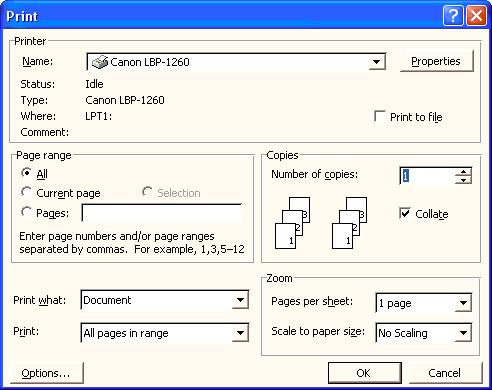
Printer: Printer. If your computer installs many types of printers to use, be sure to select the appropriate printer type. If the computer only has one type of printer installed, you don't need to worry about this part.
- Name: Type of printer
- Status: Status
- Type: Printer type
- Where: Port connected to the computer
Page range: Printing area
- All: Print all pages in the file
- Current page: Print at the cursor cursor page
- Pages: Print specified pages:
- For example: enter the number in the box box
- 2 -> print page 2
- 2,3,5 -> print pages 2, 3, 5
- 2-6 -> print from page 2 to page 6 (2, 3, 4, 5, 6)
- Selection: Print only selected areas (areas you have blacked out)
Number of copies: Print out how many copies
Print item: Default in all pages in range
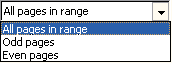
- All pages in range: Print the entire page
- Odd pages: Print only odd pages
- Even pages: Only print even pages
- Select Collate: Print from page 1 to the end, go back to print from page 1 to the end.
- Uncheck Collate: Print all pages 1, 2, . to the end of the last page
Properties: Select the type of printing paper.
Note : If your file has a page number (for example, the number of pages starting from number 10 onwards), but you have printed the page 8, the printer will not be able to perform this print job.
Remove the print command on Word 2003
If you have already made a print job but want to cancel this print job, you should not always delete the print job because the printer is printing if the print job is removed at all times. . First, remove the paper from the printer and then do the following steps in turn:
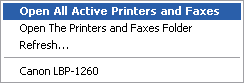
Right-click the printer icon in the Taskbar , select Open All Active Printers and Faxes
Or: Click Start> Settings> Printers and Faxes> The Printers and Faxes window appears
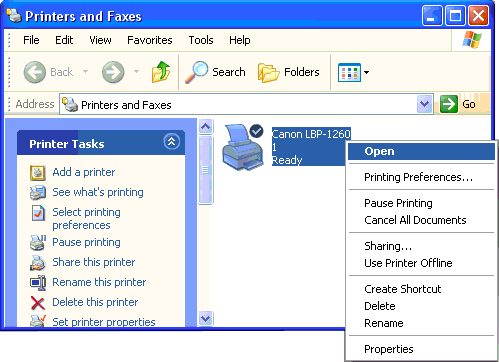
Right-click the printer icon, select Open (Or double-click the left mouse button on the printer icon)> New window appears:
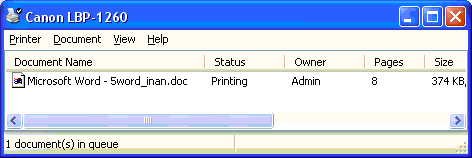
Select the file you want to remove the print job. Go to Document on the menu bar:
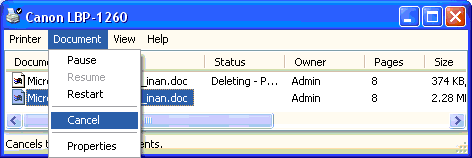
- Select Pause: Pause the print job
- Select Cancel: Cancel the print job
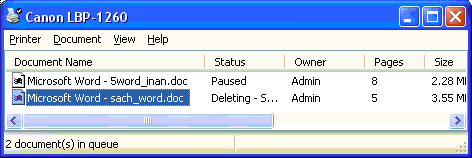
So you have completed the operation to pause or cancel the print job. Notice that the status of the file you made in the print job is Printing, but after pausing or canceling the print job, the file will be Paused or Deleting.
Was this article helpful?
Your feedback helps us improve.
Related Articles
 How to shrink the text in Word9 minutes read
 How to print Word 2016 documents3 minutes read
 How to Print Text Messages for Free from Android7 minutes read
 How to create a page printed vertically and print horizontally on a Word document3 minutes read
 How to print Excel, print Excel spreadsheets fast, standard8 minutes read
 Relax with 3 ways to print in this simple reverse order3 minutes read
Reader Comments 0
Sign in with email or Google to join the discussion.