Table of Contents
This practical guide walks through how to set up or turn off the autoplay feature on Windows 11, explains the main requirements, and highlights common issues that may appear along the way.
In other words, this AutoPlay feature can automatically detect the type of external storage device you connect to the system, and automatically perform whatever task you ask. This can sometimes be dangerous (spreading viruses) to your computer, or make you feel uncomfortable.
This article will show you how to set up or turn off the AutoPlay feature on Windows 11.
Customize AutoPlay feature on Windows 11
First you need to open the Windows Settings app by pressing the Windows + i key combination, or right-click the Start button at the far left of the taskbar and select 'Settings' from the list that appears.
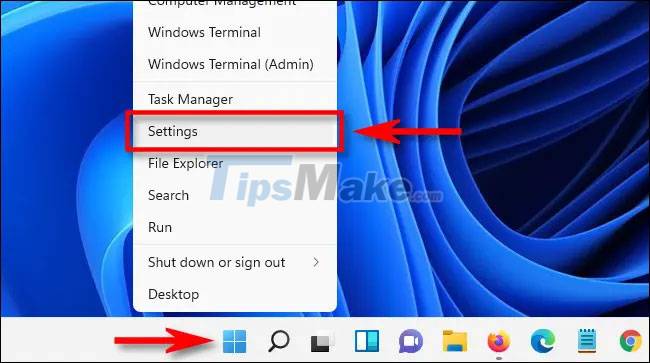
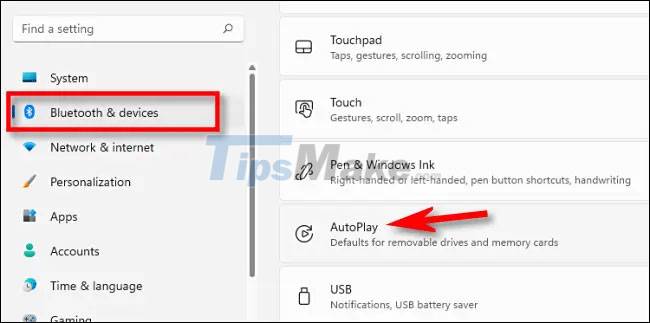
When the Settings application interface opens, look to the list on the left and click on the item 'Bluetooth & Devices'. In the corresponding screen that appears on the right, click on the item 'AutoPlay'.
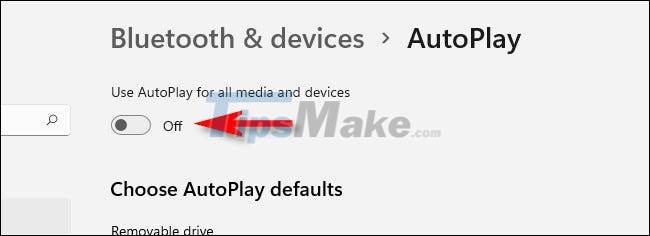
In the AutoPlay settings screen, you can configure how the AutoPlay feature works or disable it. To turn off AutoPlay, click on the switch under 'Use AutoPlay for all media and devices' to switch it to 'Off'.
If you still want to use AutoPlay, but need further customization to suit your needs, navigate to the 'Choose AutoPlay Defaults' section. This section contains two menu options.
If you click on the menu under 'Removable Drive', you will see the following options (and possibly more, depending on the program you have installed):
- Configure Storage Settings (Settings): This will take you to the Storage settings in the Windows Settings app.
- Take No Action: Nothing related to AutoPlay is suggested when you connect a removable storage device, but you can still find it in File Explorer as usual.
- Open Folder to View Files (File Explorer): Automatically opens the storage device you just connected in the File Explorer window.
- Ask Me Every Time: Displays a prompt asking you how to handle the newly connected storage device.
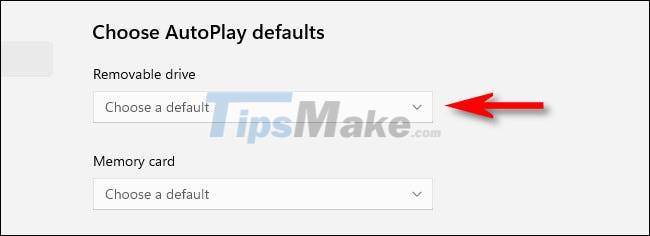
Please select the option you want.
Just below you will see a 'Memory Card' drop-down menu. If you click that, you'll see the following options (and possibly others depending on what apps are installed):
- Import Photos and Videos (Photos): Automatically copy and import photos and videos stored on an external device to the Photos Windows 11 application library.
- Import Photos and Videos (OneDrive): Automatically copy and import photos and videos stored on external devices to your OneDrive cloud storage.
- Play (Windows Media Player): Automatically play media files that Windows finds on an external storage device using Windows Media Player.
- Take No Action: AutoPlay will not work when you connect an external storage device.
- Open Folder to View Files (File Explorer): Displays files stored on removable storage devices in the File Explorer window.
- Ask Me Every Time: Displays a prompt asking you how to handle the newly connected storage device.
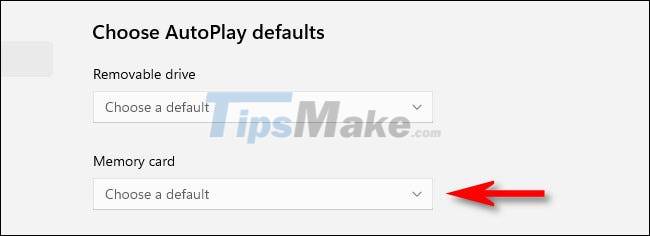
Choose the option that suits your needs.
When you're done, close Settings and the next time you insert a memory card or connect a portable hard drive, AutoPlay will do exactly what you asked.
Key Takeaways
Use the information above as a practical reference for how to set up or turn off the autoplay feature on Windows 11. Review each step carefully, confirm any requirements, and choose the option that best fits your situation.
FAQ
What does this guide explain about Set up or Turn Off the Autoplay Feature on Windows 11?
It explains the main concepts, practical considerations, and useful steps related to set up or turn off the autoplay feature on Windows 11 without requiring advanced knowledge.
Who can benefit from learning about Set up or Turn Off the Autoplay Feature on Windows 11?
This information is useful for readers who want a clear overview, practical guidance, and reliable steps related to set up or turn off the autoplay feature on Windows 11.
What should I check before applying this information?
Review the requirements, confirm that your device, software, or situation matches the instructions, and back up important data before making major changes.
Related Articles
 Custom Instructions Turn on, Turn Off Autoplay in Windows 106 minutes read
 Turn Off Autoplay in Windows 10, XP3 minutes read
 How to Change Autoplay Settings in Windows 83 minutes read
 Instructions to Turn Off Autoplay Video Feature on Facebook5 minutes read
 Instructions on How to Set, Customize, Turn on, Turn Off Autoplay on3 minutes read
 3 Ways to Enable and Disable Windows 11 AutoPlay3 minutes read
Reader Comments 0
Sign in with email or Google to join the discussion.