Table of Contents
This updated guide examines How to Change Autoplay Settings in Windows 8 and organizes the essential facts, background, and practical takeaways in clear American English.
Method 1of 2:
Using the Autoplay Settings Menu
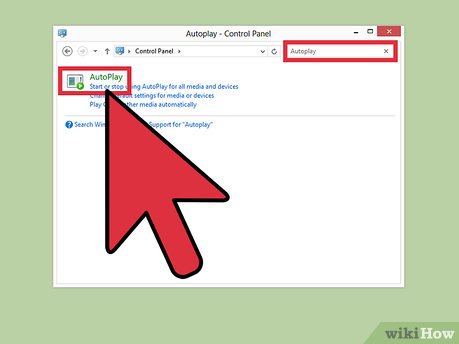 Open the Autoplay settings menu. Open the Start menu on your computer. Click 'Control Panel,' and type 'Autoplay' into the search box. Click 'Autoplay.'
 Turn Autoplay on or off. To turn Autoplay on, check the 'Use Autoplay for all media and devices' box. To turn autoplay off, uncheck the same box.[2]
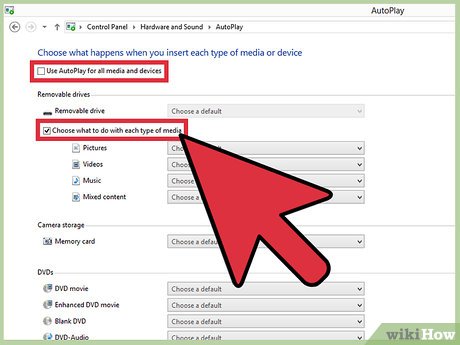 Customize your Autoplay settings. If you want to make your own choices about how Autoplay will behave, uncheck 'Use Autoplay for all media and devices,' and check the box below it that reads, 'Choose what to do with each type of media.'[3]You will be able to choose what action you want Autoplay to take when you insert various types of media (removable drives, memory cards, DVDs, etc.) into your computer.[4]
 Finish up. When you've made your changes, press 'Save' in the bottom right corner of the window. That's it! Autoplay will now behave as you dictated.
Method 2of 2:
Using the Group Policy Editor
 Open the group policy editor. Click start, and type "gpedit.msc" into the search editor (without quotation marks).
 Access Autoplay Policies. Navigate to Computer Configuration> Administrative Templates> Windows Components> AutoPlay Policies. Right click "Turn Off Autoplay" and click "Edit."
 Turn off Autoplay. Check the circle labeled "Enable." Below this, under "Options," you will find a drop-down menu titled "Turn off Autoplay on." Select either "All Drives" or "CD-ROM and removable media drives," depending on whether you want to disable Autoplay for everything, or just CD-ROMs and removable media drives.
 Finish up. Press 'Save' in the bottom right corner of the window when you're done. That's it! Autoplay will now be disabled in whatever situations you selected.
FAQ
What is How to Change Autoplay Settings in Windows 8 about?
It provides a structured overview of autoplay, explains the main context, and highlights practical takeaways for readers.
Why does this topic matter?
Understanding the main concepts helps readers evaluate the issue, avoid common mistakes, and make better-informed decisions.
How should readers use this information?
Use the guidance as a practical starting point, confirm details that may have changed, and follow current product, safety, or security recommendations.
Related Articles
 Turn Off Autoplay in Windows 10, XP3 minutes read
 How to Set up or Turn Off the Autoplay Feature on Windows 115 minutes read
 3 Ways to Enable and Disable Windows 11 AutoPlay3 minutes read
 Custom Instructions Turn on, Turn Off Autoplay in Windows 106 minutes read
 How to Change Regional Settings on Windows 103 minutes read
 Instructions on How to Set, Customize, Turn on, Turn Off Autoplay on3 minutes read
Reader Comments 0
Sign in with email or Google to join the discussion.