How to set priorities for applications in Windows 10
If a process (application) has a higher priority, it will receive more processor resources for better performance than a process with a lower priority.
Table of Contents
Windows shares processor resources for all running processes based on their priority. If a process (application) has a higher priority, it will receive more processor resources for better performance than a process with a lower priority.
If you prefer, you can set the priority manually for processes to run with Realtime, High, Above normal, Normal, Below normal or Low priority in Windows, based on your own needs instead. because of the default priority. The changes you make to the priority of a process (application) are temporary and not permanently set. When the application is closed or you restart the computer, Windows will forget the priority you set for it.
This tutorial will show you how to change the priority of an application to processor resources in Windows 10.
Important note : Do not set up processes with real-time priority (Realtime), because it can reduce the performance of the system, by making all processes lower priority than not. have the resources they need.
Method 1: Change the priority of the running process in Task Manager
1. Open Task Manager in a more detailed view.
2. Click the Details tab, right-click or hold and hold the process name (for example, "mspaint.exe" ), select Set priority and set the priority you want to give the process ( Realtime, respectively. High, Above normal, Normal, Below normal or Low ).
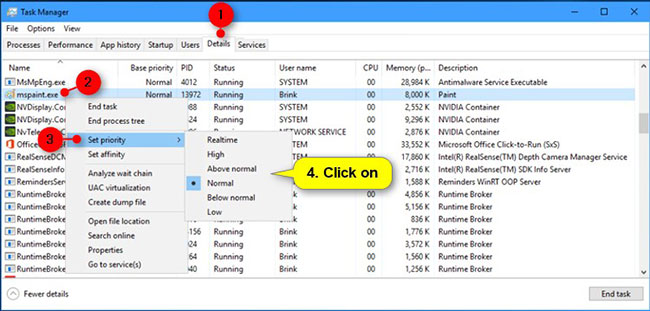
3. Click Change priority to confirm.

4. When done, you can close Task Manager if you like.
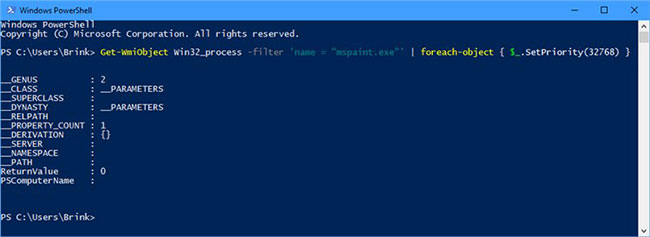
Method 2: Change the priority of the process running in PowerShell
1. Open PowerShell.
2. Enter the command below into PowerShell and press Enter .
Get-WmiObject Win32_process -filter 'name = "ProcessName"' | foreach-object { $_.SetPriority(PriorityLevelID) }
Note : Replace ProcessName in the above command with the actual name of the running process (for example, "mspaint.exe" ) that you want to change the priority of. Replace the PriorityLevelID in the above command with the number (for example, "32768" ) in the table below for the priority (for example, "Above normal" ) you want to set for this process. For example:
Get-WmiObject Win32_process -filter 'name = "mspaint.exe"' | foreach-object { $_.SetPriority(32768) }
Priority ID Priority ID 256 Realtime 128 High 32768 Above normal 32 Normal 16384 Below normal 64 Low
3. When done, you can close PowerShell if you like.
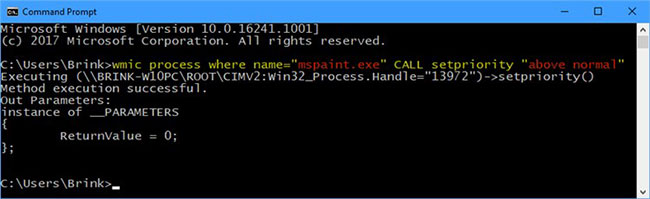
Method 3: Change the priority of the running process in the Command Prompt
1. Open Command Prompt.
2. Type the command below you want to use into the Command Prompt and press Enter .
wmic process where name="ProcessName" CALL setpriority "PriorityLevelName"
Or:
wmic process where name="ProcessName" CALL setpriority PriorityLevelID
Note : Replace ProcessName in the above command with the actual name of the running process (for example, "mspaint.exe" ) that you want to change the priority of.
Replace PriorityLevelName in the above command with the priority name (for example, "Above normal" ) in the table below that you want to set for this process.
Replace the PriorityLevelID in the above command with the number (for example, "32768" ) in the table below for the priority (for example, "Above normal" ) you want to set for this process.
For example:
wmic process where name="mspaint.exe" CALL setpriority "Above normal"
Or:
wmic process where name="mspaint.exe" CALL setpriority 32768
Priority ID Priority ID 256 Realtime 128 High 32768 Above normal 32 Normal 16384 Below normal 64 Low
3. When done, you can close the Command Prompt.

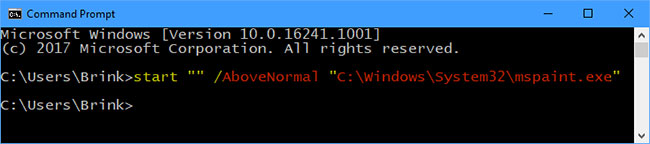
Start the application with the priority set in the Command Prompt
1. Open Command Prompt .
2. Enter the command below into the Command Prompt and press Enter .
start "" /PriorityLevelName "Đường dẫn đầy đủ của file ứng dụng"
If you like, you can use the command below to create a shortcut that will always open the application with the priority set.
cmd /c start "" /PriorityLevelName "Đường dẫn đầy đủ của file ứng dụng"
Note : Replace the PriorityLevelName in the above command with the priority name (for example, "AboveNormal" ) in the table below that you want to set for this process.
Replace the 'Full path of the application file' in the above command with the actual full path of the application file (for example, "C: WindowsSystem32mspaint.exe" ) you want to start.
For example:
start "" /AboveNormal "C:WindowsSystem32mspaint.exe"
Name of priority Realtime High AboveNormal Normal BelowNormal Low
3. Once done, you can close the Command Prompt if you like.
All operations are completed!
Hope you are succesful.
Was this article helpful?
Your feedback helps us improve.
Related Articles
 Proven Techniques to Set Priorities That Work10 minutes read
 7 utility applications should install for Windows8 minutes read
 How to add applications to the Windows 11 Taskbar2 minutes read
 How to pin applications to Windows 11 computer screen to open faster2 minutes read
 14 free and useful applications for Windows should be installed5 minutes read
 How to list all applications on Mac5 minutes read
Reader Comments 0
Sign in with email or Google to join the discussion.