How to add or remove 'SEC NVMe Idle Timeout' from Power Options in Windows 10
Installing SEC NVMe Idle Timeout in Power Options allows users to set it to turn off the NVMe device after a specified period of inactivity, in milliseconds.
Table of Contents
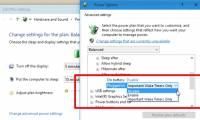
In Windows 10 Creators Update version 1703 (build 15063) and above, installing SEC NVMe Idle Timeout in Power Options allows users to set to turn off the NVMe device after a specified period of inactivity, in units milliseconds.
By default, SEC NVMe Idle Timeout is set to 100 milliseconds on battery and 200 milliseconds if plugged in .

This tutorial will show you how to add or remove SEC NVMe Idle Timeout settings in Power Options for all users in Windows 10.
Note : You must be logged in as an administrator to add or remove this setting in Power Options.
Method 1: Add or remove "SEC NVMe Idle Timeout" in Power Options using Command Prompt
1. Open Command Prompt.
2. Enter 1 of the 2 commands you want below into the Command Prompt with admin rights and press Enter .
To add SEC NVMe Idle Timeout:
powercfg -attributes SUB_DISK 6b013a00-f775-4d61-9036-a62f7e7a6a5b -ATTRIB_HIDE
Or delete SEC NVMe Idle Timeout by default:
powercfg -attributes SUB_DISK 6b013a00-f775-4d61-9036-a62f7e7a6a5b +ATTRIB_HIDE
3. You can now close the Command Prompt with admin rights if desired.
Method 2: Add or remove "SEC NVMe Idle Timeout" in Power Options with REG file
The downloaded .reg files below will modify the DWORD value in the registry key.
HKEY_LOCAL_MACHINESYSTEMCurrentControlSetControlPowerPowerSettings012ee47-9041-4b5d-9b77-535fba8b14426b013a00-f775-4d61-9036-a62f7e7a6a5b
1. Follow step 2 (to add) or step 3 (to delete) below for what you want to do.
2. To add "SEC NVMe Idle Timeout" to Power Options
A) Download the Add_SEC_NVMEe_Idle_Timeout_to_Power_Options.reg file and go to step 4 below.
3. To remove "SEC NVMe Idle Timeout" from Power Options
This is the default setting.
A) Download the Remove_SEC_NVMEe_Idle_Timeout_from_Power_Options.reg file and go to step 4 below.
4. Save the .reg file to the desktop.
5. Double click on the downloaded .reg file to merge it.
6. When prompted, click Run> Yes (UAC)> Yes> OK to approve the merge.
7. You can now delete the downloaded .reg file if you like.
Hope you are succesful.
Was this article helpful?
Your feedback helps us improve.
Related Articles
 Steps to add/remove 'Link State Power Management' from Power Options in Windows 103 minutes read
 How to add / remove 'Allow wake timers' from Power Options in Windows 103 minutes read
 How to add / remove 'Lid close action' from Power Options in Windows3 minutes read
 Steps to add/remove 'Maximum processor state' from Power Options in Windows3 minutes read
 Steps to Fix 'There Are Currently No Power Options Available' error on Windows 106 minutes read
 Set up a separate power source for Windows 7 on Laptop?3 minutes read
Reader Comments 0
Sign in with email or Google to join the discussion.