How to Securely Delete a File with Sandisk SecureAccess in Windows
If you want to securely delete a file from your computer, you can use the SanDisk Secure access program installed on your SanDisk USB flash drive. The program has a file shredder functionality that can securely remove any file from your...
Table of Contents
Part 1 of 3:
Downloading SecureAccess to a USB Drive
-
 Connect your SanDisk USB flash drive to your computer. Do this by plugging in the USB flash drive into an available USB slot on your computer.
 -
 Download SecureAccess. Open an Internet browser, and get the setup file from http://downloads.sandisk.com/downloads/SanDiskSecureAccessV2_win.exe.
- The file will automatically download.
-
 Move SecureAccess to the USB drive. Copy (CTRL + C) the setup file and paste (CTRL + V) it directly into your SanDisk USB flash drive. The file name is 'SanDiskSecureAccessV2_win.exe.'
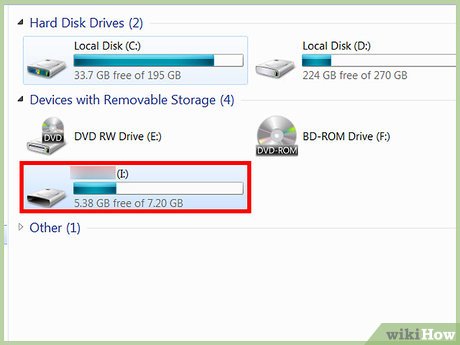
- You can access the USB flash drive by going to Start menu >> My Computer, and selecting the flash drive from the My Computer window.
Part 2 of 3:
Setting Up the Vault
-
 Install SecureAccess. Open your USB drive and double-click on the setup file to install it.
 -
 Create a password. After installation, you will be asked to create your password for the secured folder called vault. Key in your password. Take note of tickboxes under Password Recommendations to help you create a strong password.
- The Password Strength is also displayed for your information.
- Click the 'OK' button to continue.
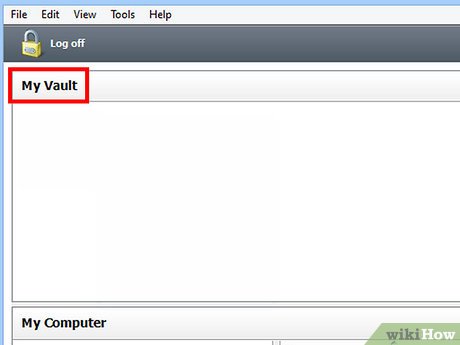
- View My Vault. After setting up your vault, you will be brought to the main screen of the program. The vault folder is located on the upper half of the screen, and the lower half is your computer's file directory. Your vault is now ready.
Part 3 of 3:
Shredding Files through the Vault
-
 Add files. Click the folder icon with an arrow going inside from the header toolbar. This is the 'Add Files' command. A window will open with your file directory.
 -
 Select files. Navigate through the folders and select the files you want to be encrypted and shredded in the vault. Click the 'Encrypt' button to proceed.
 -
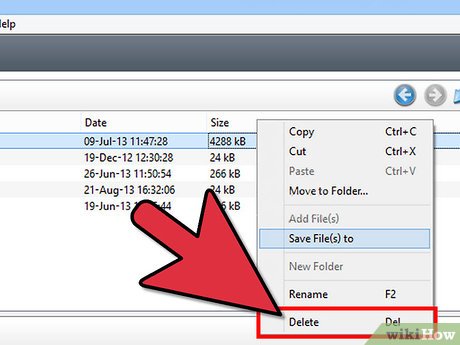 Remove files from computer. A message box will appear asking if you'd like to completely remove the original files from your computer. Click the 'Yes' button.
- Once the files are moved to the vault, they are encrypted. The original files from your computer have been securely removed and cannot be recovered anymore.
Was this article helpful?
Your feedback helps us improve.
Related Articles
 How to securely delete files using the SDelete GUI4 minutes read
 What is a .tmp file? How to open .tmp file on Windows computer?4 minutes read
 How to Completely Delete Any Windows File Using SDelete5 minutes read
 6 ways to permanently delete files on Windows - You will not be able to get that file back again9 minutes read
 How to Delete Undeletable Files in Windows3 minutes read
 Completely delete data in Windows4 minutes read
Reader Comments 0
Sign in with email or Google to join the discussion.