What is Hiberfil file and how to delete Hiberfil.sys in Windows
So can we remove it to free up space? What is hiberfil.sys file and how to delete hiberfil.sys? Here is a simple and extremely detailed tutorial.
1. What is the file hiberfil.sys?

Depending on which version of Windows you are using, there are several options for saving energy when not using your PC. Obviously you can turn it off but putting your computer in Sleep or Hibernate mode is also a great idea, it will use less power but is ready to go quickly when you need it.
Sleep mode uses only a bit of power to maintain information in the PC's RAM. Hibernate saves even more energy by writing RAM information to the hard drive -> basically shutdown. These two modes have the benefit of recovery - opening your PC much faster than starting it from a completely shutdown state. Well this is what gave birth to the file hiberfil.sys - Windows writes information in RAM to that file.
While I recommend Sleep or Hibernate instead of shutting down your PC in most cases, I also understand that many people prefer traditional shutdowns. In this case, disabling Hibernate will allow you to delete the hiberfil file and free up hard drive space.
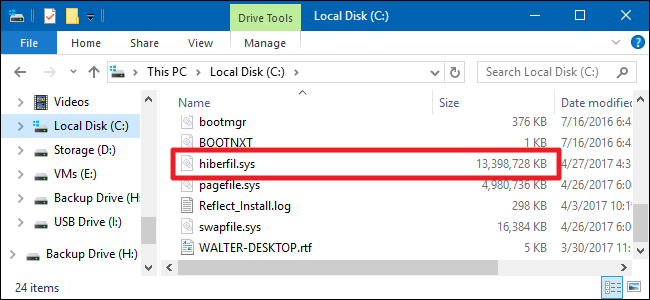
The hiberfil.sys file can take up quite a lot of space. How much of this number depends on how much memory is installed in your PC. In my case, the hiberfil.sys file takes up 13 GB of disk space - a whopping number.
2. How to turn off hibernation in Windows 10, 8, 7 or Vista
The technique for disabling Hibernate is quite similar in Windows 10, 8, 7, and Vista. You just need to use the Command Prompt in administrative mode to get this done, all just a simple command. Disabling Hibernate mode automatically deletes the hiberfil.sys file.
Step 1: Open Command Prompt by pressing shortcut key Windows + Sor Win + Q-> Enter ' command prompt ' in the search box. When you see Command Prompt in the list, right-click on it and select Run as administrator.

Step 2: At the command prompt, enter the following command and press Enter:
powercfg -h off
or:
powercfg.exe / hibernate off

This command immediately disables hibernate mode , so you'll notice it no longer appears in the Power button in the Start menu .
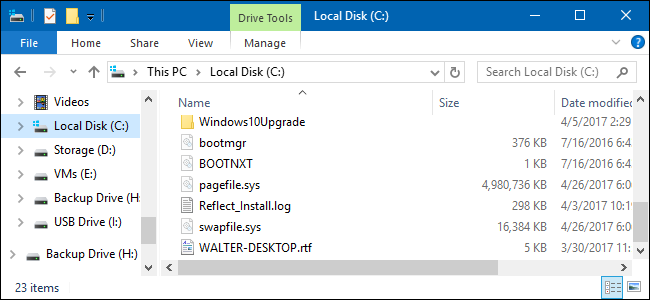
It is important that the hiberfil.sys file is erased and the disk space is 'breathable' again.

If you change your mind and want to re-enable hibernation, just go to the Command Prompt again and use this command:
powercfg -h on
or:
powercfg.exe / hibernate on
This command immediately recreates the hiberfil.sys file and activates the dynamic sleep mode again.
3. Turn off hibernation in Windows XP
Disabling Hibernate in Windows XP is slightly different from newer versions of Windows.
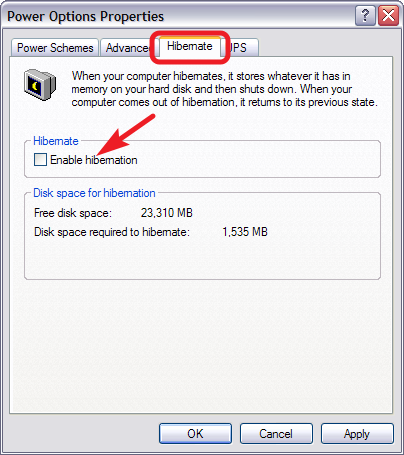
Step 1: First, open Control Panel -> Power Options . In the Power Options Properties window , switch to the ' Hibernate ' tab and disable the ' Enable hibernation ' option.

Step 2: After you turn off hibernation, restart your PC then you need to delete the hiberfil.sys file manually.
What is Hiberfil file sharing article and how to delete Hiberfil.sys in Windows here is the end. I believe that after this article, you already know a little trick that helps to hack a little more memory space, if you find the article useful, don't forget to share it with your friends.
good luck!
You should read it
- ★ What file is Hiberfil.sys? How to delete Hiberfil.sys file in Windows
- ★ How to Remove Hiberfil.Sys from XP
- ★ What is Hiberfil.sys? How to turn off Hibernate hibernation on Windows
- ★ How to specify a Hiberfile type as Full or Reduced in Windows 10
- ★ What is Swapfile.sys, how to delete Swapfile.sys?