How to save screenshots on Mac to your desired folder
Macs save screenshots to the desktop by default, making your workspace cluttered. But you can change that. Try customizing the screenshot storage folder below to keep your computer tidy and optimize your work..
Screenshots on a Mac help you quickly save information, but having them scattered all over your desktop can be annoying. You can easily customize the storage folder with just a few simple steps.
How to change the save location of screenshots on a Mac
1. On macOS Mojave
Step 1: Press Command + Shift + 5.
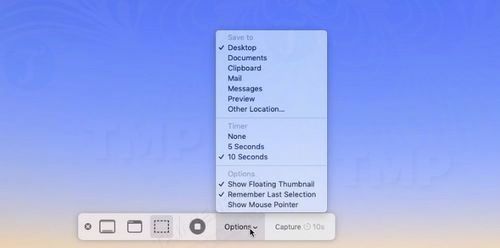
Step 2: Next, click Options.
Step 3: Select a folder from the list or choose Other Location.
Step 4: If you choose Other Location, you can navigate to any folder you want to use to store screenshots, or create a new folder.
Step 5: After changing the storage location, all images will now be stored in the location/folder you selected.
You can choose to save it to your desktop, Documents folder, Clipboard, Mail, Messages, or Preview.
2. On older versions of macOS
Step 1: Click on Finder to open the Finder window.
Step 2: Create a new folder in Finder by right-clicking on the Finder window and naming it Screenshots or any name you like.
Step 3 : Next, open Terminal by pressing Command + Space, then type Terminal into the search box, and click the icon to open the application.
Step 4 : In the Terminal window, enter the following command:
defaults write com.apple.screencapture location
(Note that there must be a space after "location" otherwise the command will not work).
Step 5: Now drag and drop your Photos folder onto the top corner of the Terminal window; it will automatically be added to the folder path.
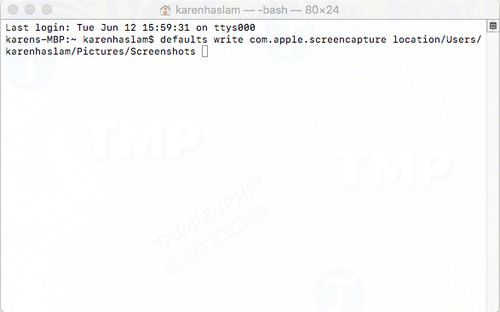
Step 6 : Press Enter.
Step 7: Enter the following command to apply the changes:
killall SystemUIServer
Step 8: A warning will appear on the screen stating that you should not delete the folder you created.
Step 9: If you still want to access the photos on your desktop, you can create an alias. Simply find the folder you created in Finder, right-click on it.
Step 10: Select Create Alias.
Step 11: Next, drag and drop the Alias folder onto your desktop.
Step 12: Try taking a few screenshots to check if it works.
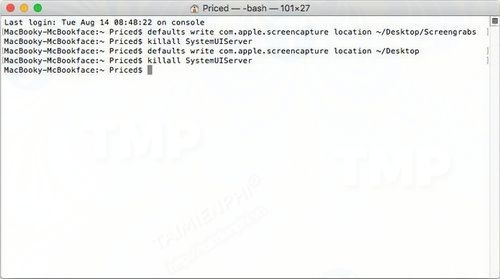
To revert to the default screenshot save location, simply reopen the Terminal window, enter the following command, and press Enter:
defaults write com.apple.screencapture location -/Desktop
Next, enter the following command and press Enter again to complete the process:
killall SystemUIServer
3. How to save images on Pasteboard
The Print Screen function on Windows computers works slightly differently than on Macs.
Instead of saving screenshots directly to the desktop, Windows screenshots are saved to the pasteboard. Users then simply open any application or image editor, such as Photoshop or Paint, and paste the image there.
On a Mac, you can also do this by using the keyboard shortcut Command + Shift + 4 to open the decimal point icon, then press and hold the Ctrl key while dragging the mouse cursor over the area you want to capture as a screenshot.
The screenshots will be copied and saved as paste; in other words, you can paste these images into applications or image editors like Photoshop, etc.
On macOS Mojave, follow these steps:
Step 1 : Press Command + Shift + 4 to open the crosshair icon.
Step 2 : Press and hold the Ctrl key, and drag the crosshair icon to the area of the screen where you want to capture the image.
Step 3 : The image will be saved to the pasteboard.
Above, Free Downloads has guided you on how to change the screenshot storage location on your Mac. Additionally, if you don't know how, you can refer to the article on how to take screenshots on a Macbook on TipsMake for more information.