Photo editing on Mac: A complete guide for all your needs.
Need to edit photos on your MacBook but don't know which tool to use? macOS offers many built-in features, from simple ones like cropping and rotating images to advanced customizations..
Whether you need a quick photo edit or are working in-depth with images, MacBooks offer many effective editing tools. Below is a detailed guide to help you easily optimize your images.
Instructions on how to do it
Prepare
- Update your Mac to ensure you're using the latest version of macOS.
- Make sure all the photos you want to edit are available, and enable iCloud Photo Library on your Mac and other devices.
To open an image in Edit view, double-click any image you want to edit in the library, then click Edit on the toolbar. Alternatively, select the image, then press the Return key to open it in Edit view. Click the tab in the middle of the toolbar to select the editing tools: Adjust , Filters , and Crop .
Additionally, the toolbar also includes photo editing extensions and buttons for quickly rotating or fine-tuning images.
During the editing process, you can also use the slider on the left of the toolbar to zoom in on the image. After you've finished editing the image, click Done .
Adjust tool
Use the Adjust tool to adjust the brightness, color, sharpness, etc., of the image. Use the sliders or the Auto button to fine-tune or delve into other editing details.
Click the triangle icon next to the Adjust tool names to display the editing options. Some tools allow for more detailed editing. Click the triangle icon next to Options to see what the tool offers.
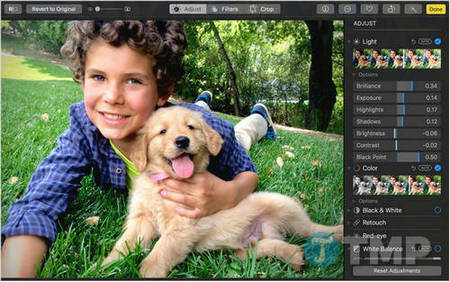
Additionally, you can toggle each tool for adjusting brightness, color, and image sharpness on or off by clicking the blue circle icon next to each tool when expanding or hovering over them.
If you want to apply image adjustments you've made from one image to another, simply copy and paste them. Open the image containing the settings and adjustments you want to copy, then click Edit => Image => Copy Adjustments .
Next, open the image you want to apply the copied adjustments to, click Edit => Image > Paste Adjustments .
Filters tool
The 9 filters in Photos emulate 3 classic photography styles: vivid, dramatic, and black and white, and are optimized to highlight natural color tones.
Choose Vivid, Vivid Warm, or Vivid Cool to enhance image vibrancy. Select Dramatic, Dramatic Warm, or Dramatic Cool to increase contrast, or Mono, Silvertone, or Noir for classic black and white.
Crop Tool
Edit, straighten, or remove the parts of the image that you want.
Drag the edges or corners of the rectangle to crop the parts of the image you want; the cropped image will then be displayed on the screen. Use the image angles in the right corner to rotate the image to the correct 90-degree angle and straighten it.
When you move the image angle, a line will appear on the image to help you align it.
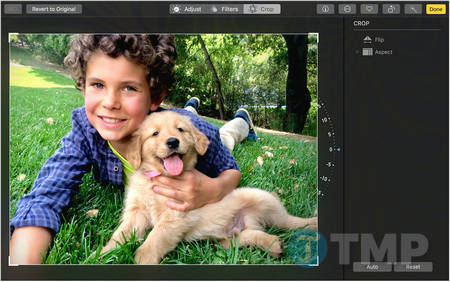
- Aspect ratio: Choose a square aspect ratio, a 5:7 ratio, or leave it as is without any changes.
- Flip : Rotate your image horizontally or click the option to flip it vertically.
Alternatively, simply click the Auto button to automatically crop and straighten the image, or click Reset to undo the action and restore the image to its original size.
Edit photos using third-party apps.
You can use third-party apps in your Photos library, such as Photoshop and Pixelmator. Simply select the photo, then choose Image = > Edit With and select the app you want.
After you've finished editing, use the keyboard shortcut Command + S to save the image. Any edits you make and save in Photos are non-destructive changes, so you can revert the image to its original state.
Other photo editing tools
Extensions: Third-party extensions expand the photo editing options in Photos. You can apply edits from multiple extensions to a single photo, or combine extensions with the built-in editing tools in Photos, or use online websites that work on Macs. With online photo editing services , you don't need to install anything on your device.
Additionally, you can use the Markup tool in the Extensions menu to add drawings, shapes, and text to your images.
- Rotate : Rotate your image 90 degrees counterclockwise. To rotate it in a different direction, press and hold the Options button.
- Enhance : Improve your photos with just one click. Automatically adjust image color, brightness, and contrast.
The Photos app on macOS allows for quick photo editing, from cropping and rotating images to enhancing colors. If you need more advanced features, you can try Pixelmator Pro or Affinity Photo to optimize your images to your liking.