How to resize images with PowerToys in File Explorer
If you're looking for a faster way to resize images, consider PowerToys for Windows 10 with Resize pictures..
On Windows 10, you can use multiple apps to resize images, but all of these tools require a lot of steps, and if you have to resize multiple images, you have to repeat them. operation for each file.
If you're looking for a faster way to resize images, consider PowerToys for Windows 10 with Resize pictures, making it easy for people to resize images in File Explorer. Must open the file.
In this tutorial, readers will learn the steps to using PowerToys images to resize one or more images on Windows 10.
The process of resizing images is very simple, but you need to install PowerToys before the option is available in the File Explorer context menu.
To install PowerToys for Windows 10, follow the steps in the article: How to use PowerToys on Windows 10.
How to resize images with PowerToys in File Explorer
To batch resize photos on Windows 10, follow these steps:
1. Open File Explorer.
2. Browse to the directory with the image you want to resize.
3. Select one or more images to resize.
Quick tip : Click the Select all buttonfrom the Home tab . Use theCtrl+shortcutAor press and hold the keyCtrland click the file you want to select.
4. Right-click the selection and select the Resize pictures option .
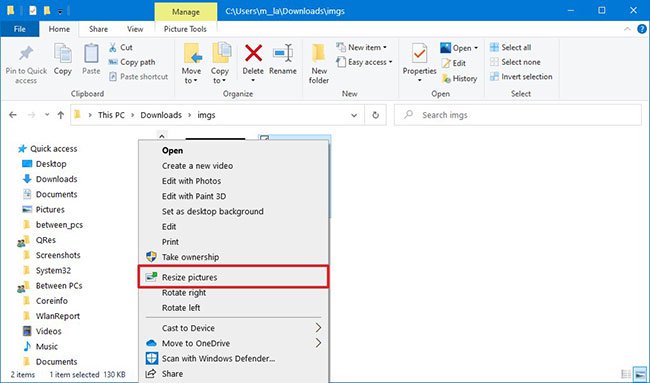 Select the Resize pictures option
5. Choose a new size.
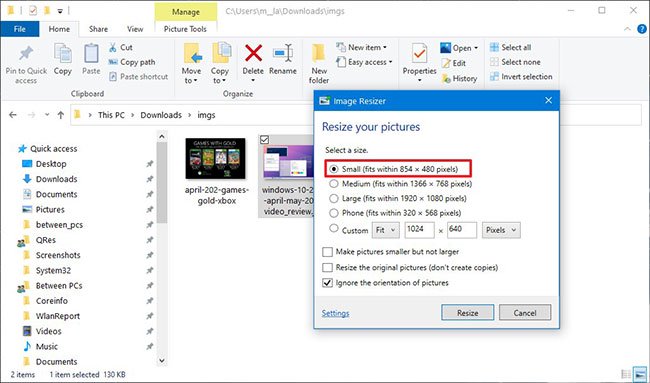 Choose a new size
6. (Optional) Select the Custom option .
7. Specify the settings you want to use, including Fit, Fill or Stretch , and the number of pixels for width and height.
8. (Optional) Check the Make pictures option smaller but not larger . This is a good option, if you select multiple images of different sizes and want to make sure that all images are of a certain size.
9. (Optional) Check the Resize the original pictures option . PowerToys will create a copy of the new size image. If you are sure of the new size, you can skip making copies of files.
10. (Optional) Check the Ignore the orientation of pictures option .
After completing the steps, the files you have selected will change to the names you specify.
Custom settings
The Resize Pictures feature also allows you to customize many settings, including default size, encoding settings and output file name.
To customize the Resize Pictures feature in PowerToys, follow these steps:
1. Open File Explorer.
2. Browse to the directory with the image you want to resize.
3. Select one or more images to resize.
4. Right-click the selection and select the Resize pictures option .
5. Click the Settings option in the lower left corner.
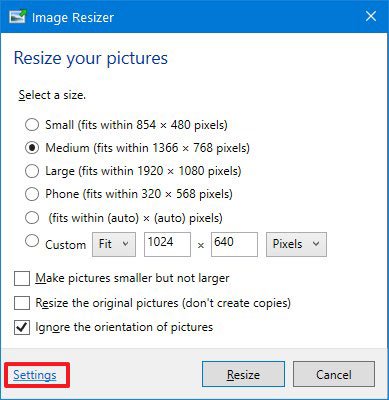 Click the Settings option in the lower left corner
6. Click the Sizes tab .
7. Define width and height for each image size.
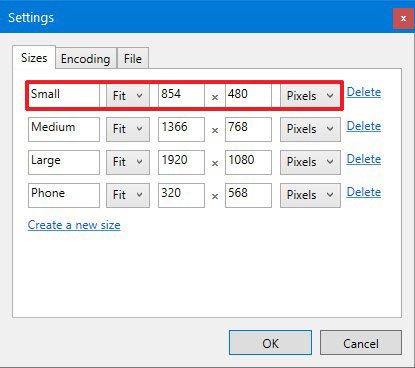 Specify width and height for each image size
8. (Optional) Click Create a new size if you want to add another size.
9. (Optional) Click the Delete option to delete the image size.
10. Click the Encoding tab .
11. Use the Fallback encoder drop-down menu to specify one of the available encoders, bmp, jpeg, png, etc.
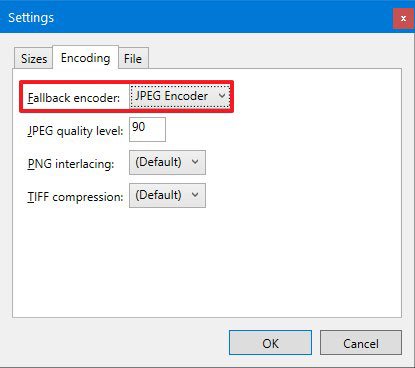 Use the Fallback encoder drop-down menu to specify one of the available encoders
12. Select the quality level for jpeg images.
13. Select to use interlacing technique (draw one frame twice, each time from top to bottom and left to right. The first draw odd lines (1, 3, 5, etc.) and the second draw even lines (2, 4, 6, etc.) to complete a frame) for png files are not.
14. Choose whether or not to compress tiff files.
15. Click the File tab .
16. Use the built-in parameters to compose the file name structure for the image you resize.
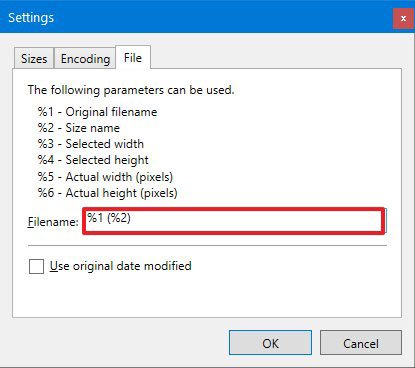 Use the built-in parameters to compose the file name structure for the image you resize
17. Click the OK button .
After you complete the steps, new configurations will be available the next time you resize the image.