Table of Contents
This practical guide walks through how to resize images in paint 3D application on Windows 10, explains the main requirements, and highlights common issues that may appear along the way.
One of the common things most people do with Paint is resize an image. For example, if the image is too large or too small, you can use the built-in application to resize it as needed.
In the old Paint app, simply add an image to the Paint app and click the Resize button . Paint 3D is nothing else. But since the user interface of modern apps is a bit different, resizing images in Paint 3D can be confusing.
So in this quick and simple tutorial, let Make Tech show you the steps to resize an image using Paint 3D in Windows 10.
Steps to resize images in Paint 3D
To resize an image or an image in Paint 3D, follow the steps listed below.
Step 1. First, open Paint 3D application . You can open it in the Start menu.
Step 2. Click the 'Open' button in Paint 3D application.
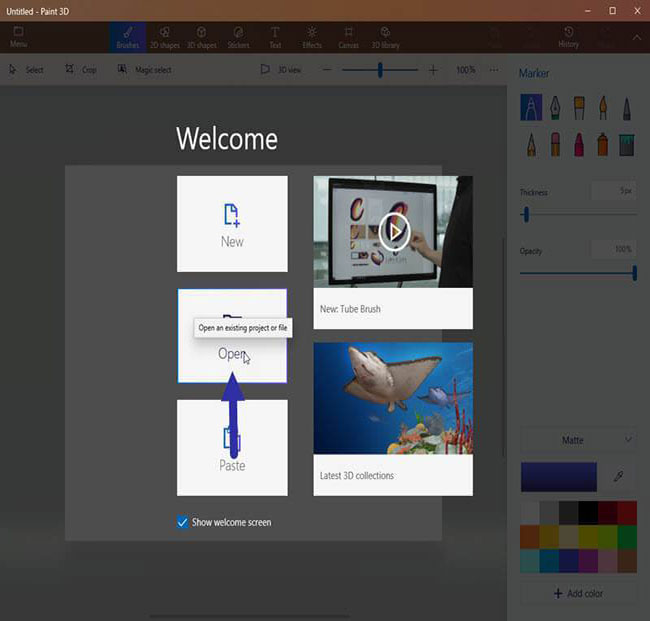
Step 3. Click the "Browse" button .
Step 4. Now, find the image to resize and click Open.

Step 5. The image will open in Paint 3D application.
Step 6. Next, click the "Canvas" option on the top bar.
Step 7. On the right sidebar, select the checkbox "Lock Aspect Ratio" in the Resize Canvas section .
Step 8. Select the checkbox "Resize image with canvas" .
Step 9. Next, choose "Pixels" from the drop-down menu.
10. Now, set the width or height as per your requirement.

Step 11. When you are satisfied with the new image size, click the "Menu" button in the top left corner.
Step 12. Select the option "Save as" on the sidebar to save the resized image as a new image.
Step 13. Since you want to save the file as an image, please click the "Image" button .
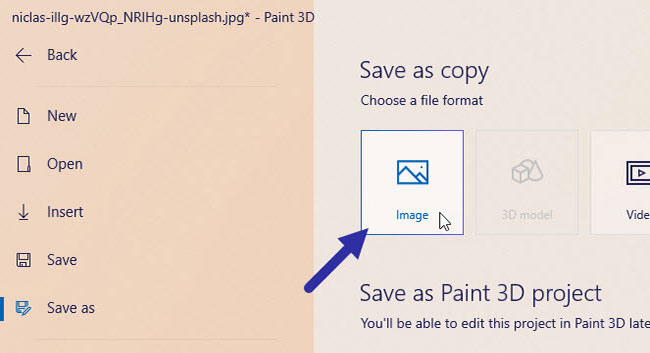
Step 14. Choose a destination, give the file a name and click the "Save" button .
Step 15. Finally, close Paint 3D application. When prompted, click the "Don't Save" button. That way, you won't modify the original image.
It's easy to resize an image using Paint 3D in Windows 10. You will find the resized image in the save location of your choice in step 14.
Key Takeaways
Use the information above as a practical reference for how to resize images in paint 3D application on Windows 10. Review each step carefully, confirm any requirements, and choose the option that best fits your situation.
FAQ
What does this guide explain about Resize Images in Paint 3D Application on Windows 10?
It explains the main concepts, practical considerations, and useful steps related to resize images in paint 3D application on Windows 10 without requiring advanced knowledge.
Who can benefit from learning about Resize Images in Paint 3D Application on Windows 10?
This information is useful for readers who want a clear overview, practical guidance, and reliable steps related to resize images in paint 3D application on Windows 10.
What should I check before applying this information?
Review the requirements, confirm that your device, software, or situation matches the instructions, and back up important data before making major changes.
Related Articles
 Paint on Windows 11 Has New Improvements, Starting to Roll3 minutes read
 Replace the Paint 3D Application with Paint Classic on Windows 103 minutes read
 How to Resize Images Properly in Photoshop9 minutes read
 How to Create a 3x4 Photo in Paint: Step-by-Step Guide3 minutes read
 Uninstall or Reinstall the Paint 3D Application on Windows 103 minutes read
 How to Use Paint 3D to Edit Images7 minutes read
Reader Comments 0
Sign in with email or Google to join the discussion.