How to Reduce DPI
Lowering the system dots per inch (DPI) settings on your computer can reduce the size of the text on your desktop and within the various folder windows. This can be helpful when attempting to free space on the desktop, or view more files....
Method 1 of 3:
Reduce the DPI settings in Windows in Windows 7
-
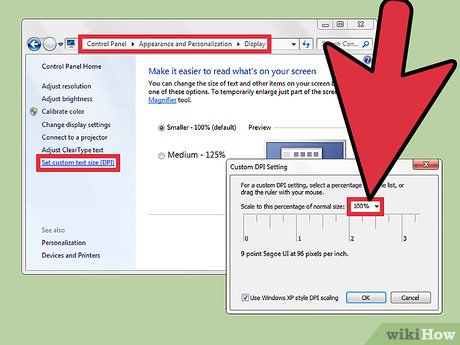 Lower the system DPI settings in Windows 7. Open the control panel from the start menu and select "Appearance and Personalization." Click on "Adjust screen resolution" and select "Set custom text size (DPI)."
- Click on the arrow next to the box labeled "Scale to this percentage of normal size" and select an option from the pull-down menu that is smaller in value than the current setting displayed. Click "OK" to confirm the changes made. The system DPI settings have been lowered.
Method 2 of 3:
Reduce the DPI settings in Windows Vista
-
 Lower the system DPI settings in Vista. Right Click on the desktop and select "Personalize" from the pull-down menu. In the Personalization window, select the "Adjust font size (DPI)" option from the pane on the far left side.
- Select the "Default scale (96 DPI)" option in the DPI scaling dialog box to reduce your screens DPI to the default scale. Take note of the prompt in the lower left-hand corner of the dialog box informing you that no changes will take place until the computer is restarted.
-
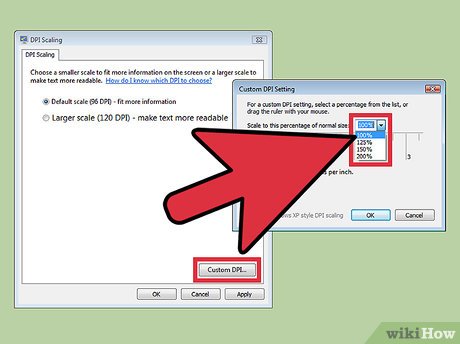 Use the "Custom DPI" button to reduce DPI settings. In the "Custom DPI Setting" dialog box, take note of the setting that appears in the box labeled "Scale to this percentage of normal size." Click on the arrow next to the box and select an option from the pull-down menu that is smaller in value than the current setting displayed and click "OK."
 -
 Restart your computer. You must restart your computer for the desired changes to take effect.
Method 3 of 3:
Reduce the DPI settings in Windows XP
-
 Lower the DPI settings in Windows XP. Access the control panel from the Start menu. In the "Classic" control panel view, double-click the "Display" icon in the control panel folder. In the default view, click on "Appearances and Themes" and select "Display."
- Select the "Settings" tab in the upper right corner of the Display Properties dialog box. Click on the "Advanced" button in the lower right corner of the dialog box. Of the 2 options available in the "DPI Setting" pull-down menu, only the "Normal size (96 DPI)" setting can reduce your system's DPI. If your system is already set at 96 DPI, you will not be able to reduce the DPI any further.
-
 Restart your computer. You must restart your computer for the desired changes to take effect. Your font sizes will appear smaller upon reboot.