Tips to reduce the size of PowerPoint files should be known
PowerPoint presentations often contain multiple photos, gif images, embedded videos, charts, graphs and other content, so it is not surprising that PowerPoint files are often large.
Large files often take up a lot of storage space, slowing down playback performance, can't be emailed beyond the allowed size limit.
- How to send an email that exceeds the size limit?
Here are some tips to help you reduce the size of PowerPoint files.
Tips to reduce PowerPoint file size
- 1. Convert the presentation to PPTX format
- 2. Insert images into the presentation instead of copying and pasting them
- 3. Edit the image before inserting it into the presentation
- 4. Compress all photos in the presentation
- 5. Stop embedding the font in the presentation
- 6. Link to other files instead of embedding them
- 7. Do not save the presentation thumbnail
- 8. Delete personal information and hide them from the presentation
- 9. Turn off AutoRecover
- 10. Copy everything into a new presentation
- 11. Unzip and compress the presentation
1. Convert the presentation to PPTX format
Microsoft has released the PPTX format in Office 2007. However, many people still use the PPT format. The PPTX version compresses all the content in the presentation, so if you have a PPT file and convert it to a PPTX file, you will see the file size decrease.
Converting files from PPT to PPTX is simple, just press the button and select the converted file. First open your PPT file, go to the File tab, then click Convert .

On the Windows File Explorer window, you will see the Save As type field , select PowerPoint Presentation , this is the PPTX file format, then click Save .

Now your PPT file will be converted into a PPTX file. As you can see, the size of the file has been reduced.

HTG Presentation 2 is PPT and HTG Presentation 3 file is PPTX file. Only convert file types, you have reduced 335 KB.
2. Insert images into the presentation instead of copying and pasting them
Users find it convenient to copy and paste images into PowerPoint rather than using the Insert function. This will not be a problem if you are not interested in the file size. When copying and pasting images, it can be reformatted into images to BMP or PNG. Both formats are larger than JPG.
- What is the difference between JPG, JPEG, GIF, PNG and SVG image formats?

You can see in the image above, the PNG file is 153KB in size when compared to JPG file with only 120KB. Every time you copy and paste a JPG file in PowerPoint, it will convert to PNG, so you have added unnecessary file size to the presentation. Using the Insert feature ensures your images are properly inserted.
3. Edit the image before inserting it into the presentation
When inserting photos into PowerPoint, you should make sure they don't need to be edited. If so, edit them with photo editing software before inserting.
When using PowerPoint to edit photos, it will store all the edits in the presentation. For example, when you change the image to black and white, PowerPoint will retain the image with that color.
If you don't have a photo editing application or PowerPoint, you should make sure PowerPoint removes all the redundant data that's not saved in the presentation. However, this does not save as much space as using a professional photo editor.
4. Compress all photos in the presentation
You can compress photos in PowerPoint at the same time. To compress the image, open the presentation, visit the File tab and then select Save As in the left pane.

Next, select More Options below the file name and file type.

On the Save As window that appears, click Tools next to the Save button.

Select Compress Pictures in the drop-down menu that appears.

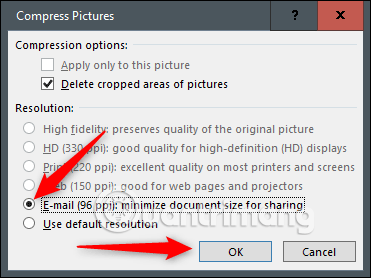
On the Compress Pictures window that appears, select the type of image resolution (based on PPI). You cannot select the Apply only to this picture option in the Compression Options group because, because of the way we access this tool, this option is disabled.
Note: If you want to compress a single image, select it, then go to P icture Tools Format> Compress Pictures .
When done, click OK .

Then remember to save the presentation again.
5. Stop embedding the font in the presentation
Users need to embed fonts because they want to create a special presentation like creating a Star Wars themed presentation that PowerPoint's default font is not available. The embedded font in the presentation does not cause any problems but it will increase the file size.
In general, unless you need to display a special font, you should turn off the option to embed the font.
Visit the File tab and select Options at the bottom of the left pane.

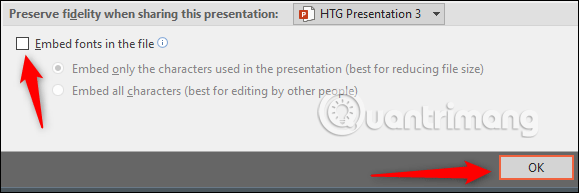
On the Save tab, uncheck Embed fonts in the file and then click OK.

Below is an example of the same presentation with embedded font, no embedded font and only the font in the embedded presentation. See the difference in file size:

6. Link to other files instead of embedding them
Consider the difference in file size if you embed the entire video into the presentation instead of linking to the video. Full video embedding will significantly increase the size of the presentation. Many people use this method because it is convenient for recipients when they do not need an Internet connection to play the video, but if the size is the issue you care about, it should not be done this way.
7. Do not save the presentation thumbnail
Office allows users to save the thumbnail of the presentation so that it can preview the file when searching for files in File Explorer. Windows has become more sophisticated, so it no longer needs the help of Office applications to do this. But, options are still available.
Here is the test showing the difference in file size when turned on and off this option.

When you enable the save thumbnail option, you will see the file size is 2,660 KB and when you do not enable this option, the file size decreases to 2,662 KB, 7 KB reduction.
To disable this feature, open the presentation, go to the File tab, and then select Properties on the right and select Advanced Properties .

You should now see the Summary tab of the Properties window. At the bottom of the window, uncheck Save preview picture , then click OK .

8. Delete personal information and hide them from the presentation
Microsoft Office will store your personal information (such as the author's name) and hidden attributes in the presentation. Removing this information can save you a bit of space.
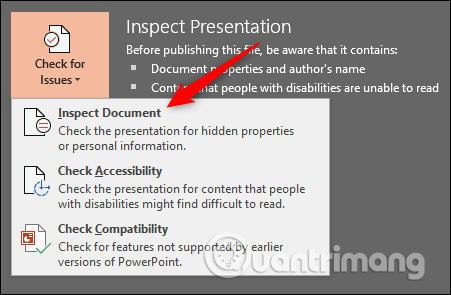
Open the presentation, go to the File tab, select the Check for Issues option, then select Inspect Document .

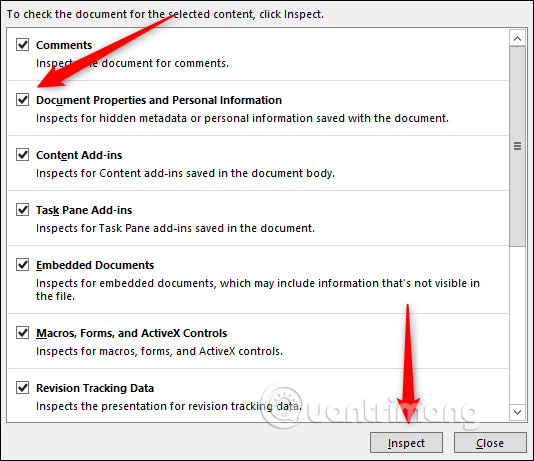
The Document Inspector window appears, select Document Properties and Personal Information and then click Inspect .

In the next window, select Remove All to delete the information, saving you a few KB of space.
9. Turn off AutoRecover
Note : You should only do this if you really need it.
AutoRecover is an essential tool for Office to back up documents regularly and provide a restore copy in case of a power failure, sudden shutdown or unexpected backup.
- Recovering unsaved Word files, retrieving Word, Excel and PowerPoint files before saving
Every time Office uses AutoRecover, it adds a bit of size to the file. To turn off AutoRecover, go to the File tab and select Options at the bottom of the left pane.
On the Save tab of the Options window, uncheck Save AutoRecover information ever xx minutes .

If you save and exit the presentation right away, you won't notice the difference. However, over time, as you continue to work on that presentation, the AutoRecover feature will add a few KB to your file.
10. Copy everything into a new presentation
While you are creating your presentation, PowerPoint saves different things in the background to help you solve it. However these are information you don't need, so copying content to a new presentation can be a good solution to this problem.
Although this is a bit confusing because you need to copy and paste each slide page to a new presentation, the new version will not save any background information, AutoRecover information or previous version of the file. You will see a change in file size.
11. Unzip and compress the presentation
As mentioned earlier, the PPTX file is a compressed file (that's why it's smaller than the old PPT file). This means you can open it with tools like 7-Zip or WinRar, extract all files from PPTX, add them to the archive, and then rename the file to PPTX extension.
However, this method when used with Word files corrupted the file and on PowerPoint it only reduced the amount of space. So if you do this, you should back up a copy first in case of a problem.
Above are all tips for reducing the size of PowerPoint presentations. Hope the article is useful to you.