Table of Contents
This updated guide examines How to Make Pictures Using Keyboard Keys and organizes the essential facts, background, and practical takeaways in clear American English.
Method 1of 2:
Creating Keyboard Art
 Open a text editor. When creating keyboard art, you'll typically use a plaintext editor, such as Notepad (Windows) or TextEdit (Mac), instead of a more complex editor like Microsoft Word or Pages:
- Windows — Open Start
 , type innotepad, and click Notepad at the top of the Start window.
 - Mac — Open Spotlight
 , type intextedit, and double-click TextEdit at the top of the search results.
- Windows — Open Start
 Determine what you want to make a picture of. Before you start typing random letters and symbols into your text editor, consider the subject you want to create.
- Even just knowing the outline shape of the subject should be enough to get you started.
- Having a rough sketch of your subject may help you envision better the shapes you'll need to use.
 Start from the top of your subject. It may be tempting to attempt to create the outline for your shape and then fill it in, but creating keyboard art is much easier when you go line-by-line.
- For example, if you're creating a cat face, you'll want to start with the ears.
 Experiment with different keyboard combinations. Certain keys may look like obvious choices for your keyboard art, but using different keys, lowercase letters, and combinations of symbols may achieve better results.
- For a cat's ears, for example, your first instinct might be to use the carrot ( ^ ) key for the ears; however, using a slash ( / ) next to a back slash () will create a larger, more "ear-like" shape ( / ).
 Adjust each line's spacing as needed. As your keyboard art begins to take shape, you may need to go back and change a line's spacing to fit a lower layer.
- For example, you may have to move an entire line forward or backward. You might also need to add an extra space between two characters to extend the line.
 Don't feel limited by symmetry. As with any art, your keyboard image's perspective will determine whether or not the image should be symmetrical; often, one side of the image will have more spaces or characters than the other.
 Consider using your computer's special symbols. Keyboard keys contain a wide variety of symbols and variations, but you may want to use advanced symbols (e.g., the degree symbol) for an extra layer of detail. Both Windows and Mac computers have dedicated symbol menus:
- Windows — Character Map. You can open Character Map by typingcharacter mapinto the Start window and then clicking Character Map at the top of the window.
- Mac — Emoji & Symbols. You can open this menu by ensuring that your mouse cursor is in TextEdit, clicking Edit at the top of the screen, and clicking Emoji & Symbols in the drop-down menu.
Method 2of 2:
Creating Common Shapes
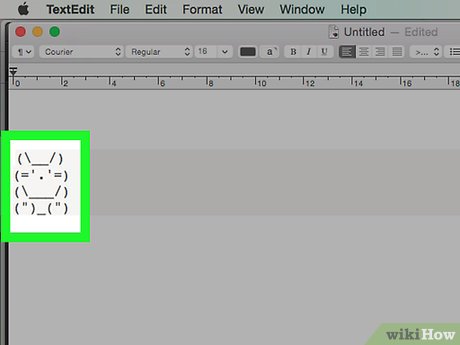 Make a bunny. You can create a bunny using basic keyboard symbols:
(__/) (='.'=) (___/) (")_(") Create an owl. Unlike bunny keyboard art, an owl is defined by straighter lines, so you'll use brackets ([ ]) and the "pipe" keys here:
,_, [0,0] |)__) -'-'-
 Design a cat. The cat keyboard art template is similar to a bunny:
/_/ (>'.'<) (U U) (")__(") Make a fish. You'll need to find the degree symbol on your computer to create this keyboard art:
}<((((°>
Sample ASCII Images
 ASCII Art Pictures
FAQ
What is How to Make Pictures Using Keyboard Keys about?
It provides a structured overview of keyboard, explains the main context, and highlights practical takeaways for readers.
Why does this topic matter?
Understanding the main concepts helps readers evaluate the issue, avoid common mistakes, and make better-informed decisions.
How should readers use this information?
Use the guidance as a practical starting point, confirm details that may have changed, and follow current product, safety, or security recommendations.
Related Articles
 Why Aren't the Keys on the Keyboard Aligned: Key Reasons Explained9 minutes read
 How to Add Number Keys to the Windows 10 Keyboard5 minutes read
 Useful Keyboard Shortcuts in Microsoft Word (Part 3)4 minutes read
 Website Test Keyboard Computer Keyboard Online, Free6 minutes read
 How to Fix Some Keys on the Keyboard Not Working9 minutes read
 Why Do the F and J Keys on the Computer Keyboard Have Horizontal4 minutes read
Reader Comments 0
Sign in with email or Google to join the discussion.