Table of Contents
This updated guide examines Click: How to Draw a Wheelchair Shower Ramp in Siemens Nx and organizes the essential facts, background, and practical takeaways in clear American English.
Part 1of 6:
Preparing to Draw
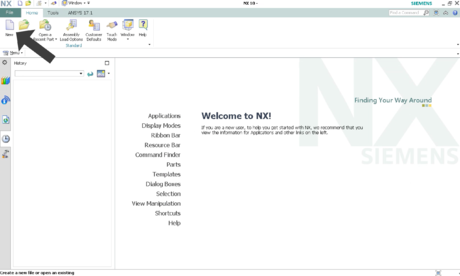 Drag your cursor to the upper left-hand corner. Assuming that NX is opened on your computer or laptop, click the button on the top left that says, "New". Once clicked, a new page will appear, named "New", that has eight headings on it.
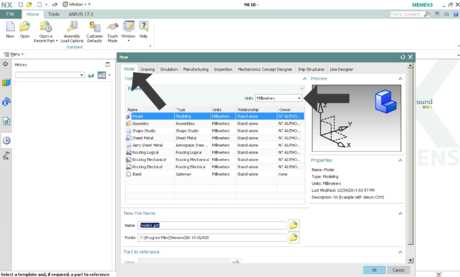 Click on the heading "Model". Under the "Model" button, click on a drop-down box called "Units". For this drawing, you'll want your units to be in inches so click on the option called "Inches".
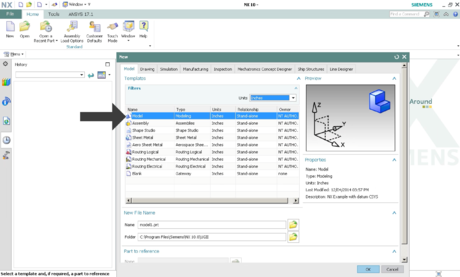 Choose your category. After clicking on it, "Inches" will be highlighted in blue signifying that you chose that option. Once this occurs, look under that box and you will see five categories and read from left to right they are called "Name", "Type", "Units", "Relationship", "Owner". Under the "Name" category, click on "Model".
 Save your model. After clicking on "Model", look below and you will see a heading called "New File Name", where you can name your drawing whatever you would like. Once named, click "Ok".
 Learn to move the object. When drafting an object in NX you will need to know how to zoom in and out, center an object, and rotate an object.
- To zoom in and out, use the wheel on the mouse or if you are using the pad on a laptop, use two fingers and move up to zoom out and move down to zoom in.
- To rotate an object, click the rotate button and then click and hold down on the object and move your mouse around to rotate the object in the position you like.
- To center an object, click on the pan button and click and hold down on the object and move your mouse around to center the object in the position you want.
- To view the object in a particular view along the x, y, and z-axis, click on the trimetric button and select one of the views to orient the object.
Part 2of 6:
Creating a Rectangle
 Locate the "Sketch" button in the upper left-hand corner and click on it. Once clicked on, a menu box will appear and x, y, and z axis will appear in the center of the modeling area. Select the x and y axis and click "Ok". Now you can begin modeling in sketch mode.
 Begin the sketch. In the upper portion of the screen, all the tools NX provides to model and create are located. In the upper left is a box called "Direct Sketch" and inside of it click on rectangle. Next, move your cursor to the center point of the x and y axis and click on it. Drag your cursor outwards and make a rectangle with a height of about 2 and width of about 3. Then left click the mouse.
 Determine the dimensions. To create dimension of the rectangle, click on the lightning bolt right above "Rapid Dimension". Move your cursor to the base of the rectangle, it should be highlighted as a red line, and click on it. Once clicked, a dimension will appear, move your cursor down, left click and type in 43.75 and hit enter.
 Click on the left vertical line to type in the height of the rectangle. Once you have selected the line type in 35 for the height. Click "Finish Sketch"
 Complete the rectangle. Now that you are out of sketch mode click on the button above extrude. Select a line on the rectangle, type in 3.5 to extrude the rectangle outward, hit enter, and select "Ok" on the left side of the screen.
Part 3of 6:
Creating Incline
 Click on "Sketch". Select the right side of the rectangle that is 35 inches wide and click on "Ok". If a menu appears when you select the right side, click on the first highlighted option that is presented.
 Position the object into the center of the screen. This will help you to get a better view of the object. Click on the button that has a hand. Now move the cursor onto the object, left click and hold it down to center the object into the modeling area. Let go once it is centered and click the hand button again to get back to the normal cursor.
 Select the line button. Click on the lower left-hand corner of the rectangle. Extend the line to the upper right-hand corner and click on that corner. If a little menu appears, just select the highlighted option presented to you.
 Continue to use the line tool. Form lines on the left and top edges to form a triangle on the rectangle. Next click on "Finish Sketch".
 Click on the button above extrude. The triangle should be highlighted in orange. If not, click on the triangle you made so it can highlighted. Now type in -45 and then under the word "Boolean" in the menu on the left, click the drop-down arrow, select "Subtract", and then hit "Ok".
Part 4of 6:
Creating Guide Supports
 Click on "Sketch". Select the top, incline part, of the ramp and hit "Ok" to begin the sketch.
 Select the rectangle button. Draw a rectangle on the objects top surface. Give it dimensions of a width 32 and height 1.
 Repeat the same process again from step 2 right below the first rectangle created.
 Position the objects. Set these rectangles in their correct positions on the incline. Click on the lightning bolt button above rapid dimension and select the one-inch edge of the rectangle and the edge of the ramp and give it a dimension of 1.5.
 Repeat the above step on the other rectangle.
 Input dimension. From the inner edge of one rectangle to the other, give that a dimension of 25.
 Complete the sketch. Select the outer edge of the top rectangle and the top edge of the surface and dimension that as 8.375 and then click "Finish Sketch".
 Click the button above extrude. Select the two rectangles. Type in 0.5 and select "Unite" in the drop-down menu in "Boolean" and hit "Ok".
 Hit the button "Edge Blend". Select the top two edges with lengths of 32 inches on each rectangle that you created, type in 0.5, and "Ok".
 Select "Face blend". This is located in the drop-down menu for "Edge Blend". Click the bottom right edge of one rectangle. Type in 0.25 and hit "Apply".
 Select the bottom right edge of the second rectangle and hit "Ok".
 Click the "Edge Blend" button. Select the ends of both rectangles to blend and type in 0.5 and hit "Ok".
 Reshape the triangle. Due to our support guides being taller than the top of the ramp, we need to trim part of the rectangle. Click on "Sketch", select the right side of the ramp, and hit "Ok".
 Zoom in. This way, you can see the excess support guides. Draw a box from the top edge so that it covers the excess support by using the rectangle button. The box width is 6.95 and the height is 0.85. Then click on "Finish Sketch".
 Hit the extrude button. Next, type in -45, hit "Subtract" in the drop-down menu and hit "Ok".
Part 5of 6:
Creating Side Handles
 Click the "Sketch" button. Click on the right side of the ramp. If a menu appears, select the highlighted option presented.
 Select the line tool. Starting from any position below the center of the back edge of the ramp, left click, drag the cursor to the left in a straight line, type in 40, hit enter, and left click again.
 Click the dimension button. Select the line we created, then select the bottom edge of the ramp, left click, type in 0.25, and hit enter.
 Click on the rectangle button. Next click anywhere along the line that was made. Move your cursor up and to the right and left click when the width is about 3.
 Click on the dimension tool. Select the top line of the box, move the cursor up above it, left click, type in 4, and hit enter.
 Select the top edge of the box. After doing this, select the bottom edge of the ramp second. Move the cursor to the right, left click, type in 1.25 and hit enter.
 Continue using the dimension tool. Select the right edge of the box and the back edge of the ramp. Left click, type in 6.5 and hit enter.
 Click on the line tool. Start from the point of the line on the back edge of the ramp. Next, follow the pattern of the triangle to create a new triangle.
 Trim any extra line segments. Click the eraser button in the "Direct Sketch" box and click on the bottom line twice on the rectangle in the triangle.
 Continue to use this tool. click on on the end of the line on the left that was 40 inches and if there are any extra lines on the triangle click that to trim it. Then, click on "Finish Sketch"
 Click on "Extrude". Select the triangle that was just made, type in -0.5, select "Subtract" in the drop-down menu under "Boolean", and click "Ok".
 Click the "Sketch" button. Select the extended out piece on the right side of the ramp and click "Ok".
 Zoom in on the box on the side of the ramp. Click on the rectangle button and create a rectangle that fits in the box but extends below the bottom edge of the ramp.
 Click on the lightning bolt above "Rapid Dimension". Select the left edge of the new rectangle and left edge of the already made rectangle. Type in 0.3 and hit enter. Select the top edges and right edges and give those dimensions of 0.3. Finally, click on "Finish Sketch".
 Hit the Extrude button. Select one of the lines of the created rectangle. Type in -3, select "Subtract" in the drop-down menu, and hit "Ok".
 Create the handle. Perform steps 1 through 15 on the left side of the ramp to create the handle on the left side.
Part 6of 6:
Creating Lock In Lip
 Click "Sketch". Select the bottom of the ramp to begin a new sketch.
 Click rectangle button. Draw the rectangle on the thick side of the incline. The rectangle should be from one edge to the other edge of the ramp of a width of 0.25 and a height of 43.75.
 Use the dimension tool. From the back right edge of the ramp to the right edge of the rectangle, the dimension is 0.25. Then click on "Finish Sketch".
 Click "Extrude". Type in -3, click "Subtract", and hit "Ok".
 Click "Sketch". Next, click the bottom surface again.
 Use the rectangle. Create a rectangle around the area that is right of the eliminated portion in the last step. Click "Finish Sketch".
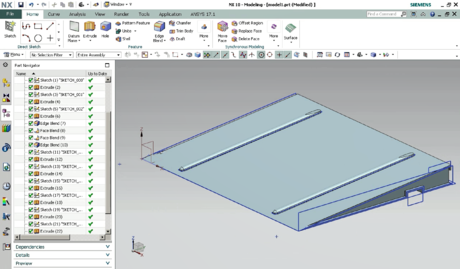
 Select the "Extrude" button. Extrude the created rectangle upward with a distance of -2.5, click "Subtract" to cut it off and hit "Ok".
FAQ
What is Click: How to Draw a Wheelchair Shower Ramp in Siemens Nx about?
It provides a structured overview of click, explains the main context, and highlights practical takeaways for readers.
Why does this topic matter?
Understanding the main concepts helps readers evaluate the issue, avoid common mistakes, and make better-informed decisions.
How should readers use this information?
Use the guidance as a practical starting point, confirm details that may have changed, and follow current product, safety, or security recommendations.
Related Articles
 How Often Should I Clean My Shower: Explained6 minutes read
 How to Choose a Medical Wheelchair for Older Adults and Patients9 minutes read
 Do Not Miss the Opportunity to Admire the Largest Meteor Shower3 minutes read
 Google Maps Introduces Wheelchair Routes3 minutes read
 Siemens Xelibri: Unique Fashion Phone Line and Big Failure in: Key Facts6 minutes read
 Vietnam Can Observe the Orionid Meteor Shower Tonight and Tomorrow5 minutes read
Reader Comments 0
Sign in with email or Google to join the discussion.