How to Lock a Computer
Locking your computer is a good way to protect your computer from unwanted users when stepping away for a moment. In order for a lock to be effective, you will have to make sure that your computer is configured to prompt for a password....
Method 1 of 2:
Windows
-
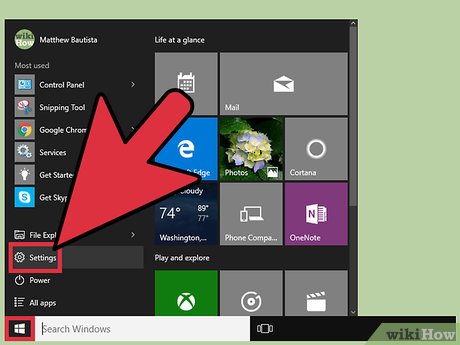 Open Windows Settings. Hit ⊞ Win and select 'Settings'.
- On older versions of Windows, open the Control Panel by hitting ⊞ Win and selecting 'Control Panel'. If you do not see it listed, enter 'Control Panel' into the search bar and select it from the results.
-
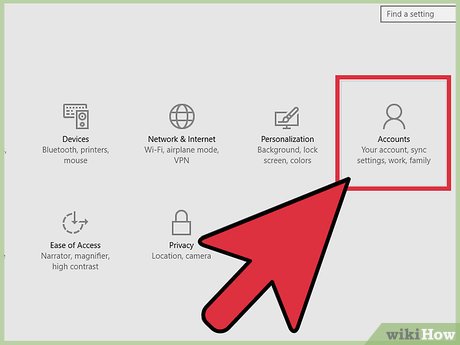 Click Accounts. This button is on the right of the Settings page and will open a list of Account options.
- On older versions of Windows, select 'User Accounts' from the Control Panel.
- Windows 10 and 8 require account passwords for their accounts when they are created. Users on older versions can go to 'Make Changes to Your User Account' and click 'Create a password' next to the account profile in use.
-
 Select 'Sign-in Options'. This is listed in the left sidebar and will take you to another options page.
 -
 Select 'When PC wakes up from sleep' from the 'Require Sign-in' dropdown. This is located at the top of the page.
 -
 Create a PIN (optional). Click 'Add' under the PIN header. After entering your account password, you can enter a PIN number twice (second time to confirm).
- PINs can only be numeric.
- PINs will be used in place of passwords when logging in or unlocking your computer.
-
 Hit ⊞ Win+L. This will lock your screen. You account's password/PIN will be required to unlock it.
- You can modify the time it takes for your display to automatically sleep (thus locking it) by going to 'Settings > System > Power and Sleep'. Select your desired time period from the dropdown menu under 'Screen'. Note that you will need to adjust this time limit for both 'plugged in' and 'on battery' states for laptops.
- The computer will also lock if your computer enters Sleep mode. The time to enter sleep can be modified at 'Settings > System > Power and Sleep' under the 'Sleep' header.
Method 2 of 2:
Mac
-
 Open 'System Preferences'. Open the 'Apple' menu in the upper left corner and select 'System Preferences'.
- You can also launch it from the launchpad or quick launch bar at the bottom of the screen.
- Users running a recent version of MacOS or OSX will have had to create a password when setting up their computer. Users running older versions can create a password by going to 'Accounts' in the 'System Preferences' and selecting 'Change Password' next to the user account.
-
 Click 'Security and Privacy'. This is located in the top row of options.
 -
 Select the 'General' tab. Tabs are listed along the top of the window.
 -
 Click the the 'Lock' icon. This is located in the lower left corner and will prompt you to enter your password. Once entered, this will unlock the settings and allow them to be modified.
 -
 Select the 'Require Password after sleep or screensaver begins' checkbox. This setting forces the user to enter a password after a selected amount of time has passed following the display entering sleep or screensaver.
 -
 Select 'Immediately' from the dropdown. This is located next to the checkbox and will make it so the user must always enter a password after the display enters sleep/screensaver.
- You can select other time limits before a password is required from the dropdown menu. This can be useful if you want to be able to return from a display sleep quickly without entering your password. However, 'Immediately' is the only option that effectively 'locks' your computer on command.
-
 Select 'Disable Automatic Login' (for users on OSX 10.9 or earlier). Automatic login allows users to bypass password entry when booting the computer and waking from sleep. Disabling it ensures that a password prompt will appear when the screen is locked or slept.[1]
- This feature was removed for Administrator accounts on OSX 10.10 and later.
- Optionally, you can click the Lock icon again to relock these changes, but they will be saved either way.
-
 Hit Ctrl+⇧ Shift+Power. This will lock your computer's screen without fully sleeping the computer. You will be prompted for your password upon any attempt to unlock.[2]
- If your mac has an optical (CD/DVD) drive you can use Ctrl+⇧ Shift+⏏ Eject to perform the same action.