Table of Contents
This guide explains how to resolve the Computer with Continuous Sleep, starting with the most likely causes and moving through practical troubleshooting steps.
1. Reset the Sleep time for the device
On Windows Supported operating systems, we have 02 ways to enter the machine into Sleep mode: Automatic and manual.
- Automatic: After a while you do not use the computer, the system will automatically put the computer into Sleep mode to save energy.
- Manual: You proactively put the computer and Sleep mode through MenuStart -> Power -> Sleep.
The main reason will revolve around the automatic sleep mode, the system is set to a short non-use time, which causes the computer to be continuously Sleepy. Assuming you set the Sleep time automatically to 1 minute, after 1 minute you do not move the mouse or type the keyboard, the machine will automatically enter Sleep mode. Your job now is to set longer wait times or disable them.
Step 1: First, open MenuStart and enter Control Panel to open.

Step 2: After that, you set the View by mode to Small icons and select Power Options .

Step 3: In the Power Options section, proceed to select Change when the computer sleeps .

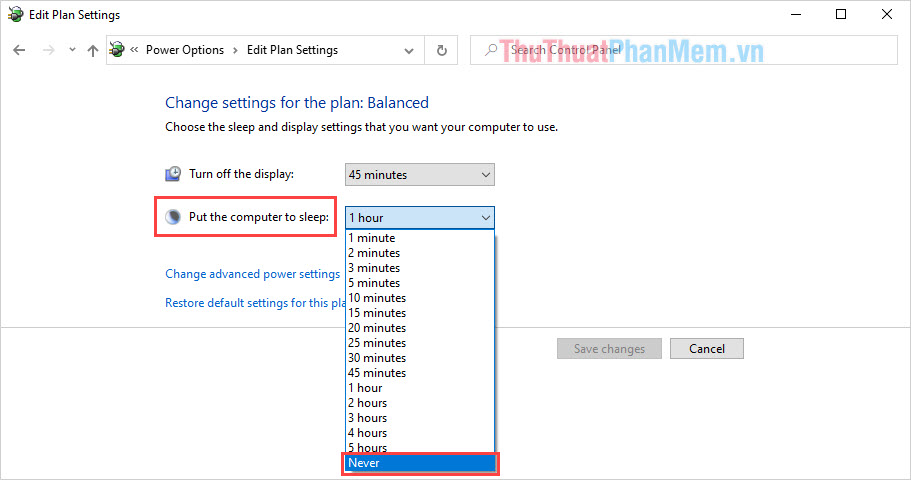
Step 4: Now you set the time of the section Put the computer to sleep. This is the time you do not use computers before they automatically enter Sleep mode. Because we are fixing the error, let Never to completely turn off this feature to see if the computer still has continuous Sleep or not, when confirming the error, then please refine it later.
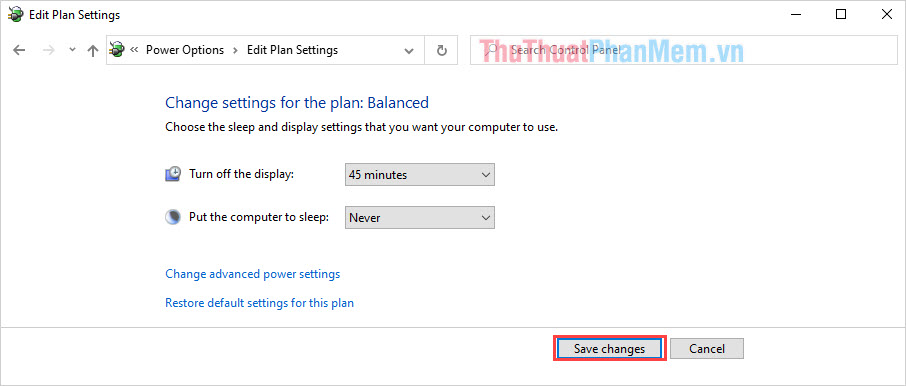
Step 5: The setup is complete, select Save changes to save all new settings.
2. Turn off Fast Startup mode
On the Windows Supported operating systems, you have Fast Startup mode and they are enabled by default on the computer. This may also be the reason why your computer goes into continuous sleep mode.
Step 1: Perform steps 1 and 2 similar to Part 1.
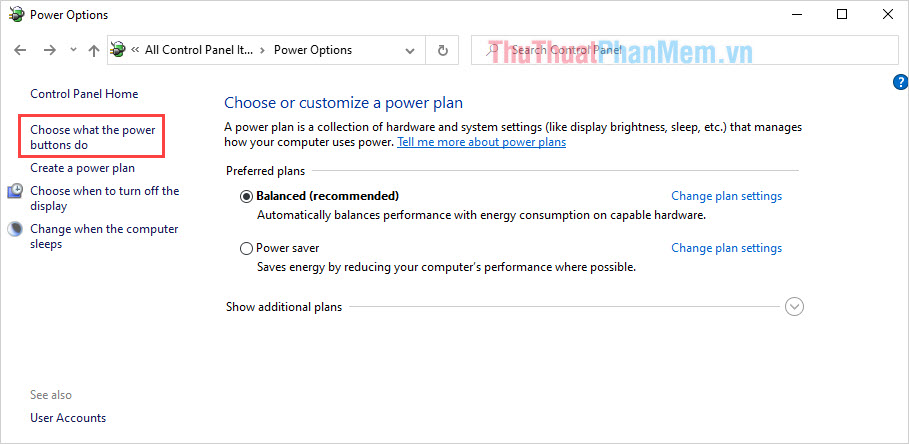
Step 2: After that, select Choose what the power buttons do .
Step 3: To set the changes here, force you to select Change settings that are curemtly unavailable .
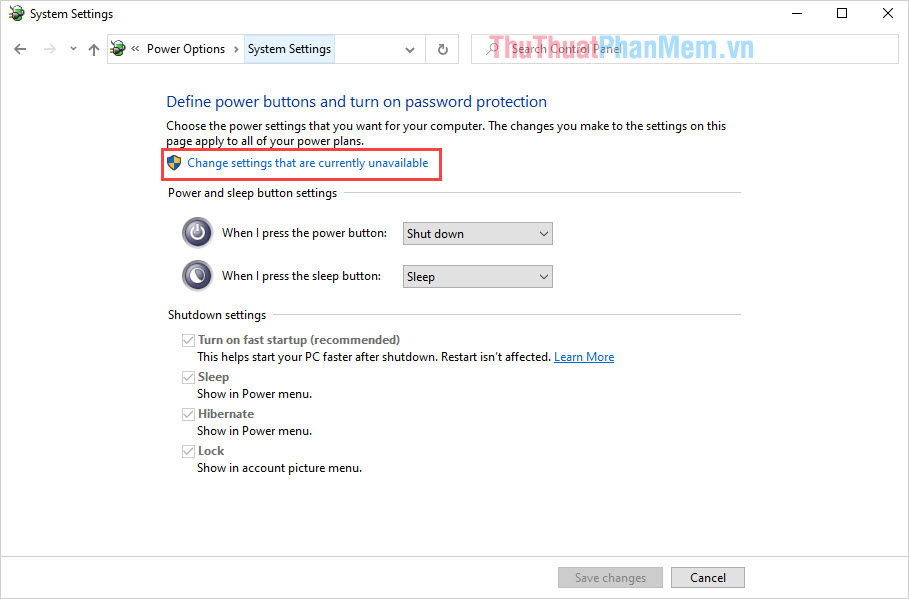
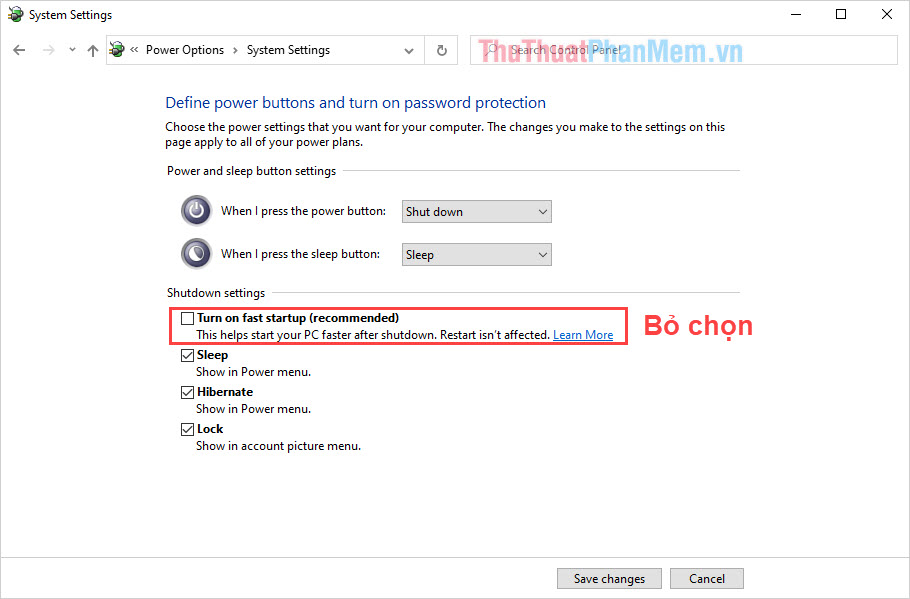
Step 4: Finally, uncheck the Turn on fast startup section and click Save changes to save.
3. Use the automatic error correction feature of Windows 10
Windows 10 comes with auto-correction features that are extremely helpful in many cases.
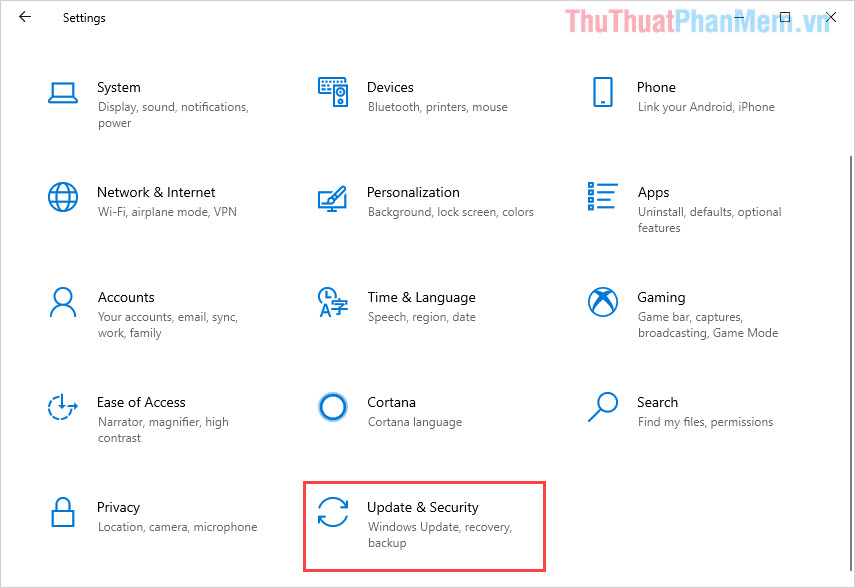
Step 1: You press Windows + I to open Settings on Windows 10. Then you select Updates and Seciruty .
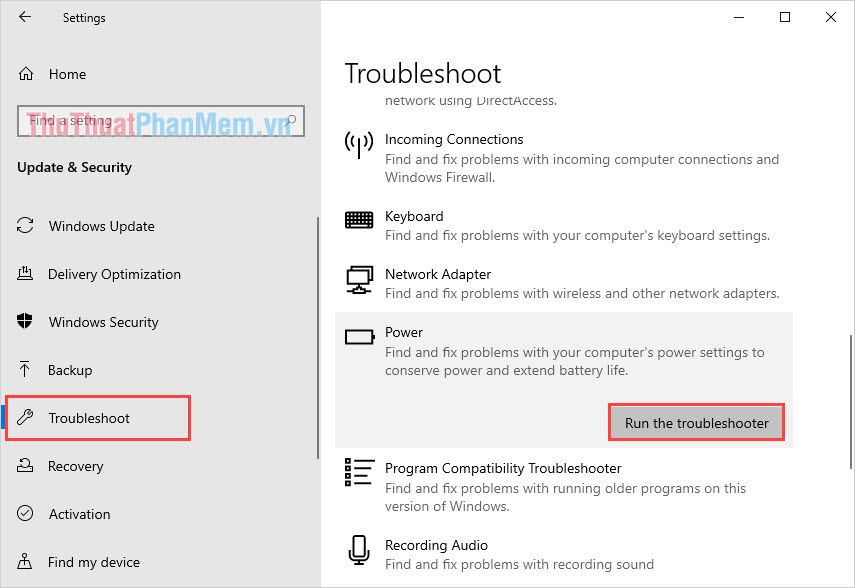
Step 2: Next, select Troubleshoot and select Run the troubleshoot in Power.
Step 3: Now wait for a while for the Windows 10 system to fix the error by itself.

4. Turn off screen sleep mode
Your computer screen after a long time of not using them will automatically sleep and you need to turn them off to avoid being disturbed.
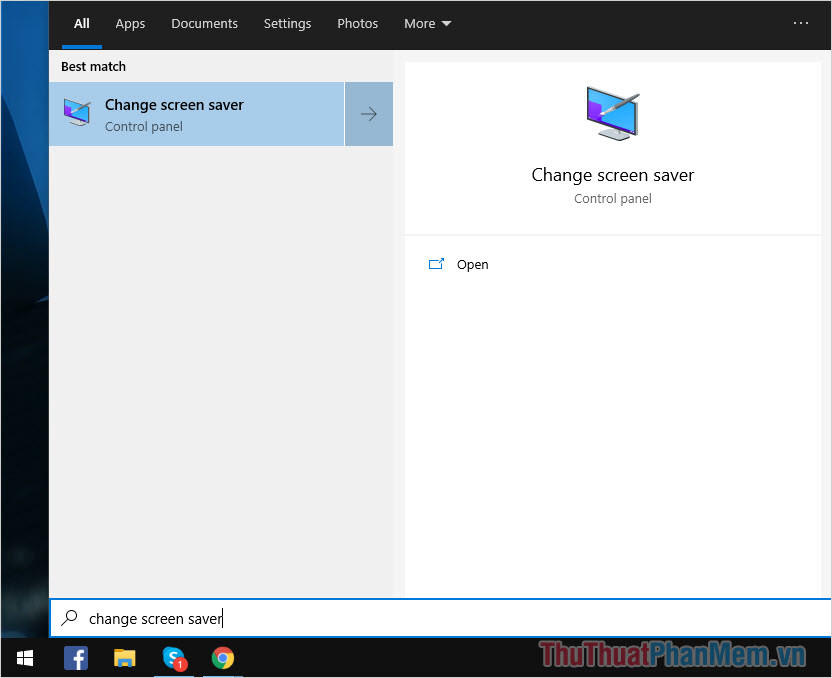
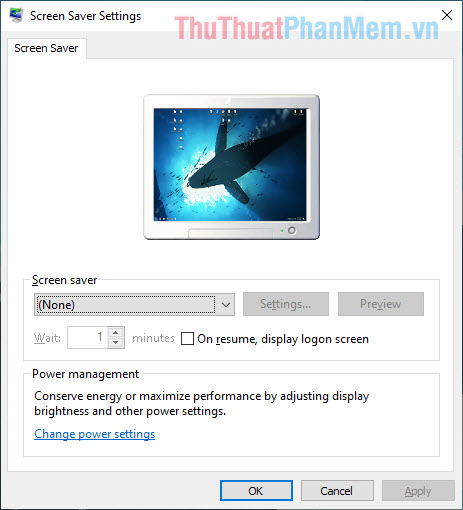
Step 1: Open MenuStart and enter Change screen saver to open screen saver setting.
Step 2: After that, you set Screen Saver to None and click Apply -> OK to save.
5. Update Windows 10
Sometimes old Windows Supported operating systems errors are also the main cause of the computer to be constantly Sleep.
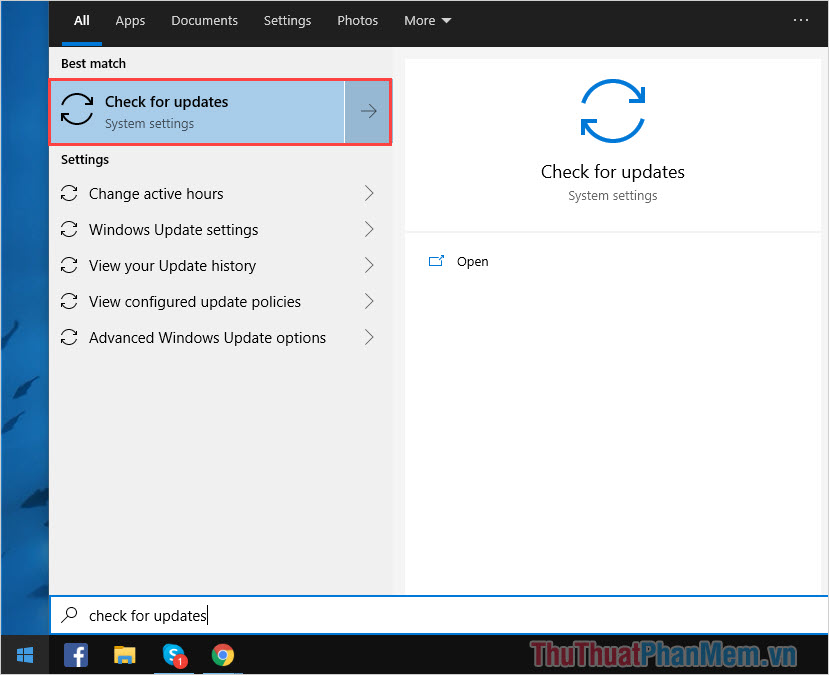
Step 1: Open MenuStart and enter Check for updates .
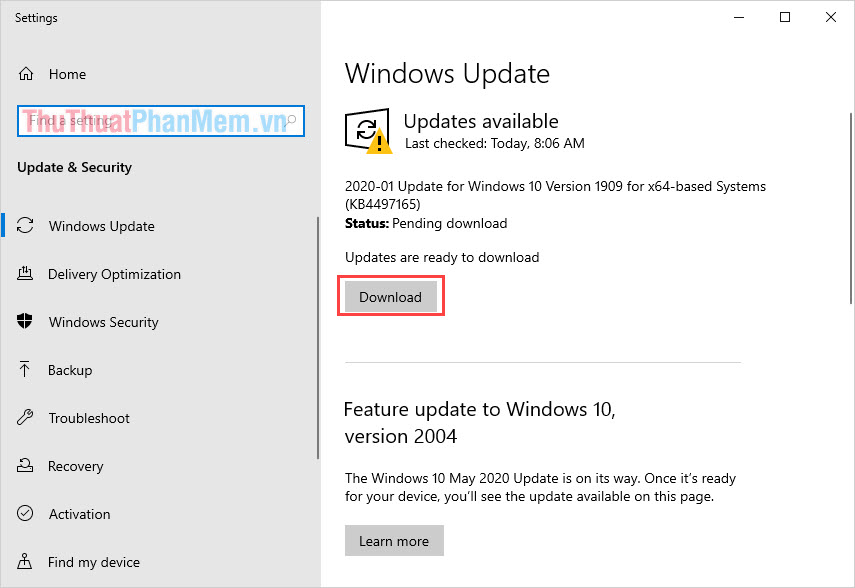
Step 2: If the computer has an update, click Download to upgrade Windows.
In this article, TipsMake showed you how to fix a computer that keeps getting Sleep. Have a nice day!
FAQ
What usually causes the Computer with Continuous Sleep?
The cause may involve incorrect settings, outdated software, damaged files, permission problems, device compatibility, or a temporary system issue.
What should I try first to resolve the Computer with Continuous Sleep?
Restart the affected app or device, install pending updates, verify settings and connections, and follow the troubleshooting steps in order.
How can I prevent the issue from returning?
Keep software updated, maintain backups, avoid interrupted installations, and review system or device settings after major changes.
Related Articles
 What You Need to Know About Sleep Needs by Age8 minutes read
 15 Truths Completely Wrong About Sleep (part 1)6 minutes read
 How to Set a Sleep Timer on Windows 10 And 75 minutes read
 5 Things You May Not Know About Sleep5 minutes read
 6 Best Sleep Monitoring and App Apps on iOS7 minutes read
 Shortcut Sleep Win 104 minutes read
Reader Comments 0
Sign in with email or Google to join the discussion.