How to secure data with Document Lock
Document Lock application on Windows will enhance data security on your computer, through data or folder encryption mechanism.
Table of Contents
The Document Lock application on Windows will enhance data security on the computer, through the mechanism of encrypting data or folders. Users just need to put the data they want to secure into Document Lock and set a password to lock the data. When needing to access, they must enter the correct password to lock the data. Below are instructions for using Document Lock to secure data.
How to secure data with Document Lock
Step 1:
First, download the Document Lock application for your computer from the link below. Then install the application on your computer to use.
- Download Document Lock app
Step 2:
In the application interface, click the Lock button to start the process of encrypting files or folders. First, select File or Folder to lock the data. In the Output section , click Output Folder to select the folder where you want to save the file or folder after encryption. In Password, enter the password to lock the data again.
Finally press Lock to lock the data.

Step 3:
We are warned about backing up data when performing locking with Document Lock. If you lose the password, the locked data cannot be restored. Agree, click Yes to perform data encryption.

Step 4:
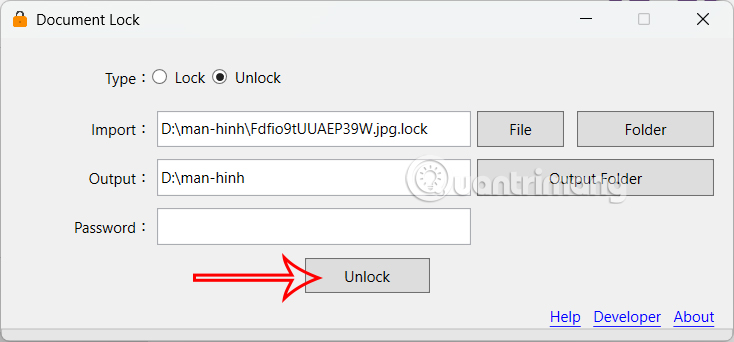
So the application has created an additional encrypted file and you can delete your original file. When you want to view the file , you need to enter the correct password and also select a new folder to save the unlocked file, then press Unlock.
The app will create a separate unlock file for you to view the contents.
Was this article helpful?
Your feedback helps us improve.
Related Articles
 Top 5 Folder software, extremely secure folder lock5 minutes read
 How to lock a data area in Word3 minutes read
 How to use PDF Page Lock to lock PDF files5 minutes read
 How to lock a data area on Word6 minutes read
 What is Secure Erase?4 minutes read
 Fix iPhone Error Not Showing Lock Screen5 minutes read
Reader Comments 0
Sign in with email or Google to join the discussion.