How to install Photoshop CS6 for the latest Macbook M1, M2
Downloading and installing Photoshop CS6 on your MacBook gives you powerful and flexible photo editing tools. You can easily process photos, create special effects and design professional graphics, improving your work efficiency and the quality of your creative products.
Installing Photoshop CS6 on MacBook helps you take advantage of the power of Adobe's leading professional photo editing tool. With outstanding features and a friendly interface, you can create unique and impressive works of art right on your MacBook.
Instructions for installing Adobe Photoshop CS6 on MacOs
Step 1: First, readers need to download the Photoshop CS6 version for Mac here and then we can install Photoshop CS6 for Mac. This version has a capacity of more than 6 GB , so readers should note that you should clean up your Mac first.

Step 2: Wait for the process to complete, click Download on Mac, here select the file you just downloaded, Photoshop CS 6 for Mac.

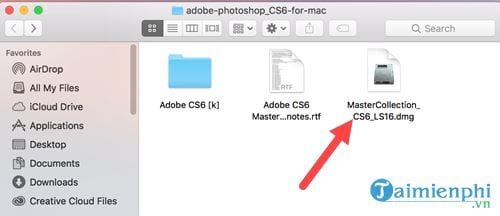
Step 3: In the Photoshop CS6 file, click on the MasterCollection_CS6_LS16.dmg file to install Photoshop CS6 for Mac.
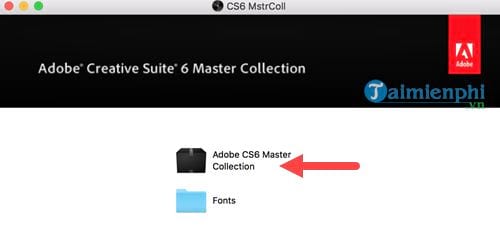
Step 4: The Photoshop installation section appears, this is a comprehensive version of Adobe's CS6 programs, click Adobe CS6 Master .
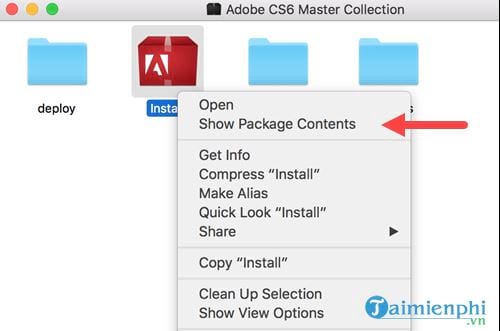
Step 5: Then the Install file appears, but don't try to click it because it won't install. Instead, right-click and select Show package Contents .
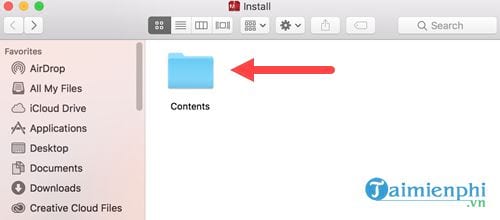
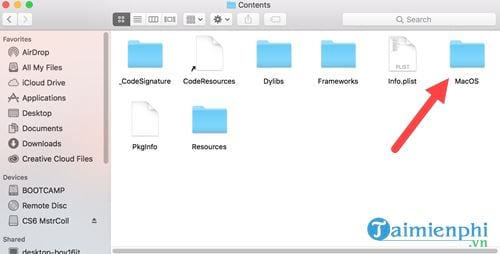
Step 6: In the Install section, a Contents folder will appear , continue clicking on it.
Step 7: Many items will appear here, continue to click on the MacOS item as shown below.
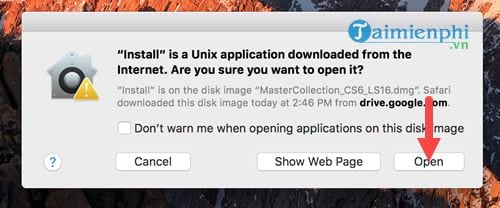
In the MacOS Folder, an Install file in the form of Terminal will appear . Double click and now we can actually install Photoshop CS6 for Mac.

Step 8: A message appears warning you whether you are sure you want to install Photoshop CS6 for Mac or not, just click Open .
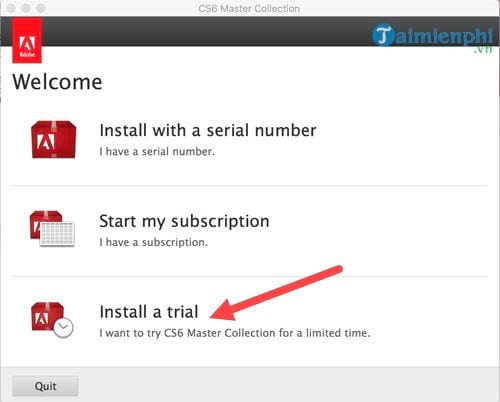
Step 9: Just like the Windows version, initially just click Install a trail (if you have a license, you can also click i have a serial number).
Step 10: Agree to the terms to install Photoshop CS6 for Mac.

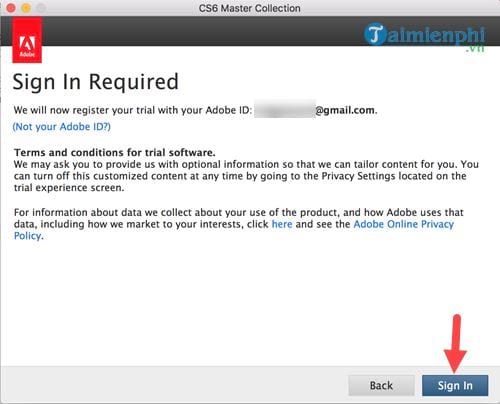
Step 11: Next, log in to your Adobe account. If you don't have one, you can sign up for Adobe right here and then use it to log in.
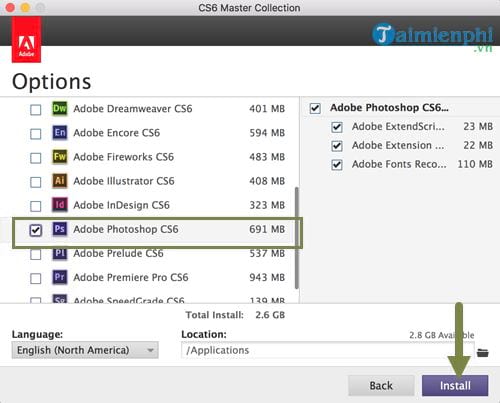
Step 12: Remember to select the option to install Photoshop CS6, but of course you can install other software if you want. This step depends on your choice and then click Install.
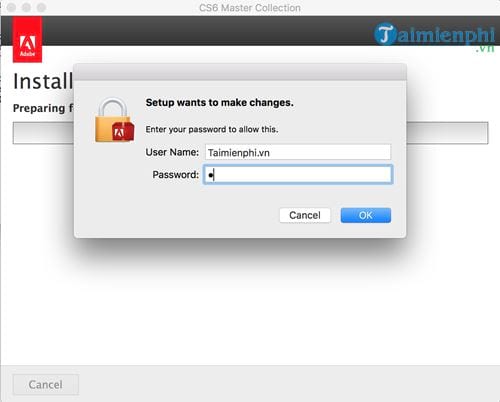
Step 13: The system will ask you to enter your Mac's password , the account you use to log in to the machine. Immediately after this confirmation, Photoshop CS6 for Mac will be installed.
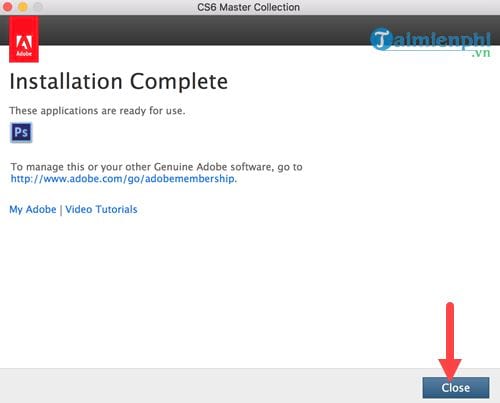
Step 14: And when the Installation Complete message appears , click Close to close, the installation of Photoshop CS6 for Mac is complete.
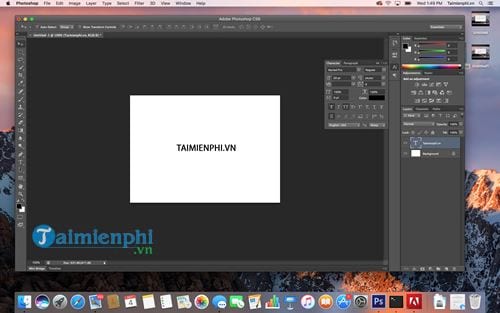
Right after that, you can go to Photoshop CS6 to experience it right on the MacOS operating system.
Above are instructions for installing Photoshop CS6 for Mac, so your Mac now has a very useful software for editing. In addition to installing Photoshop, Office is also one of the software that runs very well on Mac. If you install Office, readers can refer to the instructions on how to install Office 2016 on Macbook and follow our instructions to be able to edit documents best.
- Instructions for installing Brush on Photoshop
- Install Photoshop on Linux
- How to install Photoshop CS6 without errors on Windows
- How to install Brush into Photoshop
- How will the new MacBook get more upgrades?
- How to install AI for MacBook
- Top 5 MacBooks worth spending money on in 2025
- Instructions for using Photoshop CS5 to edit photos in full set
- Instructions to install Windows 10 on Macbook
- Apple upgraded the MacBook, MacBook Pro, and MacBook Air software
- Instructions on how to crop a circle image online
- How to Reset AI (Illustrator) to default
- 100+ Beautiful Background PNG
- How to open AI file without Adobe Illustrator
- Steps to draw dashed lines in AutoCAD
- How to copy and insert animated GIFs?
- How to Make a Cat Using Your Keyboard
- How to delete Watermark, simple stamp removal with Paint
- How to write text in Paint
- Steps to draw curves in AutoCAD
-
 Free software that can replace Photoshop
-
5 of the best AI tools to try for Photoshop beginners.
-
Comparing Adobe Illustrator and Photoshop: Similarities and Differences
-
Easy guide to adding text to images in Photoshop
-
How to install Photoshop CS6 without errors on Windows
-
How to sharpen images using Photoshop
 Free software that can replace Photoshop
 5 of the best AI tools to try for Photoshop beginners.
 Comparing Adobe Illustrator and Photoshop: Similarities and Differences
 Easy guide to adding text to images in Photoshop
 How to install Photoshop CS6 without errors on Windows
 How to sharpen images using Photoshop
-
Application
-
Web Email
-
Website - Blog
-
Web browser
-
Support Download - Upload
-
Software conversion
-
Social Network
-
Simulator software
-
Online payment
-
Office information
-
Music Software
-
Map and Positioning
-
Installation - Uninstall
-
Graphic design
-
Free - Discount
-
Email reader
-
Edit video
-
Edit photo
-
Compress and Decompress
-
Chat, Text, Call
-
Archive - Share
-
-
System
-
Mac OS X
-
Hardware
-
Game
-
Tech info
-
Technology
-
Science
-
Life
-
Electric
-
Program
-
Mobile