How to install and activate the .NET Framework 3.5 on Windows 10

On Windows 10, by default, the latest .NET Framework 4.5 will be installed, but some older applications still require you to install .NET Framework 3.5 to run it. If you do not know how to install .NET Framwork 3.5 on Windows 10, let's find out how to install it in the following tutorial!
On Windows 10, by default, the latest .NET Framework 4.5 will be installed, but some older applications still require you to install .NET Framework 3.5 to run it. If you do not know how to install .NET Framwork 3.5 on Windows 10, let's find out how to install it in the following tutorial!

How to install and activate the .NET Framework 3.5 on Windows 10 Picture 1How to install and activate the .NET Framework 3.5 on Windows 10 Picture 1

1. Install with .NET Framework 3.5 file from the homepage

Step 1: You visit https://www.microsoft.com/en-us/download/details.aspx?id=21 to download the .NET Framework 3.5.

Next, click Download to download.

How to install and activate the .NET Framework 3.5 on Windows 10 Picture 2How to install and activate the .NET Framework 3.5 on Windows 10 Picture 2

Step 2: After downloading, you double-click the file to install or you right-click the file => Run as administration to install under admin.

How to install and activate the .NET Framework 3.5 on Windows 10 Picture 3How to install and activate the .NET Framework 3.5 on Windows 10 Picture 3

Step 3: Click the Download and install this feature line .

How to install and activate the .NET Framework 3.5 on Windows 10 Picture 4How to install and activate the .NET Framework 3.5 on Windows 10 Picture 4

After that the download process will take 1-3 minutes depending on your network speed.

How to install and activate the .NET Framework 3.5 on Windows 10 Picture 5How to install and activate the .NET Framework 3.5 on Windows 10 Picture 5

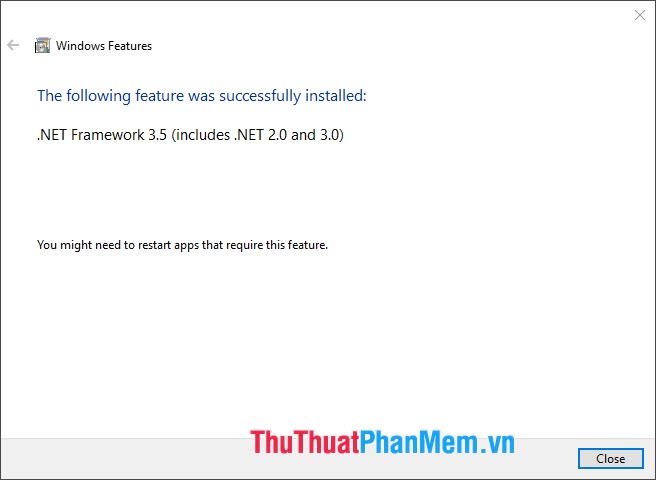
Step 4: After the success message is completed. Click Close and reboot to apply the update.
How to install and activate the .NET Framework 3.5 on Windows 10 Picture 6How to install and activate the .NET Framework 3.5 on Windows 10 Picture 6

2. Install .NET Framework 3.5 in Windows Features

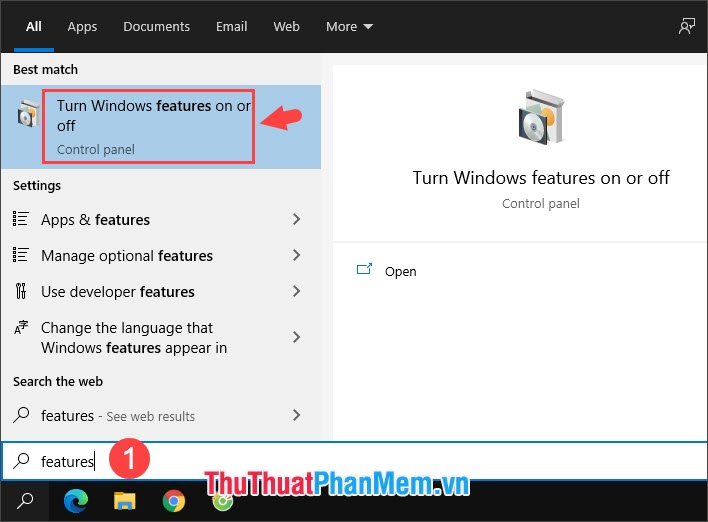
Step 1: Open the search tool (shortcut: Windows + S ) and enter the features keywords (1) => click Turn Windows features on or off (2) .
How to install and activate the .NET Framework 3.5 on Windows 10 Picture 7How to install and activate the .NET Framework 3.5 on Windows 10 Picture 7

Step 2: Click the + sign in the .NET Framework 3.5 section (includes .NET 2.0 and 3.0) to expand the hidden content.

How to install and activate the .NET Framework 3.5 on Windows 10 Picture 8How to install and activate the .NET Framework 3.5 on Windows 10 Picture 8

Then you tick the three items (1) => OK (2) .

How to install and activate the .NET Framework 3.5 on Windows 10 Picture 9How to install and activate the .NET Framework 3.5 on Windows 10 Picture 9

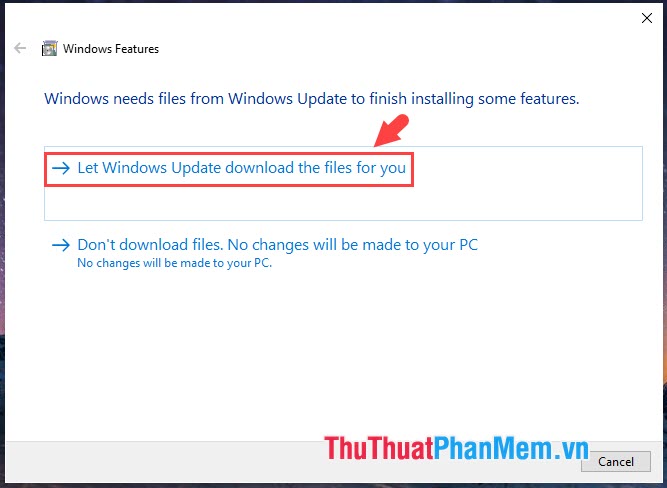
Step 3: Select the line Let Windows Update download the files for you .
How to install and activate the .NET Framework 3.5 on Windows 10 Picture 10How to install and activate the .NET Framework 3.5 on Windows 10 Picture 10

The update will then take place and apply to your computer for a period of 1-3 minutes.

How to install and activate the .NET Framework 3.5 on Windows 10 Picture 11How to install and activate the .NET Framework 3.5 on Windows 10 Picture 11

Step 4: After having informed completed means. NET Framework 3.5 was successfully installed. Click Close and restart the computer to apply the changes.

How to install and activate the .NET Framework 3.5 on Windows 10 Picture 12How to install and activate the .NET Framework 3.5 on Windows 10 Picture 12

By installing the .NET Framework 3.5 on Windows 10, you can fix missing .NET 3.5 effectively and can run old applications that require .NET 3.5 as smoothly as possible. Good luck!

4 ★ | 1 Vote