How to install a VPN on Windows Server 2019
Today's article is a step-by-step guide on how to install and configure a VPN on Windows Server 2019. This article will show you how you can easily set up a VPN server for a small environment, branch office or a hosted server. . This VPN (Virtual Private Network) server allows you to connect from remote clients or a firewall to Windows Server.
To install a VPN on Windows Server 2019, simply follow these step-by-step instructions:
Install Remote Access Role
First, install Remote Access via Server Manager or PowerShell.
Open Server Manager and select Add Roles and Features .

Select Remote Access Role and click Next following the steps in the wizard.
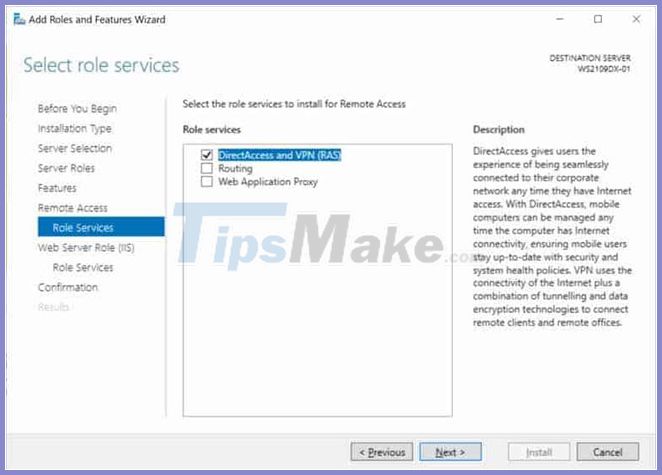
In the Role Services step , choose DirectAccess and VPN (RAS) .

In the final step, select Install to install the Remote Access role.
This may require a server reboot.
Install and configure VPN on Windows Server 2019
After a successful installation, you can now launch the wizard to install and configure the VPN server in Windows Server 2019.
Once the features are installed, which may take a while to complete, you will see the Getting Started Wizard link . Click Open the Getting Started Wizard .

This will open a new wizard to help you configure the server. On the first screen, select Deploy VPN only .
This will open the Routing and Remote Access Management Console .
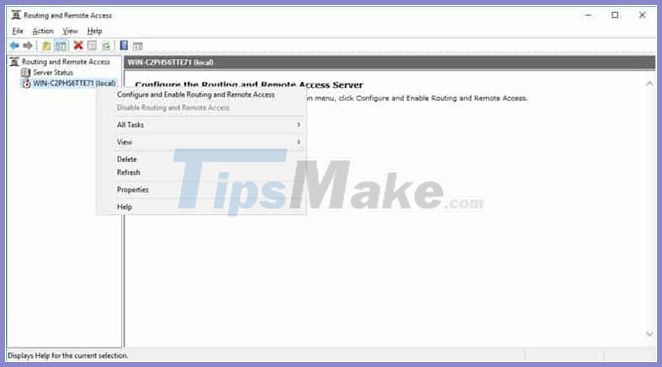
Right-click on the server name and click on Configure and Enable Routing and Remote Access .

On the new wizard, choose Custom configuration.
Select VPN Access.
After clicking Finish , you can now start the Routing and Remote Access service .

Network configuration and user access to VPN
If there is a firewall between the Internet and Windows Server, you must open the following Firewall ports to forward them to Windows Server:
- For PPTP: 1723 TCP and Protocol 47 GRE (also known as PPTP Pass-through).
- For L2TP over IPSEC: 1701 TCP and 500 UDP.
- For SSTP: 443 TCP.
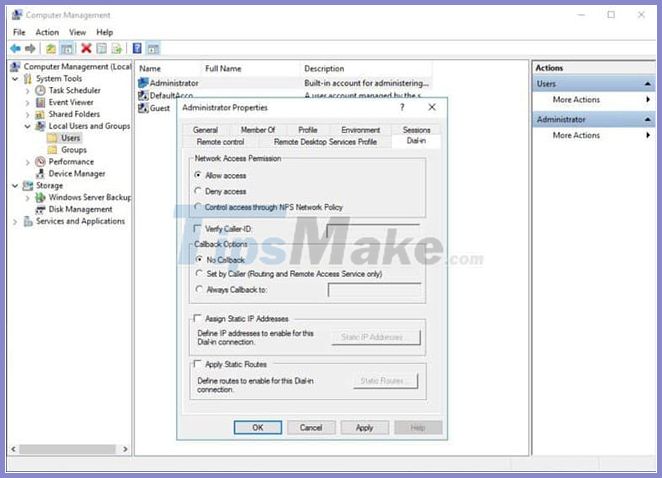
Once installed, users must have remote access enabled to connect to the VPN Server. On a standalone server, this can be done in the Computer Management MMC. In a domain environment, this can be done in the user properties section of an Active Directory user.

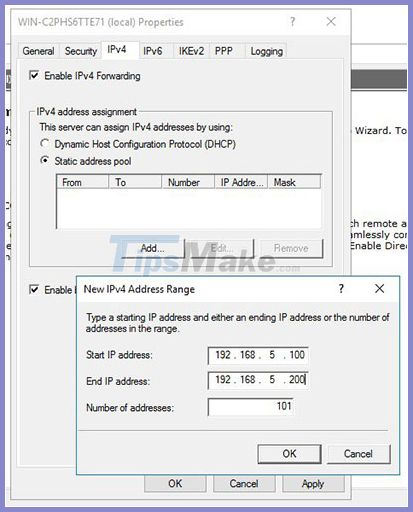
If there is no DHCP server in the environment, you must add a static IP address pool (range of addresses available to the DHCP client). This is usually necessary if you have a single server hosted by a service provider. In the properties of the VPN server you can click on the IPv4 tab , enable and configure the Static address pool .

Now, you have to add an IP address from the same subnet as the static address pool to the server's network interface, so that the user can access the server.
Good luck.