How to install and configure WampServer
WampServer is a local server package for Windows that allows you to install and host web applications using Apache, PHP and MySQL. This article will guide you the steps to install WampServer on your computer..
1. Download WampServer
Download the installer file for the latest version of WampServer and save the file to your computer.
Make sure you choose the correct installation file for your version of Windows. If you do not know if your system is 32-bit or 64-bit, refer to the article: What is the difference between 32-bit and 64-bit Windows? For more details.
2. Install WampServer
To begin the installation, you need to open the folder where you saved the file and double-click the installation file. A security warning window will open, asking if you are sure you want to run this file. Click Run to begin the installation process.
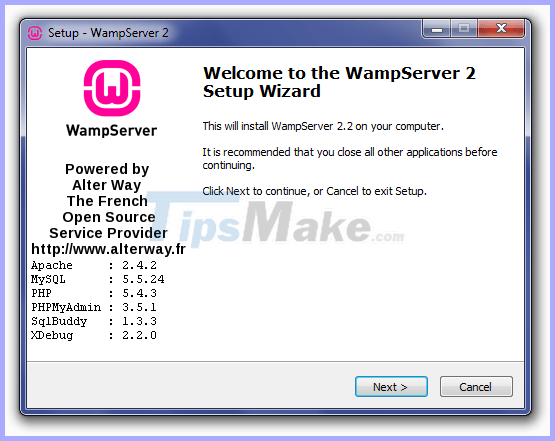
Next, you will see the Welcome To The WampServer Setup Wizard screen . Click Next to continue the installation.
The next screen you are presented with is the License Agreement. Read the agreement, check I accept the agreement , then click Next to continue the installation.
 Install WampServer
Next, you will see the Select Destination Location screen . Unless you want to install WampServer on another drive, you don't need to change anything. Click Next to continue.
The next screen is Select Additional Tasks . You will be able to choose whether you want the Quick Launch icon to be added to the taskbar or the Desktop icon created after the installation is complete. Make the selection, then click Next to continue.
Next, you will see the Ready To Install screen . You can review your settings and change any of them by clicking Back to go to the appropriate screen. Once you have reviewed your selection, click Install to continue.
WampServer will begin extracting the files to the location you selected.
When the files are extracted, you will be asked to select the default browser. WampServer by default selects Internet Explorer when opening the local file browser window. If your default browser is not IE, look for the following locations for the corresponding .exe file:
- Opera: C: Program Files (x86) Operaopera.exe
- Firefox: C: Program Files (x86) Mozille Firefoxfirefox.exe
- Safari: C: Program Files (x86) Safarisafari.exe
- Chrome: C: UsersxxxxxAppDataLocalGoogleChromeApplicationchrome.exe
Select the .exe file of the default browser, then click Open to continue.
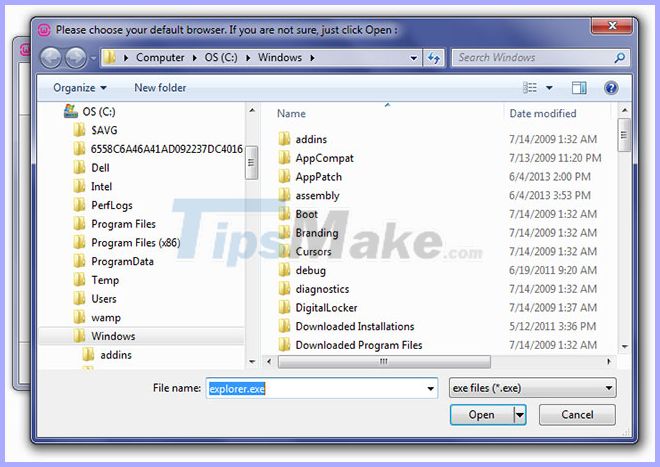 Select the default .exe browser file
A Windows Security Alert window will open, indicating that Windows Firewall has blocked some program features. Check whether you want to allow Apache HTTP Server to communicate on a private or public network, and then click Allow Access.
The Setup screen will appear next, showing you the status of the installation process.
When the progress bar is completely green, the PHP Mail Parameters screen will appear. Leave the SMTP server as localhost and change the email address into one of your options. Click Next to continue.
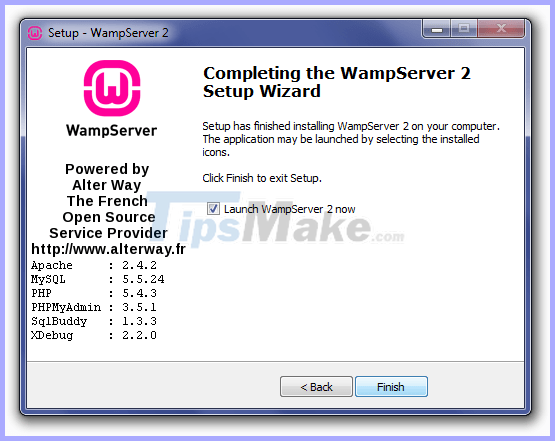
The Installation Complete screen will appear. Check the Launch WampServer Now box , then click Finish to complete the installation.
 Click Finish to complete the installation
You will see the WampServer icon appear in the system tray to the right of the taskbar. If the icon is green, everything works fine. If the icon is orange, there are problems with one of the services. If the icon is red, neither Apache nor MySQL services will run. You will need to resolve those issues before continuing.
3. Check WampServer
Once the installation is completed, check that your installation is working properly by visiting http:/// localhost / in your browser. You will see the WampServer home page is displayed.
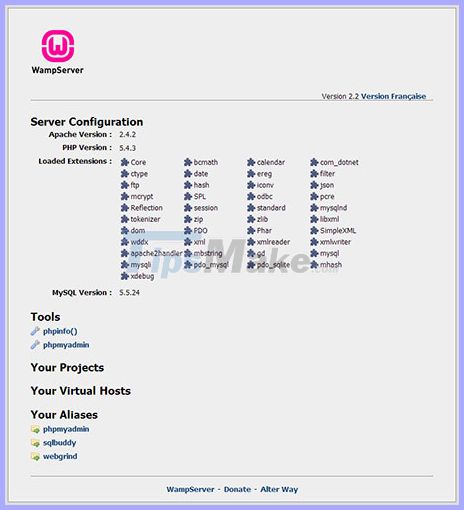 You will see the WampServer home page is displayed
If the WampServer home page is not displayed, you will want to check if your file server has localhost mapped to 127.0.0.1 and you are not running any other services on port 80, such as another local server ( XAMPP, DesktopServer, etc.), WebDAV or Skype.
You also need to check if phpMyAdmin is working by visiting http:/// localhost / phpmyadmin / in your browser. If you receive Cannot connect error message : invalid settings , then you will need to edit the C: wampappsphpmyadmin3.5.1config.inc.php file in the plain text editor (your version number may be different) and make sure it depends. This selection is set to true :
$cfg['Servers'][$i]['AllowNoPassword'] = true;4. Configure WampServer
After installing and testing WampServer, you will need to adjust some configuration options to complete your local setup.
4.1. PHP configuration
Click on the WampServer icon, go to the php menu and click on the php.ini option. This will open the php.ini file in the plain text editor. Adjust the following settings:
Set error reporting level - delete ; at the beginning of the line to activate:
error_reporting = E_ALL ^ E_DEPRECATED (~ line 112)
PHP error logging - eliminated ; at the beginning of the line to activate:
error_log = "c:/wamp/logs/php_error.log" (~ line 639)
Increase the maximum size of POST data that PHP will accept - change the value:
post_max_size = 50M (~ line 734)
Increase the maximum size allowed for uploaded files - change the value:
upload_max_filesize = 50M (~ line 886)
When you have made the above changes, click Save.
4.2. Apache configuration
To use custom permalink in WordPress, you will need to enable Apache's rewrite_module. Click the WampServer icon, go to the Apache menu > Apache modules , then find and click Rewrite_module to make sure it's turned on. WampServer will change the httpd.conf file and automatically restart Apache.
 Apache configuration
5. Create a MySQL database with WampServer
Creating database in WampServer is done through phpMyAdmin. You can access phpMyAdmin by typing http:/// localhost / phpmyadmin / in your web browser.
The main phpMyAdmin screen will appear. On the left is a list of existing databases: information_schema, mysql, performance_schema and test . Do not delete them, as they are necessary for WampServer and phpMyAdmin to run properly.
To create the database, click Databases in the main navigation bar at the top.
On the Databases screen , you'll need to enter the database name (e.g. root_wordpress-trunk) in the left field, select a database match from the Collation drop-down box (utf8_unicode_ci), then click Create.
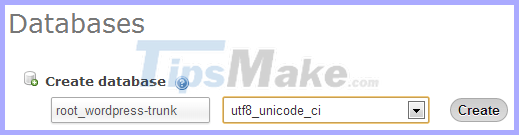 Click Create
You will see a success message once the database has been created and a new database will appear in the list on the left.
The default, rooted, phpMyAdmin user is automatically assigned to the database when created and without a password. The database connection information you will need to use when installing WordPress locally is:
/** The name of the database for WordPress */ define('DB_NAME', 'root_databasename'); /** MySQL database username */ define('DB_USER', 'root'); /** MySQL database password */ define('DB_PASSWORD', ''); /** MySQL hostname */ define('DB_HOST', 'localhost');6. Turn off WampServer
To turn off WampServer, click the system tray icon and select Stop All Services to turn off Apache and MySQL services. The icon will turn red when all services have stopped working.
Next, you will right-click the system tray icon of WampServer and click Exit to close the program.