How to Format a micro SD card
On Android
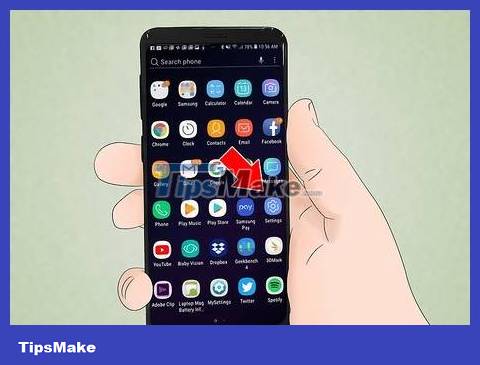
Tap the 'Settings' app on your Android device's home screen. The 'Settings' app will be somewhere on the home screen, scroll through the pages to find it.
The 'Settings' app icon may look slightly different depending on your Android version, but on most phones it's a gear.

Tap on 'Storage' or 'SD & Phone Storage' option. This option will have a different name depending on the Android version. Look for the option that contains the word 'Storage'.
You can recognize this option by looking at the SD card icon.

Select the 'Erase SD card' or 'Format SD card' option. This screen will include information about the SD card memory, free space, and the options 'Unmount SD Card' and 'Format SD Card'.
If the 'Format SD Card' option is grayed out, you need to unmount the SD card first. In this case, click on 'Unmount SD Card'.
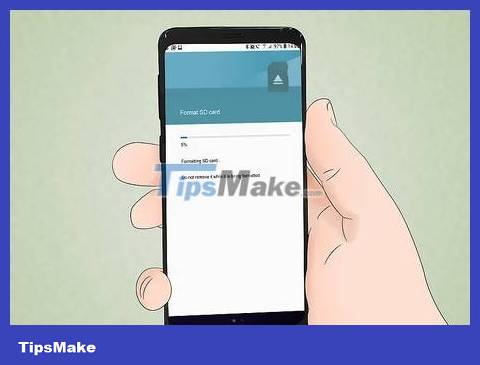
Tap the option to confirm that you want to erase data on the SD card when Android asks. The Android device will begin formatting the micro SD card and erasing all data on it.
You may see several screens asking if you are sure you want to format the SD card. If you confirm, all data on the card will be deleted.
Follow the instructions to erase and format the memory card.
Once completed, the memory card will be formatted to the FAT32 file system type. All data will be erased and you will have a new memory card formatted for your Android phone.
Note: With Android 6.0 Marshmallow, you will have the option to set the memory card as internal or removable storage. If you choose to use it as portable memory, the SD card will act like portable memory, allowing you to take the card out and copy data to a computer or other device. If you choose internal memory, after formatting, the computer will not be able to read the content on the card. The SD memory card will become the main storage system on the device.
On Windows phone
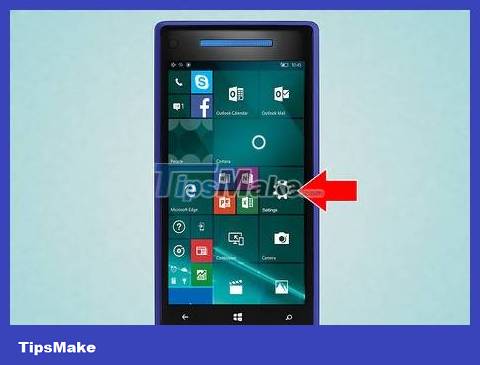
Find the 'Settings' app. This method is for Windows phones, such as Windows Phone 8 and later; HTC One M8; Nokia Lumia 635; Nokia Lumia 830; Microsoft Lumia 735.
You can find the 'Settings' section through the pinned tiles on the home screen or the application list.
Depending on your phone and current firmware, you may need to find the 'Storage Sense' app in the Apps list.
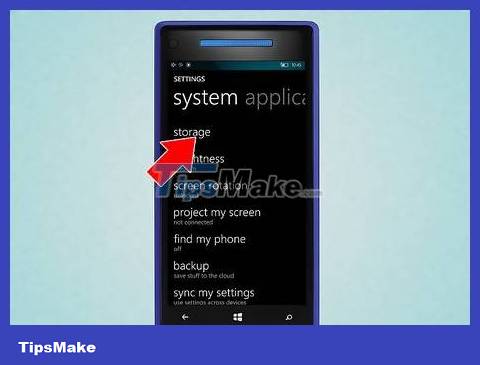
Scroll down and tap on the 'phone storage' option. On the 'Settings' screen, scroll down to find the 'phone storage' option located between the 'battery saver' and 'backup' sections.
The 'phone storage' option will display the available storage space on the phone and SD card.
After tapping 'Storage Sense', you will see an option for 'SD card'.
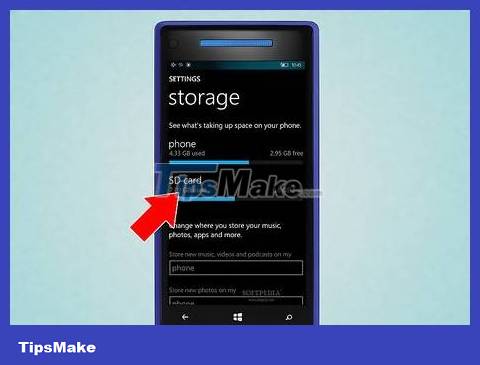
Click on the 'Format SD card' option. On the 'phone storage' page, a graph showing the amount of memory being used on the device will appear. Click on 'SD card' section.
Formatting an SD card will erase all content stored on the card. You need to make sure you back up your data somewhere.
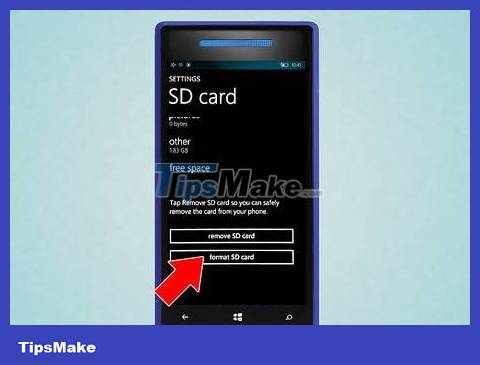
Click on the 'format SD card' option. After clicking on the 'SD card' section, the next screen will appear with two options: erase card and format card. Tap the card format option.
After you click on 'format SD card', a prompt will appear on the screen warning that erasing the SD card will erase all data and files on the card. The system will also ask if you want to continue, then click 'yes' to format.
Once the process is complete, the phone will recognize the card again and automatically ask if you want to configure it. Now, proceed according to the instructions.
On Windows
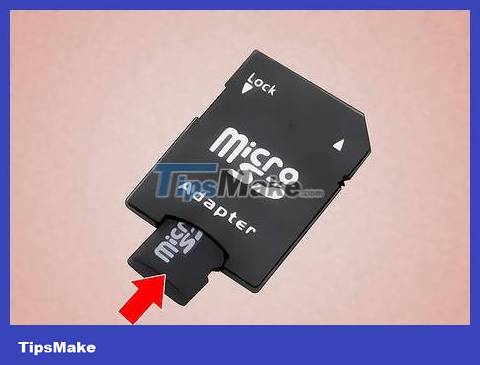
Insert the micro SD card into the adapter or micro SD card reader. For example, with a SanDisk micro SD card, you need a micro SD adapter included. The adapter looks like a regular SD card but has an additional slot at the bottom for you to insert a micro SD card into.
Note: most Micro SD cards with a capacity of 32 GB or less are formatted according to the FAT32 standard. Cards with a capacity of 64 GB or more are formatted according to the exFAT file system. If you format the SD card for use on an Android phone, Nintendo DS or 3DS, choose FAT32. With Android, if you are an advanced user, many applications or custom recoveries will not be able to read the exFAT standard.
Formatting to FAT32 is usually the best option, however, a memory card formatted to FAT32 will not allow you to copy or store files larger than 4 GB.
You can also purchase a third-party micro SD card adapter if you don't already have one. Note: the adapter must be compatible with your micro SD card. Some third-party products also have a built-in USB connector and act as a flash drive.
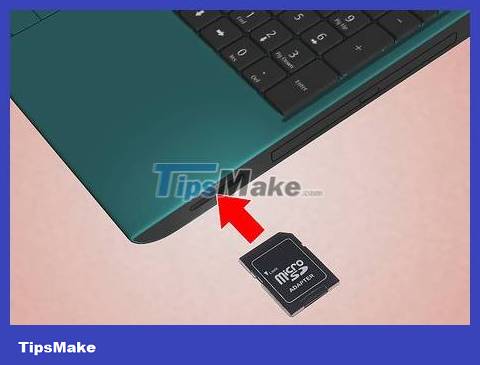
Plug the memory card reader or adapter into the USB port or SD card slot on your Windows computer. Whether you use the SD card slot or USB port depends on your computer and adapter type.
If using a micro SD card adapter, make sure the lock switch is facing up and in the open position. If this switch is in the locked position, the computer will not read the card or allow you to make any changes. The memory card will be in 'Read only' mode.
It is better to copy the data on the memory card to a computer to save. Thus, you will have a copy of data and files to copy to the card after formatting.
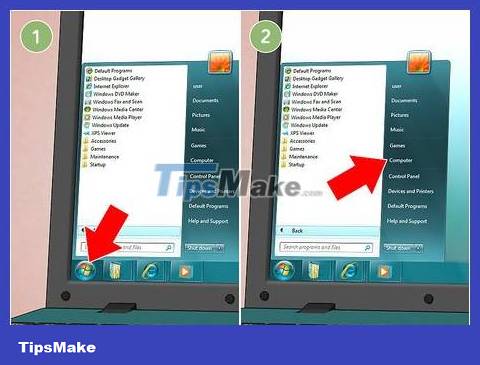
Click the Start menu and select 'Computer' or 'My Computer'. This method works on Windows 7 and later.
The 'Computer' window will appear on the screen with a list of all the drives on the computer.
Find the SD card. The card can be identified by its brand name (unless you have previously renamed the memory card). If you renamed the tag, search by that name.
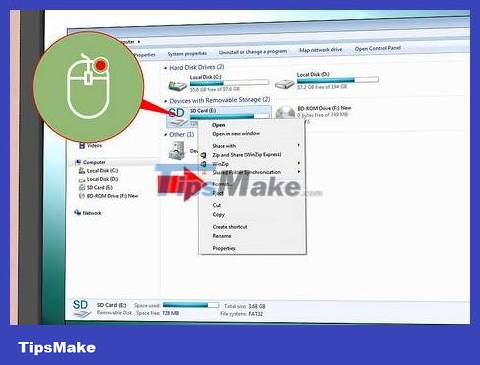
Right-click the memory card reader in the drive list and select 'Format'. A window with formatting options will appear on the screen.
If you don't see the 'Format' option, you may need to download and install the fat32format utility for the GUI (graphical user interface) version.
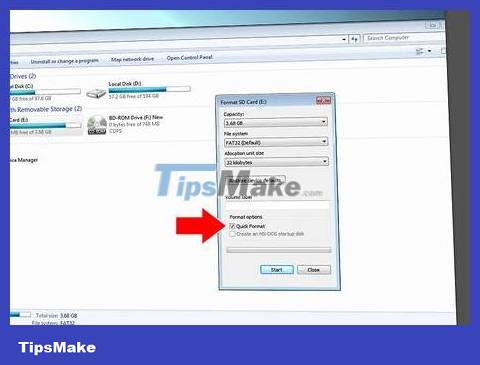
Check the box next to the 'Quick Format' option. If you can click on the 'Format' option, a frame with various options including 'Quick Format' will appear. Please check this box for best results.
If your computer has fat32utility installed, a similar frame will pop up after you launch the guiformat.exe file.
Before clicking the 'Start' button, you need to make sure that the tags and other options are correct. Check that 'Capacity' shows the appropriate amount of memory. You need to format the desired file system correctly, usually FAT32.
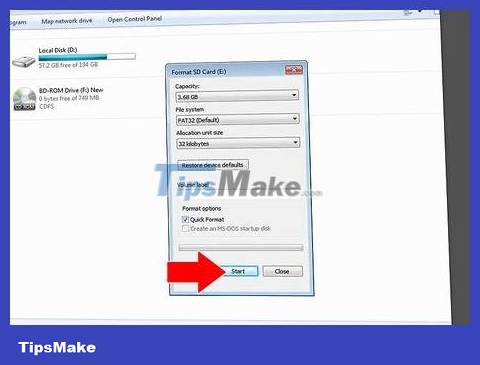
Click the 'Start' button. The computer will begin formatting and erasing all data on the micro SD card.
Once done, you will have a new data-free micro SD card, formatted for use.
On Mac
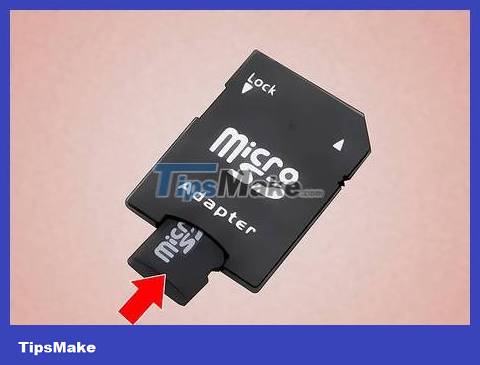
Insert the micro SD card into the micro SD card reader or adapter. For example, with a SanDisk micro SD card, you need a micro SD adapter included. The adapter looks like a regular SD card but has an additional slot at the bottom for you to insert a micro SD card into.
Note: most Micro SD cards with a capacity of 32 GB or less are formatted according to the FAT32 standard. Cards with a capacity of 64 GB or more are formatted according to the exFAT file system. If you format the SD card for use on an Android phone, Nintendo DS or 3DS, choose FAT32. With Android, if you are an advanced user, many applications or custom recoveries will not be able to read the exFAT standard.
In addition, on Mac OS 10.6.5 (Snow Leopard) and earlier, we will not be able to use or format exFAT cards because older Mac OS versions do not support this file system. At that time, you need to upgrade the OS.
Formatting to FAT32 is usually the best option, however, a memory card formatted to FAT32 will not allow you to copy or store files larger than 4 GB.
You can also purchase a third-party micro SD card adapter if you don't already have one. Note: the adapter must be compatible with your micro SD card. Some third-party products also have a built-in USB connector and act as a flash drive.
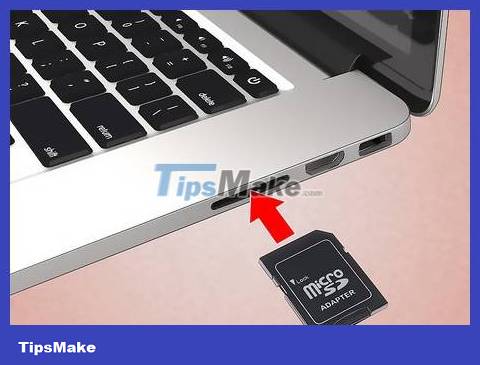
Plug the memory card reader or adapter into the USB port or SD card slot on your Windows computer. Whether you use the SD card slot or USB port depends on your computer and adapter type.
If using a micro SD card adapter, make sure the lock switch is facing up and in the open position. If this switch is in the locked position, the computer will not read the card or allow you to make any changes. The memory card will be in 'Read only' mode.
It is better to copy the data on the memory card to a computer to save. Thus, you will have a copy of data and files to copy to the card after formatting.
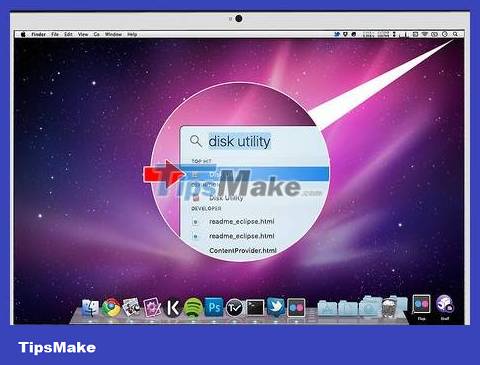
Click the search icon in the upper right corner of the taskbar at the top of the screen. Type 'Disk Utility' and click on the 'Disk Utility' application.
The Disk Utility application will appear on the screen with all available drives and memory systems.
You can also open 'Disk Utility' by going to the 'Applications' > 'Utilities' > 'Disk Utility' folder.
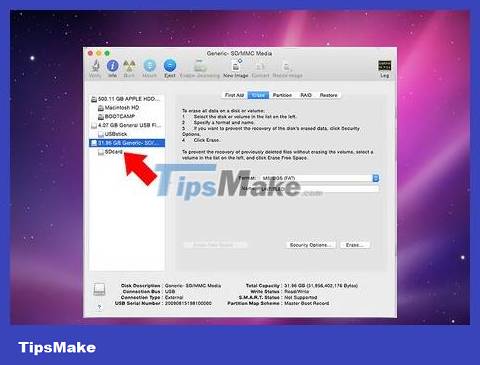
Click the micro SD card name shown in the left pane on Disk Utility. In the left pane of the window is the computer's hard drive, below are partitions (if any) and external drives.
The SD memory card will display the capacity that can be stored no different from a portable drive.
Click the SD card drive to open the options list page.
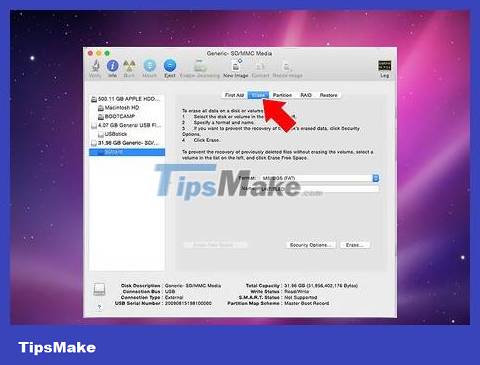
Select the 'Erase' radio button. A page that lets you delete and format tags opens.
There are also three or four radio button options at the top: 'First Aid', 'Erase', 'Partition', 'RAID' and 'Restore'. You may also see an "Unmount" option if you are using El Capitan version. To continue, click the 'Erase' button.
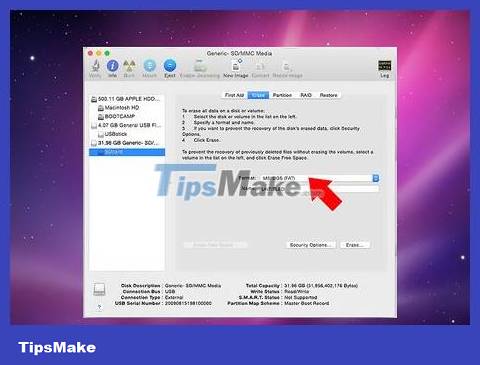
Select the desired format. A drop-down box with formatting options will appear.
We have options for Mac OS Extended (Journaled), Mac OS Extended (Case-Sensitive, Journaled), MS-DOS (FAT), and exFAT. In particular, MS-DOS (FAT) is the option to format the micro SD card to FAT32 standard. The exFAT option will format the memory card into the exFAT file system, allowing you to copy and store files larger than 4 GB.
After selecting the desired format, enter a name for the memory card.
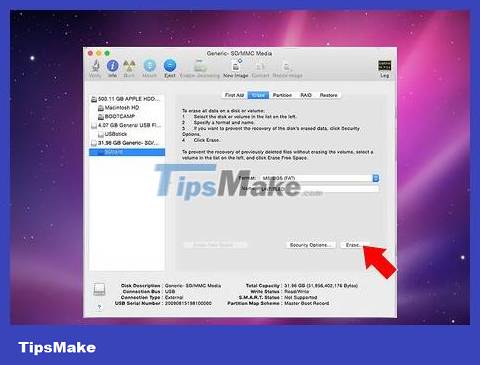
Click 'Erase' to restore and format the memory card. After clicking, a window will pop up asking if you are sure you want to erase and format the memory card. This window will warn you that if you continue, the data on the card will be completely erased. Click 'Erase' on the pop-up dialog box to confirm.
When you click 'Erase', the computer will format and erase the memory card. Once the process is complete, the new name of the card will appear. So the micro SD card has been formatted.