Table of Contents
This updated guide explains how to Force Delete Files in Windows 10 through clear steps, practical examples, and important checks that help prevent common errors.
How Are Files in Windows Deleted?
You can usually delete almost any file or folder by pressing a button Delete on the keyboard. Once deleted, the file will be moved to the Recycle Bin so you can restore deleted data as needed. To bypass the Recycle Bin and permanently delete a file, you can use the keyboard shortcut Shift+ Delete.
When a file is being used, it cannot be deleted in normal ways. If you try to do that, you may receive the "Access Denied: File in use" error message. This is mainly because the file is locked by an application. There is usually no simple way to know which application is blocking a file and prevent you from deleting it.
In those situations, you can execute a command to force the deletion of files.
Important Notes
Important note : Before forcing deletion, make sure that no important data is stored in the file and that it is safe to delete the file. Also, make a backup before deleting the file. Once deleted, you cannot recover files.
Force Delete File
To force delete a file in Windows, we will use a single command line. As soon as you execute the command, the target file will be deleted.
1. The first thing you need is the file path. Open File Explorer and go to where the file is stored. Next, click the address bar and copy the path.
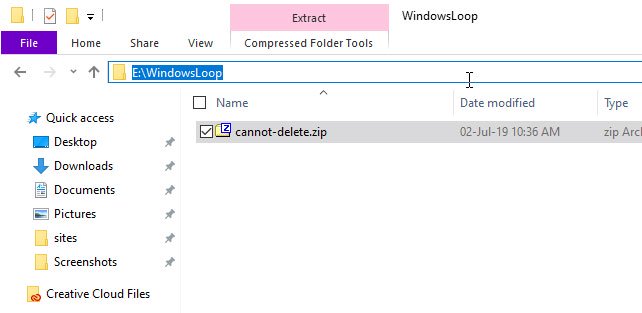 Copy the file path
2. Now, open the Command Prompt with admin rights.
3. In the Command Prompt window, execute the command below, replacing X with the actual drive letter. For example, the article file is stored in drive E:. So E is entered in the command below.
If the file you are trying to delete is in C drive, you can skip this step.
X: Execute the command with the file drive to be deleted
4. When you are in the destination drive, execute the command below, replacing it with the actual path you copied earlier.
cd "E:DummyFolder"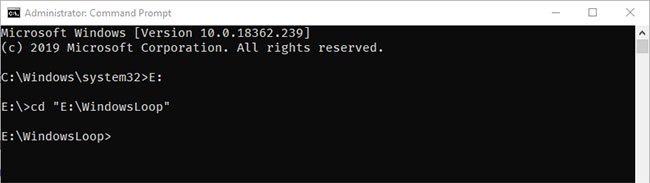 Execute the command with the copied file path
5. This step will take you to the file directory. Now, execute the following command, replacing fileName. ext with the actual file name along with the extension.
In the example case, the file to be deleted is a zip file. So the file name along with the. zip extension is entered.
del /s /q "fileName.ext"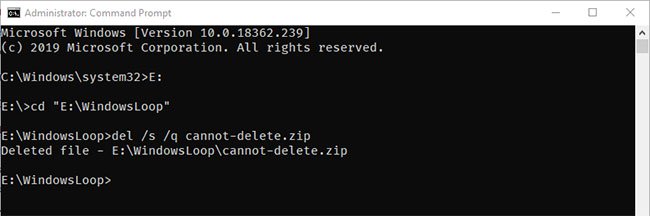 Execute the command with the actual file name along with the extension
6. If Windows can delete the file, you will see a Deleted File response .
FAQ
What is the easiest way to Force Delete Files in Windows 10?
Start with the requirements in this guide, then follow each step in order. Check the result after every major change so problems are easier to identify.
Can beginners follow these instructions?
Yes. The process is organized into practical steps, and you can repeat any step before moving forward.
What should I check if the method does not work?
Confirm your software or device version, permissions, settings, file format, and internet connection when the task depends on online services.
Related Articles
 Delete the Most 'Stubborn' Files on Windows10 minutes read
 How to Delete Files on Mac Directly Without the Trash4 minutes read
 How to Add Trash to Permanently Delete Files on Windows 10/118 minutes read
 How to Batch Delete Files on Windows 106 minutes read
 2 Ways to Permanently Delete Files on Windows3 minutes read
 How to View Recently Deleted Files on Windows 10?4 minutes read
Reader Comments 0
Sign in with email or Google to join the discussion.