Table of Contents
A yellow exclamation mark on the Windows network icon usually means the computer is connected to a local network but cannot reach the internet, or Windows has detected limited connectivity. Start with the connection itself, then check the IP settings. Do not assign a random static IP address; on most home networks, Windows should receive its address automatically from the router.
First, find out where the problem is
- Open a few different websites to rule out a problem with one site.
- Check another phone or computer on the same network. If every device is offline, the router, modem, or internet service is the likely cause.
- If only this computer is affected, continue with the Windows steps below.
- On public Wi-Fi, open a browser and look for a sign-in or terms page.
1. Reconnect Wi-Fi or Ethernet
For Wi-Fi, confirm that Airplane mode is off, disconnect from the network, and reconnect with the correct password. If necessary, go to Settings > Network & internet > Wi-Fi > Manage known networks, forget the network, and connect again.
For Ethernet, unplug and firmly reconnect the cable at both the computer and router. Try another router port or a known-good cable if possible. A link light can show that a physical connection exists, but it does not prove that internet access is working.
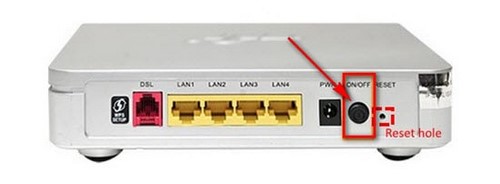
2. Restart the computer and network equipment
Restart the PC. If all devices are affected and you manage the network, restart the modem and router according to the manufacturer's instructions. This temporarily disconnects everyone using the network, so avoid doing it during important calls or transfers. Wait for the status lights to stabilize, then test again.
3. Run the Windows network troubleshooter
On Windows 11, open Settings > System > Troubleshoot > Other troubleshooters and run the network-related troubleshooter. Windows may instead open the Get Help app on current builds. Apply only changes you understand, then test the connection.
4. Return IPv4 and DNS to automatic settings
This is especially useful if the problem began after an IP or DNS setting was changed. The following screenshots use the older Control Panel interface, which remains available on many Windows systems.
- Right-click the network icon and open Network and Sharing Center, or open Control Panel and go to Network and Internet > Network and Sharing Center.
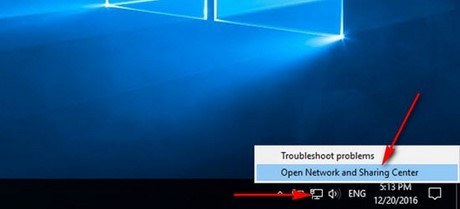
- Select the active Wi-Fi or Ethernet connection.
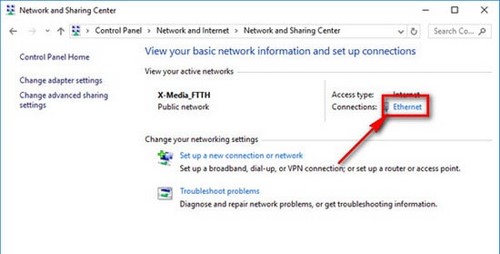
- Choose Properties.
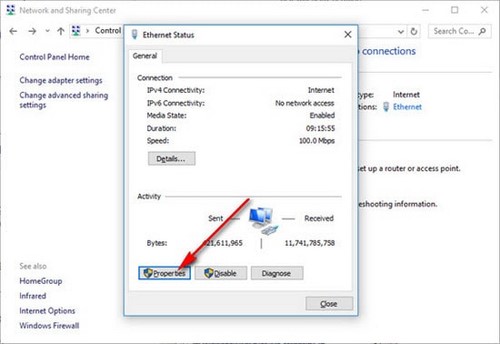
- Select Internet Protocol Version 4 (TCP/IPv4), then choose Properties.
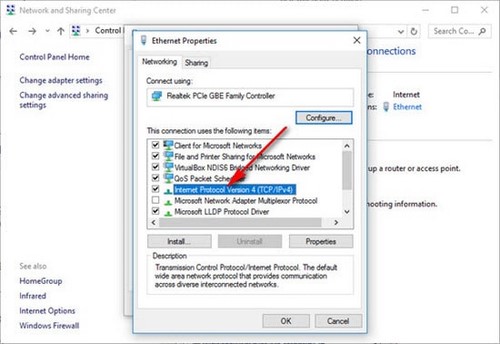
- For a typical home network, select Obtain an IP address automatically and Obtain DNS server address automatically. Click OK, close the dialogs, and reconnect.
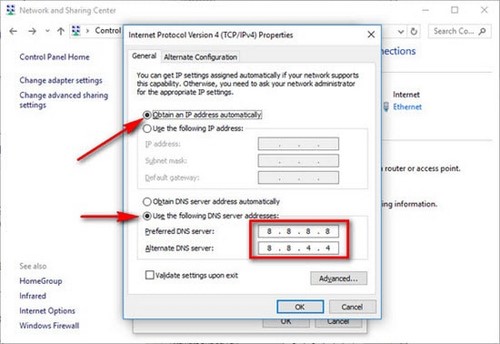
The screenshot shows an example of manually entered DNS servers, but automatic DNS is the safer starting point. If your employer, school, VPN provider, or internet provider supplied specific static settings, record them and contact the administrator before changing anything.
5. Renew the IP address and reset the network stack
If the router uses DHCP but Windows has not obtained a valid address, run Microsoft's standard network commands.
- Search for Command Prompt, select Run as administrator, and approve the Windows prompt. The older shortcut shown below opens a normal Command Prompt; the repair commands should be run in an elevated window.
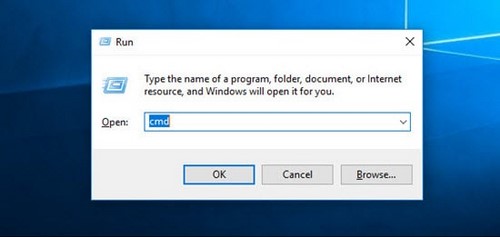
- Enter these commands one at a time, pressing Enter after each:
netsh winsock reset netsh int ip reset ipconfig /release ipconfig /renew ipconfig /flushdns - Restart Windows, then reconnect and test.
The release and renew commands interrupt the connection while Windows requests a new DHCP lease. A “media disconnected” message means the relevant adapter is not connected; reconnect Wi-Fi or Ethernet before trying again. Microsoft documents this sequence in its Windows Wi-Fi troubleshooting guide.
6. Check for an invalid DHCP address
Open Command Prompt and run:
ipconfigIf the active adapter has an IPv4 address beginning with 169.254, Windows did not receive an address from the router. Reconnect the adapter, restart the router if you manage it, and confirm that DHCP is enabled. The TipsMake guide to fixing a 169.254 IP address explains this case in more detail.
7. Use Network reset only as a last resort
In Windows 11, go to Settings > Network & internet > Advanced network settings > Network reset. This removes and reinstalls network adapters and returns related settings to their defaults. You may need to reinstall VPN software or virtual network adapters and reconnect to saved networks afterward.
When to contact your provider or administrator
Contact the internet provider if every device remains offline, the modem reports a service fault, or the connection repeatedly drops after a restart. On a work or school computer, contact IT before changing static IP, proxy, VPN, or DNS settings. For more Windows-specific checks, see the guide to troubleshooting Wi-Fi in Windows 11.
Related Articles
 Instructions for Fixing Wifi Error with Yellow Exclamation6 minutes read
 The Network Was Blocked by a Yellow Exclamation Mark9 minutes read
 Instructions to Fix Yellow Exclamation Computer Network with Only5 minutes read
 Instructions for Fixing Wi-Fi Errors with Yellow Exclamation5 minutes read
 How to Fix the Wi-Fi Yellow Exclamation Mark6 minutes read
 How to Fix the Yellow Exclamation Mark on Drive D6 minutes read
Reader Comments 0
Sign in with email or Google to join the discussion.