How to fix Full Disk 100% error on Windows 10
Full disk is a nightmare for many people using Windows 10. It causes the computer to hang and freeze. So how to fix Full disk error?
Full Disk error is an error that many people have encountered when using Windows 10 recently. This error often causes jerks, lags, and computer freezes, which is very annoying. So how to fix this error?
What is Full Disk Error?
Full Disk error is a condition where the drive is reported to be in 100% operating status (Disk 100%). This condition can be recognized as follows: every time you open Task Manager to view detailed activities, the Disk tab is always red, with an index of 99%, 100% or always occupying 90% or more. This error has existed since Windows 8 was released. However, until now, when Windows 10 has been released with many updates, this error has not been completely fixed by Microsoft. This condition causes the computer to slow down and freeze when operating. If you are experiencing this error and want to find a way to get rid of the discomfort caused by the Full Disk error, you can follow the methods below.
How to fix Full Disk 100% error on Windows 10
Method 1: Set virtual RAM manually instead of default Automatic mode
Leaving Ram in Automatically mode is one of the reasons why the computer gets Full Disk error. So instead of leaving it in Auto mode, you should set virtual RAM.
Step 1: In the Windows search box, type Performance then select Adjust the appearance and performance of windows

Step 2: Switch to the Advanced tab , select the Change box

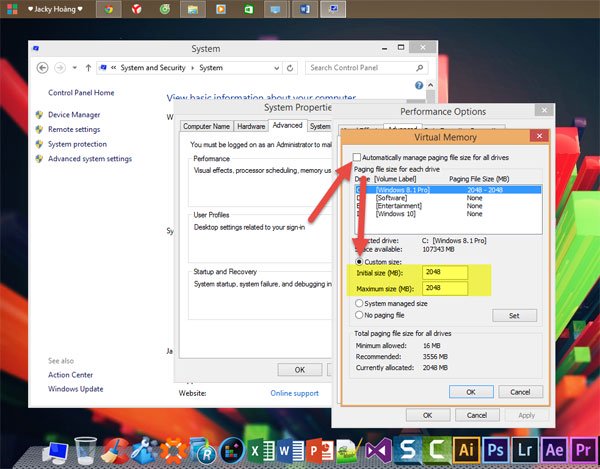
Step 3:
In the Virtual Memory tab , uncheck Automatically manage paging file size for all drives . Select the drive where your operating system is installed (usually drive C) . Then check Custom size .
In Maximum size and Initial size . You set the virtual RAM to 1/2 of your real RAM.
Method 2: Defragment hard drive
If you have installed Windows 10 for a long time, defragmenting the hard drive is something you should do regularly to avoid full disk errors that can harm your computer.
Step 1: Open This PC (My Computer) then select any hard drive
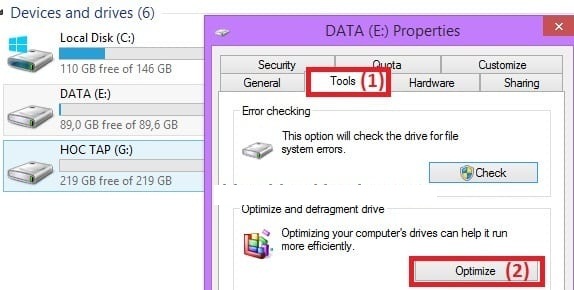
Step 2: Select Properties then select Tools . Select the hard drive containing the operating system to start defragmenting.
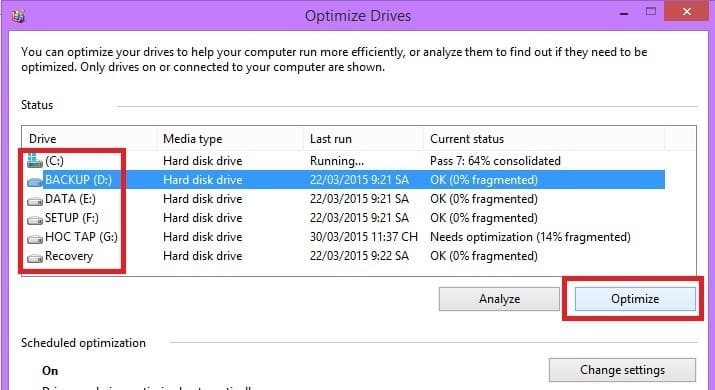
Step 3: Select Optimize to start the process and click Ok when finished.
Method 3: Upgrade SSD
SSD hard drives have much higher data reading and writing speeds than HDD hard drives, so if you have tried the above methods but they are not effective, this is the last option to help you solve the Full Disk problem. Although it will cost more, it is guaranteed that this is a 100% successful method, and it will also help your computer run much faster.
- How to create disk full BAT file repair Windows 10
- 12 steps to fix Full Disk error 100% on Windows 10
- Instructions for fixing 100% Full Disk error on Windows 10
- Fix Full Disk error 100%, 99% on Windows
- Instructions on 3 ways to fix Full Disk error 100% on Windows most effectively
- Full Disk Windows 10 Error - Cause and simple fix
- Instructions to successfully fix full disk error in Windows 10
- How to fix Full Disk error 100% on Windows 10 effectively
- How to Improve Video Quality
- How to Upload an HD Video to YouTube
- How to Search by Image
- How to Block Yahoo!
- How to Recover Data from Memory Cards
- How to Install a Network Printer
- How to Record Text to Speech on PC or Mac
- How to Print a Webpage
- How to Reset Your Computer
- How to Adjust Colors on an LCD Monitor


-
 Fix the 'Something went wrong 1076' error on Gemini.
-
Laptop displaying a blue screen: Causes and effective solutions.
-
Troubleshooting and fixing the 'BIOS checksum Error' on your computer.
-
How to check for blue screen errors using BlueScreenView
-
iTunes Error 45054: Causes and Solutions
-
Fixing iTunes error 45075, unable to install iTunes on your computer.
 Fix the 'Something went wrong 1076' error on Gemini.
 Laptop displaying a blue screen: Causes and effective solutions.
 Troubleshooting and fixing the 'BIOS checksum Error' on your computer.
 How to check for blue screen errors using BlueScreenView
 iTunes Error 45054: Causes and Solutions
 Fixing iTunes error 45075, unable to install iTunes on your computer.